Showing posts with label Under 30 minutes. Show all posts

Sunday, July 29, 2012

Summer's Bounty Quinoa

Summer is definitely one of my favorite times to cook because the quality and quantity of so many fruits and vegetables are at their peak. I received a large bunch of basil in my CSA box recently and wanted to come up with another way to use it besides in pasta. I ended up using quinoa as the base of the dish, combining it with a basil puree, and adding cherry tomatoes, corn, romano beans (similar to green beans, but slightly flatter and bigger), red onion, and some feta. The result was a flavorful, satisfying, healthy, and very summery dish that was equally good warm or at room temperature.


Summer's Bounty Quinoa
Serves 4 as a main dish, 6-8 as a side

Active Time: 30 minutes
Total Time: 30 minutes

1 c. quinoa
2 c. water
2 c. packed fresh basil leaves
1 clove garlic, minced
Extra virgin olive oil
Kosher salt
Black pepper
2 ears white corn, kernels cut off the cob
1 large red onion, peeled, halved, and thinly sliced
1 lb. romano beans or green beans, ends snapped or trimmed off, then chopped
1/2 pint cherry tomatoes, halved
1/2 c. feta cheese, crumbled

Put the quinoa and water into a medium sized saucepan, cover with a lid, and bring to a boil. Reduce the heat to low and simmer for 20-25 minutes, until liquid is absorbed.

Meanwhile, prep the vegetables. Then, in a large skillet, heat 1 T. olive oil over medium heat. Add the red onion and a pinch of salt and saute for about 7-10 minutes, or until softened. Set aside in a medium-sized bowl and cover with foil or a kitchen towel. Return the skillet to heat, add the corn and a pinch of salt and saute for 1-2 minutes, stirring, then remove from the pan and set aside in the bowl with the onion. In a small saucepan, bring some water to a boil for the beans. Cook for 3-4 minutes, then drain and add to the bowl with the onion and corn.

Add the basil, garlic, 1/2 t. kosher salt and 1/8 t. black pepper (or, a few grinds) to a food processor. Measure out 1/4 c. olive oil. Start the food processor, then slowly add in the olive oil until it comes together.  

When the quinoa is done, add the basil puree and stir to combine. Then, add in the reserved onion, corn, and beans as well as the tomatoes and feta and stir to combine. Season to taste for additional salt and pepper, garnish with a sprig of basil (if you have any left over) and serve.

Thursday, April 12, 2012

Broccoli, Avocado, Chickpea and Feta Salad

We've been getting broccoli in our CSA box about every other week now that it's in season, which is continuing to challenge me to find new things to do with it. I threw together this dish last week when I was in the mood for a healthy dinner but still wanted something satisfying. The combination of broccoli, avocado, chickpeas, feta, and a topping of sunflower seeds makes this dish well balanced with vegetables, protein, and healthy fats. I ate this as a warm dish for dinner, but it was also great at room temperature when I brought it to work the next day for lunch.


Broccoli, Avocado, Chickpea and Feta Salad
Active Time: 15 minutes
Total Time: 15 minutes

Serves 2 (as a main dish)

2 medium heads broccoli, long stems cut off (reserve for another use like a stir fry), and florets chopped into medium-sized pieces
1 15 oz. can chickpeas, rinsed and drained
1 avocado, chopped
1/2 c. feta cheese, crumbled
Juice of 1/2 lemon
Extra virgin olive oil
Toasted salted sunflower seeds, for topping
Kosher salt
Black pepper

Heat a medium pot of water to a boil. Meanwhile, prepare the broccoli, avocado, and chickpeas. Add the broccoli to the pot and boil for approximately 2 minutes. Drain and transfer to a medium-sized bowl. Add the chickpeas, feta, avocado, lemon juice, and 1 T. olive oil. Season with a pinch of salt (you don't need as much given the saltiness of the feta) and some freshly ground black pepper. Stir to combine, then transfer to plates or low bowls. Top with a generous sprinkling of sunflower seeds, and serve. Note: if storing for later, wait to top with the sunflower seeds until you serve it as they can get a little soggy.

Wednesday, April 4, 2012

Quinoa with Asparagus, Mushrooms, and Poached Eggs

Asparagus is one of the things for me that marks the arrival of spring - its true season is relatively short, so take advantage of this time when it's at the peak of its freshness (and much cheaper). I love asparagus with eggs, and wanted to create more of a main dish out by adding sauteed mushrooms and putting the whole thing over quinoa. I made this for dinner, but certainly it would also work well for a lunch or brunch. We also ended up adding an additional poached egg each, so feel free to cook up either 1 or 2 eggs per person depending on your preference (or how hungry you are). Welcome spring!


Quinoa with Asparagus, Mushrooms, and Poached Eggs
Serves 2

Active Time: 25 minutes
Total Time: 25 minutes

1 c. quinoa
1 bunch asparagus, woody ends snapped off and cut into about 1-2'' pieces
1/2 lb. cremini mushrooms, sliced
2-4 eggs
Kosher salt
Black pepper
Extra virgin olive oil
1 T. freshly chopped chives for garnish

Rinse the quinoa and put it in a small saucepan along with 2 c. water and cover. Bring to a boil, then reduce heat to low and simmer 15-20 minutes. Meanwhile, prep the asparagus and mushrooms and heat another pot with water until nearly boiling (not a full boil). In a large skillet, heat 1 T. olive oil over medium high heat. Add the mushrooms and saute for about 5 minutes, stirring occassionally. Add a pinch of salt and pepper, remove from the pan, and set aside. Add 1/2 T. olive oil to the skillet and saute the asparagus over medium high heat for about 1-2 minutes, add a pinch of salt and pepper, and set aside. Crack the eggs into ramekins or teacups, then gently add the eggs from the ramekins into the pot of near-boiling water. Let cook for about 2-3 minutes, during which time add 2 t. olive oil and a pinch of salt to the quinoa, then divide into plates or low bowls and top with the asparagus and then the mushrooms. Remove the eggs with a slotted spoon and add to the top of each dish. Break the yolk while it's still runny with a fork, then season with another pinch of salt and pepper, garnish with the chives, and serve.

Tuesday, March 27, 2012

Baked Artichoke, Spinach, and Ricotta Penne

It's a little rainy here in Northern California, which is to be expected in the Spring and we certainly need it after a very dry winter. On days like these, I tend to feel like something warm and comforting for dinner, but still healthy. This pasta dish features a nice balance of vegetables (artichokes and in-season spinach) with ricotta instead of a heavy (and time-consuming) bechamel sauce. I also simply broil it at the end with some parmesan cheese on top to create a nice golden crust, saving the hassle of having to bake it for a long time like other baked pasta dishes. I used brown rice penne (found easily at Trader Joe's or Whole Foods) in this dish, which I think has just as good of a texture as regular pasta, but some more nutritional value than regular white pasta and also provides a different grain source than wheat. Having said this, regular or whole wheat penne would also work great here.


Baked Artichoke, Spinach, and Ricotta Penne
Serves 2 (easily doubled to serve 4)

Active Time: 20 minutes
Total Time: 20 minutes

8 oz. brown rice, whole wheat, or regular penne (or other short pasta)
1 bunch spinach, roughly chopped, or 1 bag baby spinach
1 14 oz. can artichoke hearts (regular or marinated), drained and roughly chopped
1/2 c. ricotta cheese
1/4 c. freshly grated parmesan cheese
Kosher salt
Black pepper

Heat a pot of salted boiling water, add the pasta, and cook until al dente (according to package directions). Meanwhile, prepare the artichoke hearts, spinach, and parmesan cheese. Reserve about 1/4 c. of the pasta water, then drain. Return the pasta to the pot and add in the spinach and pasta water. Stir for a minute or two until the spinach starts to wilt, then add in the ricotta, artichoke hearts, 1/2 t. salt and some freshly ground black pepper. Stir to combine well. Put the oven on broil. Transfer the pasta mixture to either one 8x8 inch baking dish or 2 individual smaller gratin dishes. Top with the parmesan cheese, then broil until the top gets golden brown (watch it with the oven light on to make sure it doesn't burn). Remove from oven, wait a minute or two for it to cool slightly, then serve.

Tuesday, January 17, 2012

Fresh Ginger Lemonade (Hot or Cold)

Everyone wants to start the new year in a healthy way. After traveling in early January and fun over the holidays, I was ready to start my first-ever detox program this week. Detox programs range in aggressiveness and effectiveness; I'm following a more gentle program (The Clean Program) that is focused on resetting your body by eating clean, healthy food and eliminating what are typically inflammatory foods for a few weeks. It also of course requires cutting out alcohol, coffee, and sweets, but that really hasn't been so hard (as much as I do love wine). I've actually enjoyed coming up with ways to think up more uber-healthy meals and drinks. Along these lines, two of the best things for your digestive system are ginger (which promotes a healthy gut) and lemon (which promotes a healthy liver). I recently bought a ginger-lemon-mate drink the other day and thought that the ingredients were so simple that I could surely make my own. Turns out it was very easy to replicate and is a great drink either warm or cold to keep you healthy during the winter. Feel free to multiply the recipe if you want to make a larger batch - this makes one glass at a time.


Fresh Ginger Lemonade
Serves 1

Juice of 1/2 a lemon
2 t. fresh finely minced ginger (I found the kind in a jar works best) 
1-2 t. agave nectar
1 c. water

Put all the ingredients into a jar or glass and shake it up until mixed. Drink as is or heat it up - it's delicious both ways.

Sunday, January 8, 2012

Almond & Kale Linguine

This dish was something I threw together the other night with some ingredients we had on hand and it turned out to be our favorite dish of the week. I had picked up some curly kale and thought that it would be fun to cut it up small to resemble curly parsley while also adding some extra nutrition to the pasta. I had some dried linguine (feel free to use either regular, whole wheat, or brown rice linguine) and thought I'd add in some toasted almonds to kick up the protein. This is a simple pasta but developed lots of flavor using some of the pasta water to make a light sauce and finishing with some fresh lemon juice and parmesan cheese. It's a quick, easy, healthy dish that's perfect for a weeknight meal.


Almond & Kale Linguine
Serves 2 (can be easily doubled)

Active Time: 20 minutes
Total Time: 30 minutes

8 oz. linguine
1/2 bunch curly kale, washed, leaves removed from stems, and chopped into small pieces
2 cloves garlic, minced
1/2 c. almonds, roughly chopped
1/4 c. freshly grated parmesan cheese, plus more for serving
Juice of 1/2 lemon
Salt

Boil pot of water for the pasta and add a few big pinches of salt. Cook pasta according to directions.

Meanwhile, if using salted almonds, simply toast in a small saucepan over medium heat until golden brown and fragrant (don't let them burn!). If using raw almonds, toast and then drizzle with a little olive oil and a pinch of fine grain sea salt and stir to coast. Set aside.

When pasta is almost done, heat 1 T. olive oil in a large skillet over medium heat. Add the garlic and saute for about 10 seconds, then add the kale. Saute for only about 1-2 minutes until it starts to wilt.

Reserve 1/2 c. of the pasta cooking liquid, then drain the pasta, and immediately add it to the skillet with the kale. Add the cheese, almonds, lemon juice, and 1 t. kosher salt, then pour the 1/2 c. cooking liquid over the dish and stir for a minute or two until it all comes together. Separate into bowls and serve with a little extra parmesan cheese.

Friday, December 30, 2011

Whole Wheat Dutch Babies

Need an easy, delicious breakfast idea for this weekend? While I love regular pancakes, we also grew up loving dutch babies around our house, which are essentially a puffed-up oven-baked pancake. Dutch babies are great because they only call for a few ingredients, they are hard to screw up, and the result is quite impressive with very minimal effort. I thought I would switch up the standard recipe by trying whole wheat pastry flour instead of regular all-purpose white flour in order to make my version of dutch babies a little more nutritious and they turned out great. Whole wheat pastry flour can be found at any grocery store in the baking aisle or bulk food section and is a great pantry staple to substitute for all-purpose white flour in almost any baked good recipe. Don't use regular whole wheat flour here - it's too heavy and the dutch babies won't rise correctly. Serve the dutch babies topped with a squeeze of lemon juice and a dusting of powdered sugar, then eat it like that or add maple syrup, jam, or fresh fruit.


Whole Wheat Dutch Babies
Serves 4

Active Time: 5 minutes
Total Time: 25 minutes

6 eggs
1 c. whole wheat pastry flour
1 c. lowfat milk
1/2 t. vanilla extract
4 T. (1/2 stick) butter
Lemon, powdered sugar and maple syrup, jam, or fruit for serving

Place a 10'' cast-iron skillet (or similar oven-proof skillet) in the oven and preheat to 450 degrees Fahrenheit
Whisk the eggs together in a medium-sized bowl until frothy. In a separate bowl, whisk the flour, then whisk the flour into the bowl with the eggs. Whisk in the milk and vanilla, combining well to make sure there are no clumps (the batter will be thin). When the oven is preheated, remove the skillet and add in the butter, stirring with a wooden spoon until melted (which only takes about 10 seconds). Then, immediately add the batter to the pan (right on top of the butter) and return to the oven. Bake for about 20 minutes or until golden and puffy. Don't peek until it's done or the dutch babies will lose their height. When ready, remove from the oven, cut into four big pieces, and serve with a squeeze of lemon juice, some powdered sugar, and syrup, jam, or fruit, if you'd like.

Sunday, November 20, 2011

Pumpkin Pomegranate Pancakes

It's Sunday morning, and I can't think of anything better when it's cold and rainy outside than a big plate of pancakes. I love coming up with different pancake recipes (since we have pancakes just about every weekend) and these are some of my favorites yet - the pumpkin makes the pancakes so moist, and the topping of pomegranate seeds with maple syrup adds a little bite and a bit of sweet-tartness. These would also be a wonderful breakfast on either Thanksgiving morning or the day after - as you can see they are quite festive!


Pumpkin Pomegranate Pancakes
Makes ~12-14 pancakes

Active Time: 20 minutes
Total Time: 20 minutes

1 1/2 c. whole wheat pastry flour (or 3/4 c. each regular whole-wheat flour and all-purpose flour)
1/2 t. cinnamon
1/2 t. ground ginger
1/4 t. nutmeg
1 t. kosher salt
1 T. baking powder
1 c. canned or fresh pumpkin puree
1 T. maple syrup
1 T. molasses
2 eggs
1 1/2 c. lowfat milk
Pomegranate seeds and warm maple syrup, for serving

Whisk together the dry ingredients in a medium-sized bowl. In a separate bowl, stir together the pumpkin, molasses, maple syrup, and eggs and blend well. Add the milk and stir to incorporate, then add the wet ingredients to the dry ingredients and stir to combine. Using a 1/4 c. measure, spoon out each pancake onto a griddle, keeping the other pancakes warm in a 200 degree F oven. Top each stack of pancakes with pomegranate seeds and serve with warm maple syrup.

Friday, September 30, 2011

Kale Salad

After making this kale salad, I know that it is going to become a regular part of our weeknight and weekend meals, and after you try it I'm pretty sure that you'll start rethinking your regular lettuce salads as well. I got the inspiration for it from an event we recently attended at Scribe Winery, where we're wine club members. If you happen to visit Sonoma, I would highly recommend it - they not only make amazing wine (chardonnay, pinot noir, cabernet, and syrah) but they have also managed to create a winery experience unlike many other places we have been to. Tastings are served at picnic tables looking out over the valley with wildflowers from their garden (they operate an organic garden on site and have chickens and pigs) and they bring out complimentary cheese, salami, and crackers with each tasting. They have perfected the sort of laid-back chic look and mentality - you can feel free to hang out after your tasting, bring a picnic, or explore the grounds. The winery also throws periodic parties for wine club members and it was at one of these events when we had the kale salad, which was fresh from their garden. They also roasted 2 pigs that were raised on the property and served fingerling potato salad, roasted peppers from their garden, baked white beans over the fire with herbs and tomatoes, and of course poured their wine freely. I've included some pictures from the event below.

Back to the kale salad - we actually eat a lot of kale, but I usually always cook it - whether it's a quick braise over the stovetop with garlic, olive oil, and salt and pepper, an added ingredient to soups, or even part of a stir fry. I've had kale salad before and excluding the version at Scribe, I always thought of it as a little too bitter and raw tasting. The secret is lettuce the dressing sit on the kale for a little bit of time before serving, much different from lettuce salads where you want to dress it at the last minute. Dressing the kale early allows it to soften a little bit and absorb the flavor of the dressing. I also love it because you can make it ahead of time if you're having company, or before you start making the other components of your dinner on a weeknight, and then just let it be until you're ready to serve. I'd recommend letting it sit for at least 30 minutes or so before serving. I made it before a dinner party and let it sit for about 3 hours, although I don't know that I'd do it overnight. Lacinato (or dino) kale is best in this recipe vs. the regular curly kind, although either would probably be good.


Kale Salad
Active Time: 15 minutes
Total Time: 15 minutes (plus time to sit)

2 bunches lacinato kale, rinsed, leaves ripped from stems, and cut into thin strips
1/2 c. freshly grated pecorino or parmesan cheese

Dressing:
1 clove garlic, finely minced
2 T. fresh lemon juice 
3 T. extra virgin olive oil
1 T. dijon mustard
1/2 t. kosher salt
Lots of freshly ground black pepper

Prepare the kale and grate the cheese. Combine all of the dressing ingredients and whisk together, then combine in a large bowl with the kale and cheese. Let sit for at least 30 minutes or up to several hours before serving.


Sunday, September 11, 2011

Almond Butter Cookies

I whipped up these cookies using only a few ingredients, with one of my favorite things as the star - almond butter. They are particularly great because they're just sweet enough for a treat but also healthy enough to be a great snack. I would even bring these along with me on a hike or trail run. As an added bonus, they're gluten free since I made them with oat flour instead of whole wheat flour. You can find oat flour at almost every supermarket (I bought mine at Trader Joe's), or make it yourself by putting some rolled oats in a food processor and running it until it resembles a coarse flour. To add some extra interest (and texture), I rolled these cookies in chopped sliced almonds before baking. The agave nectar and almond butter combination does lead these to leak out a little bit of stickiness while they're baking - don't worry about this, it actually creates a nice caramelized bottom. I was also able to fit all of these onto one baking sheet since they don't expand much when baking, which makes these quick enough to make even on a weeknight.


Almond Butter Cookies
Makes 16-18 cookies

Active Time: 10 minutes
Baking Time: 10-12 minutes

1 c. creamy almond butter
1 egg
3/4 c. oat flour
1/2 c. cane sugar
1/4 c. agave nectar
1/4 t. cinnamon
1/2 t. fine grain sea salt
1/2 to 3/4 c. sliced almonds, chopped

Preheat the oven to 375 degrees Fahrenheit. Combine all of the ingredients in a bowl, cover with plastic wrap, and put in the fridge for 30 minutes (you can also leave them in there longer if need be). Remove from the fridge, roll the dough into about 1-1 1/2'' balls, then flatten slightly with your hands, and roll in the chopped sliced almonds. Transfer to a baking sheet and cook for 10-12 minutes. Let cool for at least a few minutes on the baking sheet to set, then transfer to a wire rack to cool completely.

Wednesday, August 31, 2011

Cherry Tomato and Zucchini Pappardelle

Sometimes the simplest recipes truly are the best. This is a pasta that I often make on weeknights, and while it is simple, it's so good that I felt that I had to share it. It only takes a few ingredients, and it's absolutely delicious, particularly in the summer when tomatoes and zucchini are at their peak in flavor. Feel free to substitute whatever type of pasta that you like, but we especially like this with flat, wide pappardelle noodles. I use the technique here of making the zucchini look like pasta, which enables me to use 1/2 of the pasta that I normally would and get some more vegetables in. It's actually very easy to create these thin strips of zucchini with a vegetable peeler. Hold the zucchini upright first, pressing into it somewhat firmly to make the strips as you run the peeler down the zucchini. As you work farther into it, lay the zucchini flat and continue to run the peeler down the zucchini. I had heard of this technique before and was skeptical, but it actually is easy!


Cherry Tomato and Zucchini Pappardelle
Serves 4

Active Time: 20 minutes
Total Time: 20 minutes

8 oz. pappardelle or long pasta of your choice (fettucini would work)
2 medium zucchini (~1 lb.), ends trimmed off and sliced into thin strips using a vegetable peeler
2 c. cherry tomatoes, halved
3 garlic cloves, thinly sliced
1/4 c. dry white wine (I used Chardonnay)
Extra virgin olive oil
Whole milk ricotta cheese, for serving
Fresh basil, cut into thin strips (chiffonade), for serving
Kosher salt
Black pepper

Cook the pasta according to package directions, making sure to salt the pasta water before adding the pasta. Meanwhile, heat 2 T. olive oil over medium heat in a large skillet. Add the garlic and saute about 30 seconds, then add the tomatoes, a pinch of salt, and cook for about 5 minutes, until tomatoes start to soften. Add the white wine, some freshly ground black pepper, and cook another 1-2 minutes.

About 1-2 minutes before the pasta is done, add the zucchini to the pasta pot. Drain, and add to the pan with the tomatoes. Stir well to coat the pasta/zucchini with the tomato mixture, and add additional salt and pepper to taste. Divide into pasta bowls, garnish with a dollop of ricotta and a sprinkling of basil, and serve.

Sunday, August 14, 2011

Heirloom Tomato Gazpacho

Heirloom tomatoes are hitting their peak right now in California, which means not only that you can find some huge, juicy, wonderful tomatoes, but also that they're relatively cheap. When tomatoes are this good and this abundant, gazpacho is a great way to highlight their flavors and create a great summer dinner, appetizer, or lunch. I made this into a meal by topping it with chopped avocado, tomatoes, and cucumber, and creating the soup with a base of a little bit of bread like the Italians do. Plus, perhaps the best part of this soup is that you make it in a food processor or blender, so prep time is minimal. I thought I liked the chunky version of gazpacho, but always felt like it ended up tasting like you're eating a big bowl of salsa. This version still retains some texture and is full of flavor, but feels like soup. Like many soups, as the flavors combine, it's even better the next day (if you still have any left over:) ).


Heirloom Tomato Gazpacho
Serves 4 as a main dish, 8 as an appetizer

Prep Time: 20 minutes
Total Time: 20 minutes (plus a little time to chill)

3 lb. heirloom tomatoes, quartered (dice 1 of the tomatoes and reserve for garnish)
1 english cucumber, chopped (dice a little bit and reserve for garnish)
1 red bell pepper, seeded and coarsely chopped
3 shallots, peeled and roughly chopped
1 c. cilantro, roughly chopped (have a little extra for garnish)
1 c. basil, sliced
2 slices dense white country bread, crusts removed and cut into large cubes
2 T. champagne or sherry vinegar
2 garlic cloves, minced
Extra virgin olive oil
1 t. cumin
1/4 t. cayenne pepper
Kosher salt
Black pepper
1 avocado, diced

In a food processor or blender, drizzle the bread with olive oil, vinegar, garlic, cumin, and cayenne pepper and let sit while you prepare the other ingredients. Add half of the chopped tomatoes, cucumber, red pepper, shallots, basil, and cilantro, and blend with the soaked bread and spices, until relatively smooth but still retaining a little bit of consistency. Transfer to a large bowl, puree the other half, and add it to the bowl. Season with about 1 1/2 t. kosher salt and lots of freshly ground black pepper, then chill for at least 30 minutes. Serve topped with the diced tomato, cucumber, avocado, cilantro and a drizzle of olive oil.

Friday, July 29, 2011

Summer Squash Pasta with Arugula, Hazelnuts, and Breadcrumbs

When I'm at the farmer's market - especially in the summer when so much product is at its peak - I tend to go a little overboard and buy large quantities of anything that looks good. Case in point, the 6 summer squash that I picked up this past week. Summer squash is so plentiful (and cheap) right now and in so many fun, different varieties and colors. While they are wonderful simply sauteed with a little olive oil, herbs, salt and pepper, I had some arugula on hand as well and thought I'd make a light pasta with all of these ingredients. I've been drawn to pastas at restaurants with breadcrumbs lately - they add such a nice texture and provide for a different "sauce" than pesto or tomatoes. But rather than simply breadcrumbs I decided to add hazelnuts in with the breadcrumbs as well to add a little extra flavor as well as nutritional value. The result: a light, healthy, delicious pasta which highlights the best of some of the great summer produce available now. Note that this recipe is vegan without the parmesan cheese.


Summer Squash Pasta with Arugula, Hazelnuts, and Breadcrumbs
Serves 4

Active Time: 30 minutes
Total Time: 30 minutes

1 slice whole wheat bread, roughly torn
1 c. hazelnuts
Extra virgin olive oil
1 to 1 1/4 lb. assorted summer squash or zucchini, halved lenthwise and cut into thin "half moons"
12 oz. linguini or spaghetti
2 cloves garlic, minced
Juice of 1 lemon
6 c. arugula, chopped
Kosher salt
Black pepper
Freshly grated parmesan, for serving

Bring a large pot of water to a boil and cook pasta according to package directions.

Meanwhile, put the hazelnuts in a food processor and process until they resemble coarse bread crumbs. Add the bread and process together until the hazelnut crumbs and breadcrumbs are similar in size. Heat a small skillet over medium heat and toast the hazelnut-breadcrumb mixture until fragrant and starting to turn light brown, about 5 minutes. Set aside.

In a large skillet, heat 1 T. olive oil over medium heat. Add the summer squash, a pinch of salt and pepper, and saute, stirring occassionally, until softened, about 7-10 minutes.

Drain the pasta, and return the empty pasta pot to the burner over low heat. Add 1/4 c. olive oil to the pot and the garlic. Saute until fragrant, about 15-30 seconds, then squeeze in the lemon juice. Add the pasta back to the pot as well as1 t. kosher salt and stir to combine. Then, add in the breadcrumbs, squash, and arugula and stir for a minute or two until the arugula wilts slightly and everything combines. Serve with freshly grated parmesan cheese, if you'd like.

Sunday, July 10, 2011

Mushroom Tacos with Avocado-Tomatillo Salsa

We were in the mood for Mexican the other night but I wasn't quite up for time required to make enchiladas (even though they are so good). Tacos, however, are a great way to get a fresh, healthy, and relatively easy meal and are also something that's fun to play with because you can experiment with different toppings. For this version, I thought mushrooms would be an great and somewhat different base, and I also wanted to incoporate some of the fresh corn that's finally in season. Top it off with one of the easiest salsas that I've ever come up with and you've got one tasty taco. The salsa is also great as a dip for tortilla chips - it has a nice thick consistency. I made the full amount of everything here for the two of us and we just reheated the leftovers in a skillet the next day - they were just as good the second time around.


Mushroom Tacos with Avocado-Tomatilo Salsa
Serves 4 (three tacos each)
Active Time: 15 minutes
Total Time: 20 minutes

Taco filling:
Extra virgin olive oil
1 portabello mushroom (about 1/2 lb.), halved and thinly sliced
1/2 lb. white buttom mushrooms, thinly sliced
1/4 lb. oyster mushrooms, roughly chopped (or other wild mushroom of your choice)
3/4 of one yellow onion, halved and sliced
1 t. kosher salt, divided
Black pepper
1 bunch green onions, white and green parts, sliced into ~1/2'' pieces
2 ears corn, kernels removed
1 T. fresh oregano, finely chopped
12 small corn tortillas

Salsa:
2 small avocados, pitted, skin removed, and cut into quarters
2-3 tomatillos, skin removed, rinsed, and quartered
1 lime
1 serrano chile, stem removed, seeds left intact, roughly chopped
1 t. kosher salt
1/2 t. black pepper
1/2 c. diced yellow onion (remaining quarter of the onion used above)

Queso fresco cheese (for topping)

Heat 1 T. olive oil in a large skillet over medium-high heat. Add the onion and mushrooms, 1/2 t. kosher salt and a pinch of black pepper, and saute 4-5 minutes, stirring often, until both soften. Add the green onions, corn, and another 1/2 t. kosher salt and saute for another 3 minutes. Remove from heat and stir in the 1 T. fresh oregano.

Meanwhile, make the salsa by combining the avocado, tomatillos, juice of 1 lime, serrano chile, kosher salt, pepper, and onion in a food processor and processing until smooth. Put the stack of tortillas in between 2 damp paper towels and microwave for about 1 minute.

To assemble the tacos, spoon some of the mushroom-corn-onion mixture onto each tortilla, then top with a generous dollop of the avocado-tomatillo salsa and a crumbling of queso fresco cheese.

Sunday, June 19, 2011

Fresh and Quick Mexican Bowl

As I've been adjusting to my new job, I've found that I generally have less time to throw dinner together than I used to, so you'll start to see more recipes from me that can be prepared in 30 minutes or less. This particular recipe is one that I've been making for a while and never disappoints. It's best heading into summer when you can get fresh corn, but frozen would also work too in a pinch. A tip about removing kernels from the cob - use a serrated knife and do it in a bowl - makes it much easier.

This dish is fresh, light, and highlights some of the early summer produce - corn, summer squash, and avocados. The best part is that it comes together in about 15 minutes. Seriously!


Fresh and Quick Mexican Bowl
Serves 2

Active Time: 10 minutes
Total Time: 15 minutes

Extra virgin olive oil
2 ears corn, husked and kernels removed
2 small zucchini or summer squash, diced
1 bunch green onions, green and white parts, thinly sliced
1 t. ancho chili powder
1/2 t. smoked (not sweet) paprika
1/2 t. kosher salt
1 15-oz can black beans, drained and rinsed
1/2 avocado, thinly sliced
Salsa of your choice
Queso fresco cheese

Heat 1 T. olive oil in a large skillet over medium-high heat. Add the corn, zucchini, green onions, ancho chili powder, smoked paprika, and salt and saute for 5 minutes. Separate into two deep bowls and top with the black beans, salsa, avocado, and queso fresco.

Tuesday, May 3, 2011

Asian Noodles with Broccolini and Tofu

Don't be afraid of tofu if you haven't tried it or haven't liked it in the past. I was not a big fan of it until I finally learned the trick to cooking it correctly - pressing the water out and then searing it until it's crispy on the outside. The best thing about this dish, howeverm besides the fact that it's quick and good weeknight meal, are the flavors - and you could certainly substitute shrimp for the tofu and snap peas or snow peas for the broccolini. I used broccolini here, sliced in half lengthwise, instead of regular broccoli, to mimic the noodles. Both broccoli and broccolini are in season in the spring and at the peak of their flavor.


Asian Noodles with Broccolini and Tofu
Serves 2

Active Time: 10 minutes
Total Time: 20 minutes

1/4 c. low-sodium soy sauce or Bragg liquid aminos
1 T. mirin or rice wine vinegar
2 T. + 2 t. sesame oil
3/4 t. Tabasco
8 oz. extra-firm tofu
8 oz. broccolini
1/2 c. green onions, white & light green parts only
1/4 c. sliced almonds, toasted
6 oz. whole wheat or brown rice spaghetti or angel hair pasta

Bring a medium pot of water to a boil. Meanwhile, slice the tofu lengthwise into 4 rectangles and lay them out in between a clean kitchen cloth or paper towel. Put a few cookbooks or something similar on top of the tofu slices and let them compress for about 5 minutes.

Slice the broccolini lengthwise to make slimmer pieces. Thinly slice the green onions and set aside.

Heat 2 t. of the sesame oil in a large skillet over medium-high heat. When the oil is hot, remove the tofu from the compress and cook for about 3-4 minutes on each side, until it gets a light brown crust on each side, then set aside.

Meanwhile, when the water starts to boil, add the noodles and cook according to package directions, adding the broccolini during the last 2 minutes of cooking time. Drain and place in a medium-sized bowl.

In a small bowl, whisk together the soy sauce/Bragg liquid aminos, mirin or rice wine vinegar, 2 T. sesame oil, and tabasco. Slice the tofu into matchsticks and add it to the noodles and broccolini along with the green onions. Pour the dressing over it all and stir to coat. Divide into two servings and top with the toasted sliced almonds.

Thursday, April 28, 2011

Peanut Soba Noodles

My apologies for the hiatus in not posting a recipe last week - to make up for it here is the first of two wonderful asian noodle dishes that I have created recently. These are great for a weeknight meal when you want to throw something together in less than 30 minutes.

While this dish doesn't have a main protein, this soba noodle recipe is actually packed with it, between the peanut butter, peanuts, and edamame. We like to make a big batch of this and have it for leftovers, but you can certainly cut it in half or a third for a one-night meal or smaller portions. We also served this at a casual dinner party - everyone went back for seconds!

Soba noodles made with 100% buckwheat are gluten-free, making this a great meal for anyone with a gluten allergy. Just make sure that you read the label if this is the case - some soba noodles also include whole wheat flour. Soba noodles can generally be found in any grocery store in the asian section.


Peanut Soba Noodles
Makes 6-8 servings

Active time: 5 minutes
Total time: 15 minutes

16 oz. dried soba noodles
2 c. edamame
2 carrots, grated
1 c. roasted, salted, shelled peanuts, plus a few more for garnish
1 c. chopped green onions, plus a few more for garnish
1 T. toasted sesame seeds, plus a few more for garnish
3/4 c. natural creamy peanut butter
4 T. low-sodium soy sauce
2 T. sesame oil
2 t. Tabasco or other hot sauce
3/4 c. hot water from the soba noodles

Bring a large pot of water to a boil. Meanwhile, grate the carrots and chop the scallions. Additionally, combine the peanut butter, soy sauce, sesame oil, and Tabasco in a small bowl.

Cook the soba noodles according to package directions, reserving about 1 c. of the cooking water before draining. Drain the noodles. Gradually add about 3/4 c. of the cooking water to the peanut sauce mixture, whisking to combine. This will help to thin and emulsify the sauce, making it easier to coat the noodles. Put the noodles, carrots, sesame seeds, peanuts, edamame, and green onions in a large bowl. Add the peanut sauce gradually and stir to combine until coated to your liking (I used the full amount of sauce for this amount of noodles).  Top with some additional peanuts, scallions, and green onions, and serve!

Monday, April 4, 2011

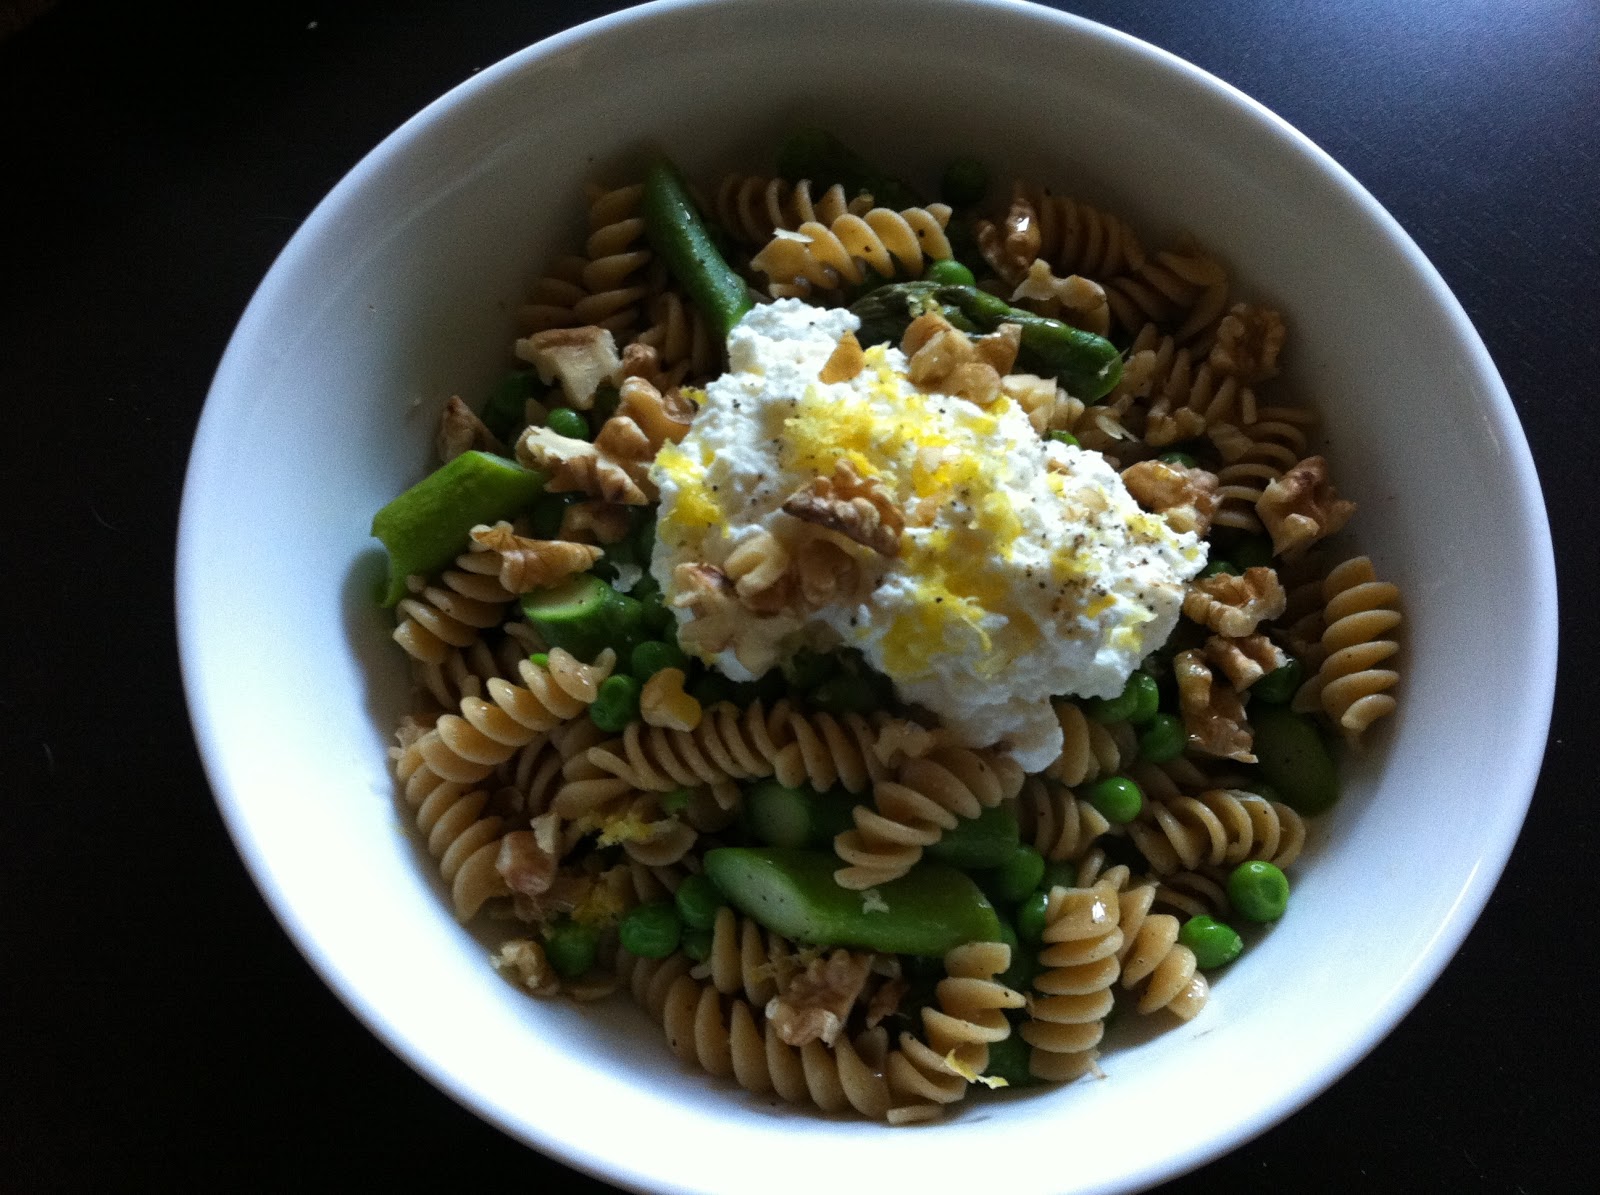
Hello Spring Asparagus & Pea Pasta

I have been anxiousy awaiting the arrival of spring vegetables - particularly asparagus and fresh spring peas. This pasta dish (which can be made gluten free with the substitution of brown rice pasta) allowed me to use up some of the rotini I had left over from my arugula and pumpkin seed pesto pasta and incorporate some of the wonderful new things I got at the farmer's market. Don't worry, however, if you can't find fresh peas - frozen actually work well in this dish. It's a simple, delicious, and easy weeknight meal.


Hello Spring Asparagus & Pea Pasta
Serves 2

Active Time: 5 minutes
Total Time: 15 minutes

3/4 lb. asparagus, ends snapped off and cut into 1'' pieces
1 c. peas (fresh or frozen & thawed - they can be easily thawed in the microwave)
6 oz. (about 2 c.) whole wheat rotini pasta (this shape holds onto the ricotta the best)
1/3 c. walnuts, toasted and roughly chopped
Lemon zest
Extra virgin olive oil
Whole-milk ricotta cheese
Kosher salt
Black pepper

Boil water for the pasta. Meanwhile, snap off the tough ends of the asparagus and cut into 1'' pieces. Also, toast the walnuts in a small skillet until fragrant and lightly browned, a few minutes, then roughly chop.

Add the pasta when the water is boiling and cook until al dente (according to package directions - or about 9 minutes), adding the asparagus and peas for the last 3 minutes of cooking time.

Drain and toss with 1 T. olive oil, 1/2 t. salt and 1/4. t. pepper. Divide into pasta bowls and top with a large dollop of ricotta, a fresh grating of lemon zest, walnuts, pinch of kosher salt and pepper, and a drizzle of olive oil.

Sunday, March 20, 2011

Gluten-Free Energy Bars

I have been experimenting with creating new types of energy bars following up on my post last month (Peanut Butter, Oat, and Honey Power Bars). I've also received some requests from friends and family to incorporate some gluten-free recipes into my repertoire. It turns out that this isn't that difficult when it comes to energy bars. I still wanted to create a bar that had a nice balance of protein (almond butter, quinoa, and nuts), fiber (oats & flaxseed), and natural sweeteners that are relatively low glycemic (honey, agave nectar, and pure maple syrup) and therefore help keep you satiated for an afternoon snack or during a run or bike ride. I learned a lot about different sweeteners from Heidi Swanson's cookbook "Super Natural Cooking". For example, I had no idea that brown sugar, which I always used to sweeten my oatmeal with, is in most cases just white sugar colored with a little bit of molasses. Now I use maple syrup.

These bars are a great everyday snack for kids and adults alike. They also are perfect for those of you out there involved in long-distance or endurance sports, or just enjoy hiking or other activities where you need some sustenance. I brought one of these on my long run today (I'm training for the Skyline to the Sea trail marathon in April) and it gave me the energy I needed throughout the run without any stomach issues. I also found it much easier to eat and digest during the run than other bars which can feel more like a "brick" when you're trying to chew it and get it down (i.e. Clif Bars). It's difficult for me to find bars that I both actually enjoy eating and are good during exercise and I think these fit the bill.

Store the bars in an airtight container, between layers of parchment paper or foil, as they are chewy (although the quinoa gives them a great crunch!). They'll last for about 2 weeks this way. I also froze some of the bars by wrapping each of them in foil and then putting them in a plastic bag and placing them in the freezer. They should last in the freezer for up to 3 months and unthaw quickly.


Gluten-Free Energy Bars
Makes 16 bars

Active Time: 15 minutes
Total Time: 15 minutes (plus a few hours to set)

2 c. old-fashioned (not instant) rolled oats
3/4 c. quinoa (uncooked)
1/4 c. ground flaxseed
1/2 c. slivered almonds
1/2 c. pecans, roughly chopped
1/4 c. hulled sunflower seeds
1 c. dried fruit (I used 1/2 c. cranberries & 1/2 c. cherries), chopped if the fruit is larger in size
1 c. almond butter
1/2 c. honey
1/4 c. agave nectar (I used raw dark agave nectar)
1/4 c. pure maple syrup (I like Grade B)
1/2 t. fine grain sea salt
1 t. vanilla
1/4 t. cinnamon

Preheat the oven to 350 degrees Fahrenheit. Line a 13x9x2 baking pan with parchment paper.

In a medium bowl, combine the dry ingredients - oats, quinoa, ground flaxseed, almonds, pecans, and sunflower seeds. Put the dry ingredients on a baking sheet or sheet pan and toast in the oven for 10 minutes.

After the dry ingredients have been in the oven for about 5 minutes, put the almond butter, honey, agave, and maple syrup in a medium saucepan over medium low heat. Stirring often, bring to a low boil. Remove from heat and stir in the salt, vanilla, and cinnamon.

Remove the dry ingredients from the oven and put into the saucepan with the wet ingredients. Stir to combine well. Transfer the mixture to the 13x9x2 baking pan and using a small piece of parchment paper, press down to distribute the mixture evenly in the pan. Let the bars set for about 3 hours then cut into 16 bars.

Thursday, March 17, 2011

Arugula and Pumpkin Seed Pesto Pasta with Ricotta

In honor of St. Patrick's Day, I put together a green dish for dinner last night for you all to enjoy today. With the official arrival of spring next week, new seasonal produce is showing up at the farmer's market and in stores, including arugula. This dish will best be enjoyed by people who like the peppery, slightly bitter green, but would also be great with spinach for a milder flavor. Pumpkin seeds are pretty widely available now and are also known as pepitas - they bring a nice balance to the arugula, as do the dollop of ricotta and drizzle of olive oil to finish the dish. Plus, it's a quick meal with only a few ingredients which comes together easily on a weeknight!


Arugula and Pumpkin Seed Pesto Pasta with Ricotta
Serves 4

Active Time: 10 minutes
Total Time: 20 minutes

12 oz. whole-wheat rotelle/fusilli pasta
1 c. hulled pumpkin seeds
1/3 c. extra virgin olive oil, plus extra for serving
1 clove garlic, minced
1 1/2 t. kosher salt
1 t. lemon zest
5 c. baby arugula, tightly packed (about 6 oz.)
Whole-milk ricotta cheese, for serving
Black pepper

Bring a pot of water to a boil for the pasta. Cook the pasta until al dente, according to package directions, reserving 1 c. of cooking liquid, then drain and return pasta to pot.

Meanwhile, toast the pumpkin seeds in a small pan over medium heat until fragrant, which takes just a few minutes. Put the pumpkin seeds in a food processor and add 2 c. packed arugula, the clove of minced garlic, lemon zest, and 1 t. kosher salt. Run the food processor and after a few seconds, start adding the 1/3 c. of olive oil through the top of the processor. Run for a few more seconds until the pesto comes together and you have a rough paste.

Add the pesto and 1/2 c. of the cooking liquid to the pot with the pasta, stirring well to combine, and adding additional cooking liquid if needed to allow the pesto to better combine with the pasta. Stir in the remaining 3 c. of arugula, continuing to stir until it wilts slightly.

Divide into serving bowls/plates and top with a large dollop of ricotta, then drizzle with a little more olive oil and a pinch of salt and pepper.