Summer's harvest is starting to show up in our CSA box around now in Northern California and we just received our first summer squash as well as a huge bunch of basil this past week, along with some rainbow chard. One of my favorite things to do with the first vegetables of each season is make a new variation of my lasagna recipe. This time, since I had such a large amount of basil and I know that the flavors of pesto go so well with summer squash (try simply grilling it and topping it with some pesto for a side dish in the future), I thought I'd create a combination tomato-pesto sauce to work into the lasagna and really complement the vegetables. Lasagna is a dish that has a lot of individual components, but none of them are difficult. It's a great thing to make on a weekend night when you want to cook in - we always make a whole pan for the two of us and eat the leftovers for dinner the next night (this reheats really well).
Summer Vegetable Lasagna with Tomato-Pesto Sauce
Serves 4-6
Active Time: 45 minutes
Total Time: 1 hour, 15 minutes
~1lb. summer squash (such as yellow crookneck), diced
1 bunch rainbow or swiss chard, leaves ripped from stems and chopped
~1 lb. white mushrooms, diced
Whole wheat, brown rice, or regular dried lasagna noodles
1 15 oz container whole milk ricotta cheese
2 eggs
3/4 c. freshly grated parmesan cheese
4 oz. grated mozzarella cheese
28 oz. can crushed tomatoes
2 c. packed basil leaves
1/4 c. pine nuts, toasted
1 clove garlic, minced
Kosher salt
Black pepper
Extra virgin olive oil
Preheat the oven to 400 degrees. Figure out how many lasagna noodles you will need to create three layers of noodles in your baking dish (approximately 13x9) and set the baking dish aside. In a similar size Pyrex or other dish, lay the noodles inside, then fill with the hottest tap water that you can get (or near-boiling water from a tea kettle) and add a dash of olive oil to keep the noodles from sticking. This is my shortcut to boiling noodles for lasagna - they soften while you prepare the other ingredients.
Chop up the summer squash and mushrooms and heat a large skillet over medium heat with a drizzle (1-2t) of olive oil. When the skillet is ready (you'll know once the oil moves easily across the pan when you tip it), add the summer squash and a pinch of salt. Saute for about 5 minutes or until softened, then set aside in a bowl. Add some more olive oil to the pan, then add the mushrooms and a pinch of salt and a little pepper. Saute for about 5-7 minutes, stirring occasionally, and meanwhile prepare the chard. When the mushrooms are done, set aside in another bowl, then add a little more olive oil to the pan and cook the chard with a pinch of salt, stirring rather frequently, for about 3 minutes until wilted slightly, then set aside in another bowl. Notice that I season each component separately so that the entire dish is seasoned.
Next, prepare the pesto by placing the 2 c. packed basil leaves, minced garlic clove, and pine nuts in a food processor. Start the processor, then slowly add in the olive oil until the mixture starts to come together but isn't too oily - about 1/3 c. Scoop out of the food processor into a small bowl and stir in 1/2 t. kosher salt and 1/4 t. pepper (or a few generous grinds from a pepper grinder). I don't add cheese to this pesto since there is enough in the rest of the dish.
In a medium-sized bowl, add the crushed tomatoes, 1/2 c. of the pesto, and 1 t. kosher salt to make the sauce.
Grate the parmesan cheese. In another medium sized bowl, add the ricotta, eggs, 1/2 t. salt, and 1/4 c. of the parmesan cheese and stir until blended.
Now it's time to assemble. Add about 1/2 c. of the sauce to the bottom of the pan and smear to create a light coating (so the noodles won't stick to the bottom). Lay down a layer (1/3) of the noodles, then approximately 1/2 of the ricotta mixture. I find that using my hands in lasagna, while messy, is best to distribute the components, so spread the ricotta out with your fingers. Then, top with approximately 1/2 of the squash, 1/2 of the mushrooms, and 1/2 of the chard (also using your fingers). Top with about 3/4c. of the sauce (the sauce doesn't need to be in exactly an even layer as it will cook together). Repeat with another layer of noodles, the remaining 1/2 of the ricotta, 1/2 of the squash, 1/2 of the mushrooms, 1/2 of the chard, and another 3/4 c. sauce. Top with the final layer of noodles, then the remainder of the sauce. I try to more carefully spread out the sauce on this final layer as you ideally want the noodles to be coated so they don't dry out in the cooking process. Then, top with the mozzarella cheese, and finally, the remaining 1/2 c. of parmesan cheese. The great thing about making lasagna this way is since you've already pre-cooked many of the ingredients, you just have to pop it in the oven for 30 minutes. It should have a nice golden brown crust when you remove it and it's important to let it sit for a few minutes before serving so that the lasagna stays together. Enjoy!
Showing posts with label Over 1 hour. Show all posts
Wednesday, June 27, 2012
Sunday, September 25, 2011
Green Enchiladas
Enchiladas are becoming one of my favorite thing to make when we're in the mood for Mexican food, and they actually can be healthy when you pack them with fresh vegetables and don't go overboard on the cheese. They are a little bit time consuming, but I attempted to cut down on the prep time here by making a green tomatillo and cilantro sauce that whips us easily in the blender. Like lasagna, enchiladas are something where you can vary the ingredients depending on the season to take advantage of what is fresh (see my prior post for enchiladas with yams in the fall/winter). For this recipe, I made one big batch (since you're already doing the work) and divided the enchiladas into one pan with 8 and another one with 4. You can either cook them all at once or pop one of the pans in the freezer for the future - just put it in the fridge the night before you want to make it to allow it to unthaw and cook per the same instructions the following night.
Green Enchiladas
Serves 6 (2 enchiladas each)
Active Time: 40 minutes
Total Time: 1 hour, 15 minutes
1 lb. roma tomatoes, diced
1 lb. yellow summer squash, halved and cut into thin half moons
Two 15 oz. cans pinto beans, drained and rinsed
2 yellow onions, peeled, halved, with one onion thinly sliced and one cut into chunks
3 cloves garlic, peeled
1 lb. tomatillos, husks removed, rinsed, and quartered
2 serrano peppers (for medium spiciness, or use only 1 for mild), with stems cut off
2 c. cilantro, chopped
1 c. low sodium vegetable broth
4 oz. queso fresco cheese, crumbled
6 oz. monterey jack cheese, grated
12 whole wheat tortillas (about 8'' in diameter)
Extra virgin olive oil
Kosher salt
Black pepper
Avocado, sliced, for garnish
Prep all of the vegetables, rinse/drain the beans, and preheat the oven to 375 degrees Fahrenheit. Heat 1 T. olive oil in a large skillet over high heat and 1 T. olive oil in another large skillet over medium heat. Put the whole tomatillos, garlic cloves, onion chunks, and serrano peppers in the skillet on high heat. Cook 3 minutes, making sure that they get some color, then turn and cook 2 minutes more. Transfer to a blender. Meanwhile, in the other skillet, add the squash and sliced onion and a pinch of salt and pepper. Cook about 8-10 minutes until softened, then transfer to a large bowl.
In the blender with the tomatillos, peppers, and onion, add 1 c. of the cilantro, 1 c. of vegetable broth, and 1/2 t. kosher salt. Blend until smooth.
In the bowl with the squash and onions, add the beans, tomatoes, the other cup of chopped cilantro, the queso fresco cheese, 1 1/2 t. kosher salt and 1/2 t. black pepper. Stir to combine.
Add 1/2 c. of the green enchilada sauce from the blender to a 9x13'' baking pan and 1/4 c. of the sauce to an 8x8'' baking pan. Heat the tortillas in the microwave between two pieces of dampened paper towel for about 45 seconds - 1 minute to soften.
Get everything together in one area (tortillas, sauce, bowl of filling, and pans) to assemble the enchiladas. To do this, take one tortilla at a time, put it on a plate, scoop a generous amount of filling along the middle, then roll it up and place it seam-side down into the pan. Repeat with the remaining tortillas, putting 8 in the 9x13'' pan and 4 in the 8x8'' pan. Then, top with the remaining enchilada sauce, using your fingers to help you spread the sauce, trying to moisten each enchilada (and keep it from drying out too much during cooking). Top with the monterey jack cheese. From here you can either bake all of the enchiladas at once, or freeze either the smaller or larger pan if you'd like.
Bake for about 35 minutes until the cheese starts to turn golden brown. Let sit for a couple of minutes before serving, then divide onto serving plates and top with sliced avocado.
Green Enchiladas
Serves 6 (2 enchiladas each)
Active Time: 40 minutes
Total Time: 1 hour, 15 minutes
1 lb. roma tomatoes, diced
1 lb. yellow summer squash, halved and cut into thin half moons
Two 15 oz. cans pinto beans, drained and rinsed
2 yellow onions, peeled, halved, with one onion thinly sliced and one cut into chunks
3 cloves garlic, peeled
1 lb. tomatillos, husks removed, rinsed, and quartered
2 serrano peppers (for medium spiciness, or use only 1 for mild), with stems cut off
2 c. cilantro, chopped
1 c. low sodium vegetable broth
4 oz. queso fresco cheese, crumbled
6 oz. monterey jack cheese, grated
12 whole wheat tortillas (about 8'' in diameter)
Extra virgin olive oil
Kosher salt
Black pepper
Avocado, sliced, for garnish
Prep all of the vegetables, rinse/drain the beans, and preheat the oven to 375 degrees Fahrenheit. Heat 1 T. olive oil in a large skillet over high heat and 1 T. olive oil in another large skillet over medium heat. Put the whole tomatillos, garlic cloves, onion chunks, and serrano peppers in the skillet on high heat. Cook 3 minutes, making sure that they get some color, then turn and cook 2 minutes more. Transfer to a blender. Meanwhile, in the other skillet, add the squash and sliced onion and a pinch of salt and pepper. Cook about 8-10 minutes until softened, then transfer to a large bowl.
In the blender with the tomatillos, peppers, and onion, add 1 c. of the cilantro, 1 c. of vegetable broth, and 1/2 t. kosher salt. Blend until smooth.
In the bowl with the squash and onions, add the beans, tomatoes, the other cup of chopped cilantro, the queso fresco cheese, 1 1/2 t. kosher salt and 1/2 t. black pepper. Stir to combine.
Add 1/2 c. of the green enchilada sauce from the blender to a 9x13'' baking pan and 1/4 c. of the sauce to an 8x8'' baking pan. Heat the tortillas in the microwave between two pieces of dampened paper towel for about 45 seconds - 1 minute to soften.
Get everything together in one area (tortillas, sauce, bowl of filling, and pans) to assemble the enchiladas. To do this, take one tortilla at a time, put it on a plate, scoop a generous amount of filling along the middle, then roll it up and place it seam-side down into the pan. Repeat with the remaining tortillas, putting 8 in the 9x13'' pan and 4 in the 8x8'' pan. Then, top with the remaining enchilada sauce, using your fingers to help you spread the sauce, trying to moisten each enchilada (and keep it from drying out too much during cooking). Top with the monterey jack cheese. From here you can either bake all of the enchiladas at once, or freeze either the smaller or larger pan if you'd like.
Bake for about 35 minutes until the cheese starts to turn golden brown. Let sit for a couple of minutes before serving, then divide onto serving plates and top with sliced avocado.
Labels:
Beans,
Kid-friendly,
Over 1 hour,
Summer,
Summer Squash,
Tomatoes
Monday, September 19, 2011
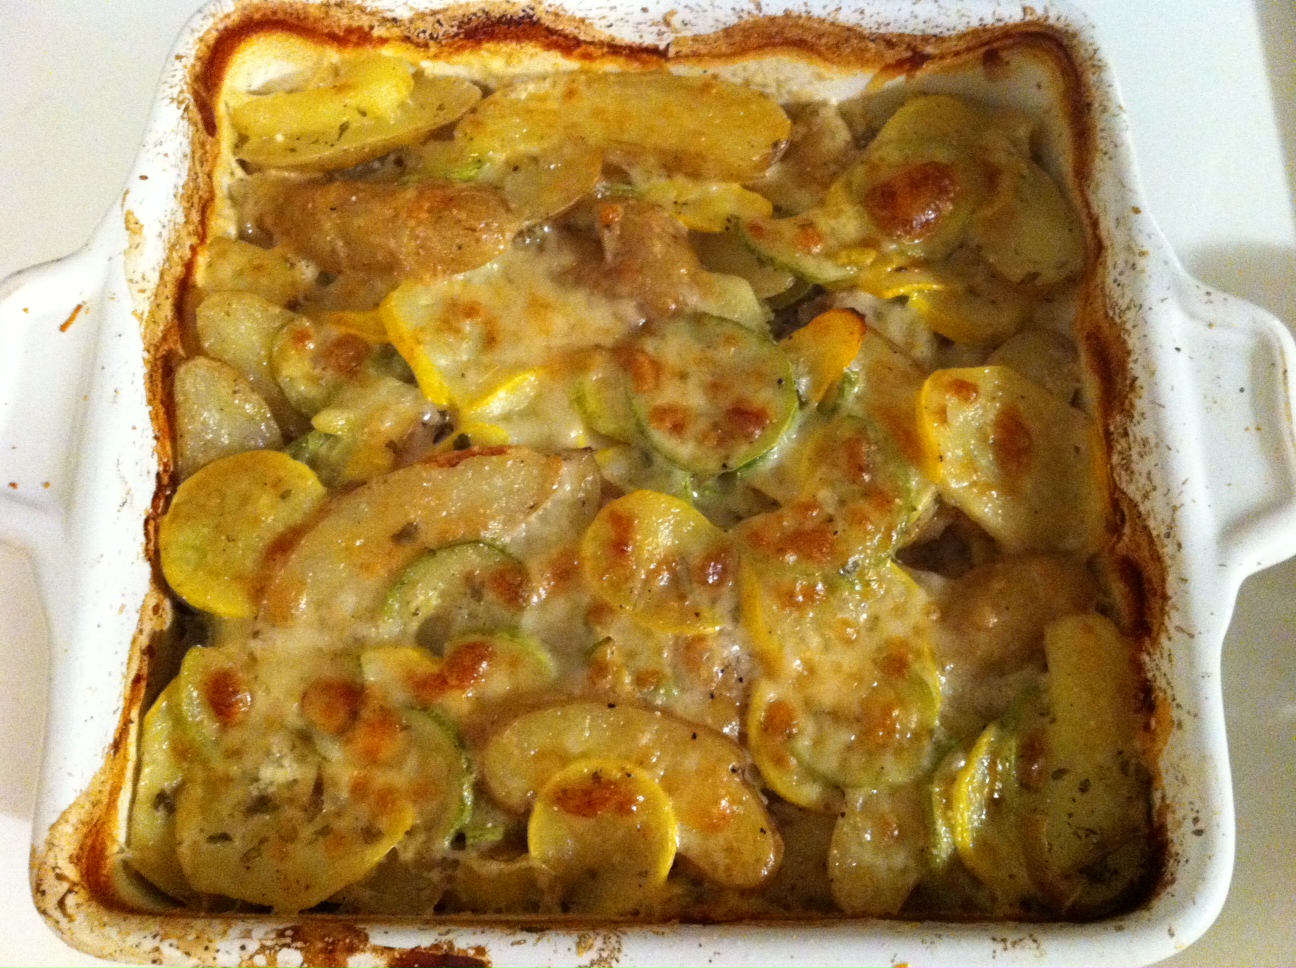
Fingerling Potato & Summer Squash Gratin
There is still an abundance of summer squash (at least down here in California) as we're experiencing the last part of all of the wonderful summer produce. Tomatoes and summer squash tend to do exceptionally well late in the season, when they've had a chance to ripen with some warmer temperatures. I attempted to take advantage of the summer squash here in a rustic gratin with some fingerling potatoes, fresh herbs, and a little bit of cheese. Serve with a salad and some bread and you have a delicious late summer/early fall meal.
Fingerling Potato & Summer Squash Gratin
Serves 4
Active Time: 30 minutes
Total Time: 1 hour, 10 minutes
Extra virgin olive oil
1 1/4 lb. fingerling potatoes
1 1/4 lb. assorted summer squash, thinly sliced
1 t. fresh rosemary, finely chopped
1 t. fresh thyme, finely chopped
2 oz. goat cheese, crumbled
1/4 c. lowfat or whole milk
1/2 c. gruyere cheese, grated
1/2 c. parmesan cheese, grated
Kosher salt
Black pepper
Preheat the oven to 400 degrees Fahrenheit. Put the potatoes in a pot with water covering to 1'' above the potatoes. Cover and bring to a boil, then uncover and let cook 10 minutes. Drain and set aside to cool slightly.
Meanwhile slice the squash and heat 1 T. olive oil in a medium skillet over medium heat. Add the squash and saute for about 5 minutes or until slightly softened.
Slice the potatoes into thirds lengthwise and combine with the squash in a large bowl. Add 1 T. olive oil, 1 1/2 t. kosher salt, 1/2 t. black pepper, and the rosemary and thyme and stir to coat.
Coat an 8x8 inch baking dish with olive oil or cooking spray and add 1/2 of the potato/squash mixture to the pan, pressing down with your fingers. Then add the goat cheese and top with the other half of the potato/squash mixture, pressing down again with your fingers. Drizzle the milk over the whole thing, then top with the gruyere and parmesan cheeses.
Bake for 30 minutes covered with foil, then uncover, return to the oven, increase the temperature to 425, and bake for another 10 minutes until golden brown.
Fingerling Potato & Summer Squash Gratin
Serves 4
Active Time: 30 minutes
Total Time: 1 hour, 10 minutes
Extra virgin olive oil
1 1/4 lb. fingerling potatoes
1 1/4 lb. assorted summer squash, thinly sliced
1 t. fresh rosemary, finely chopped
1 t. fresh thyme, finely chopped
2 oz. goat cheese, crumbled
1/4 c. lowfat or whole milk
1/2 c. gruyere cheese, grated
1/2 c. parmesan cheese, grated
Kosher salt
Black pepper
Preheat the oven to 400 degrees Fahrenheit. Put the potatoes in a pot with water covering to 1'' above the potatoes. Cover and bring to a boil, then uncover and let cook 10 minutes. Drain and set aside to cool slightly.
Meanwhile slice the squash and heat 1 T. olive oil in a medium skillet over medium heat. Add the squash and saute for about 5 minutes or until slightly softened.
Slice the potatoes into thirds lengthwise and combine with the squash in a large bowl. Add 1 T. olive oil, 1 1/2 t. kosher salt, 1/2 t. black pepper, and the rosemary and thyme and stir to coat.
Coat an 8x8 inch baking dish with olive oil or cooking spray and add 1/2 of the potato/squash mixture to the pan, pressing down with your fingers. Then add the goat cheese and top with the other half of the potato/squash mixture, pressing down again with your fingers. Drizzle the milk over the whole thing, then top with the gruyere and parmesan cheeses.
Bake for 30 minutes covered with foil, then uncover, return to the oven, increase the temperature to 425, and bake for another 10 minutes until golden brown.
Labels:
Fall,
Gluten-Free,
Kid-friendly,
Over 1 hour,
Potatoes,
Summer,
Summer Squash
Tuesday, May 31, 2011
Spring Farro and Pea Soup
There has been quite a hiatus in between my last post and this post due to some significant life changes - a new job and a move from the Peninsula to Marin County (all still in the Bay Area). Now that I'm settled and starting the new gig tomorrow, I was finally ready to resume cooking tonight and create something that incorporates my favorite vegetable - fresh english peas. Granted, you don't have to make this recipe with fresh peas (frozen will work fine) but the plump, beautiful peas that are in season only in the spring are worth it if you can find them. I usually buy mine at the farmer's market, but having missed it last weekend, was surprised (and happy) to find them at Whole Foods.
This soup takes a little time to simmer so that the farro can cook, but other than that is very easy to make. I made it tonight and if you're making it on a weeknight, you can always get in a quick workout/run, catch up on some more work, or do something around the house while it cooks.
This dish is also great the next day - the farro will have absorbed more of the liquid so you can either just heat it up and serve it like a risotto or add some water and heat it up if you want more of a soup-like consistency.
Spring Farro and Pea Soup
Serves 4-6
Active Time: 20 minutes
Total Time: 1 hour, 10 minutes
Extra virgin olive oil
1 yellow or vidalia onion, thinly sliced
1 large leek, white and light green parts only, thinly sliced
2 celery stalks, thinly sliced
2 large carrots, diced
1 cup farro
1 15 oz. can cannellini or Great Northern beans, drained and rinsed
1 T. fresh thyme leaves
2 dried or 1 fresh bay leaf
4 c. low-sodium vegetable stock
Water
1 to 1 1/2 c. fresh shelled english peas or frozen peas (about 1 lb. fresh english peas in their shell)
Kosher salt and black pepper
Freshly grated Parmesan cheese
Chop/slice the onion, leek, celery, and carrots. Heat 1 T. olive oil over medium high heat in a large stockpot or dutch oven. Add the onion and leek and saute for 2-3 minutes, stirring occasionally. Add the carrots and celery and saute for an additional 2-3 minutes, stirring occasionally.
Add the beans, farro, thyme, bay leaves and stir to combine. Pour in the vegetable stock, add 1 t. kosher salt and 1/4 t. black pepper. Bring to a boil, then simmer for 40 minutes.
Add the peas and simmer an additional 10 minutes. Taste for seasoning and add more salt and pepper depending on the saltiness/seasoning of your stock.
I recommend garnishing the soup with freshly grated parmesan cheese as it really finishes the dish (I added it after taking the picture).
This soup takes a little time to simmer so that the farro can cook, but other than that is very easy to make. I made it tonight and if you're making it on a weeknight, you can always get in a quick workout/run, catch up on some more work, or do something around the house while it cooks.
This dish is also great the next day - the farro will have absorbed more of the liquid so you can either just heat it up and serve it like a risotto or add some water and heat it up if you want more of a soup-like consistency.
Spring Farro and Pea Soup
Serves 4-6
Active Time: 20 minutes
Total Time: 1 hour, 10 minutes
Extra virgin olive oil
1 yellow or vidalia onion, thinly sliced
1 large leek, white and light green parts only, thinly sliced
2 celery stalks, thinly sliced
2 large carrots, diced
1 cup farro
1 15 oz. can cannellini or Great Northern beans, drained and rinsed
1 T. fresh thyme leaves
2 dried or 1 fresh bay leaf
4 c. low-sodium vegetable stock
Water
1 to 1 1/2 c. fresh shelled english peas or frozen peas (about 1 lb. fresh english peas in their shell)
Kosher salt and black pepper
Freshly grated Parmesan cheese
Chop/slice the onion, leek, celery, and carrots. Heat 1 T. olive oil over medium high heat in a large stockpot or dutch oven. Add the onion and leek and saute for 2-3 minutes, stirring occasionally. Add the carrots and celery and saute for an additional 2-3 minutes, stirring occasionally.
Add the beans, farro, thyme, bay leaves and stir to combine. Pour in the vegetable stock, add 1 t. kosher salt and 1/4 t. black pepper. Bring to a boil, then simmer for 40 minutes.
Add the peas and simmer an additional 10 minutes. Taste for seasoning and add more salt and pepper depending on the saltiness/seasoning of your stock.
I recommend garnishing the soup with freshly grated parmesan cheese as it really finishes the dish (I added it after taking the picture).
Labels:
Farro,
Kid-friendly,
Over 1 hour,
Peas,
Spring,
Vegan,
Whole-Grain
Thursday, March 24, 2011
Rainy Day Lentil Soup
We've been having quite the storm in California over the past week. When it's gloomy outside, it always seems nice to cozy up with a big bowl of soup. Even if you don't think you like lentil soup, try this one out - it's full of flavor. There is a great balance between the french lentils, tomatoes, vegetables, red wine, and a hit of balsamic vinegar at the end. I also recommend topping it with some shaved or grated parmesan cheese and a drizzle of olive oil, which gives it an extra something. Serve with a crusty bread and let it warm you up during this wet spring weather!
Rainy Day Lentil Soup
Serves 4
Active Time: 30 minutes
Total Time: 1 hour 30 minutes
1 c. dried french green lentils, rinsed
1 large or 2 small yellow onions, chopped
2 leeks, white & light green parts, sliced
3 cloves garlic, minced
2 large carrots, diced
3 stalks celery, diced
28 oz. can diced tomatoes
1 T. tomato paste
1 c. dry red wine (I used a Côtes du Rhône)
1 bunch thyme
2 dried or 1 fresh bay leaf
2 T. balsamic vinegar
2 c. low-sodium vegetable stock
1 c. water
Extra virgin olive oil
Parmesan cheese
Kosher salt
Black pepper
Chop the onions, leeks and garlic. Heat 1 T. olive oil in a Dutch oven or stockpot over medium heat. Add the onions, leeks, garlic, 1/2 t. kosher salt, and 1/4 t. pepper and saute for about 10 minutes, breaking up the leeks with a wooden spoon.
Meanwhile, chop the celery and carrots. Add them to the pot and saute for an additional 10 minutes. Add the tomato paste and cook another minute, stirring. Add the red wine and stir, then the diced tomatoes and their juices, vegetable stock and water. Also add the bay leaves and bunch of thyme to the pot (you will remove these before serving) and 1 t. kosher salt and another 1/4 t. pepper. Cover and bring to a low boil, then reduce heat and simmer for 1 hour, until the lentils are cooked (they will still have a slight bite to them, similar to al dente pasta).
Remove the bay leaves and bunch of thyme with tongs. Stir in 2 T. balsamic vinegar and check for seasoning. Ladle the soup into bowls, drizzle with olive oil, and top with freshly grated or shaved parmesan cheese.
Friday, February 18, 2011
Low Sodium, Big Flavor French Onion Soup
This week, I accepted a challenge from my friend Jess to revamp a favorite recipe into a very low sodium version - less than 40mg per serving. Jess has a fabulous blog http://sodiumgirl.wordpress.com/ AND a book coming out next year. Not only does Jess like to come up with creative ways to make flavorful, low sodium recipes, she also has to for her health. Jess was impacted by a severe onset of lupus while we were in college, and while she has made an awesome recovery, her kidneys cannot regulate sodium levels the way that a normal person's kidneys can, which means - no salt.
While we might not all have conditions like Jess, I think it is important for us all to think about our sodium intake. We might focus on calories, carbs, and fat, but sodium intake has risen dramatically in recent years and can have long-term affects on your health. There are little ways that I try to cut back but I know I need to be more mindful of it. One easy first step is trying to avoid products that already have a lot of unnecessary sodium added to them - such as chicken/vegetable stock, soups, and canned goods - and buy a low-sodium or no salt added version instead. You can always add your own seasoning and in most cases will end up adding much less than what the full-sodium version contains. I do this with vegetable stock, canned tomatoes, and many other things.
This challenge was all about taking a traditionally high sodium favorite - I chose French Onion Soup - and trying to remake it to a very low sodium version. The trickiest part of this was the stock - even low sodium varieties have far higher sodium levels than the 40mg dictated by Jess' low sodium rules. So, I had to be creative, and ended up coming up with a flavorful soup based on Julia Child's version which incorporates vermouth and cognac, and adding depth by using herbs, balsamic vinegar, molasses, and most importantly, carmelizing the onions very well. This is not a quick recipe, but it isn't difficult either if you have the time!
Low Sodium, Big Flavor French Onion Soup
Serves 4 as a main dish, 6 as a starter
Active Time: 1 hour
Total time: 1 hour, 45 minutes
Ingredients:
2 1/2 lbs. yellow onions, thinly sliced
3/4 lb. shallots, thinly sliced
2 T. unsalted butter
1 T. extra virgin olive oil
1/2 t. dry mustard
1/2 t. brown sugar
2 T. flour
4 c. hot water
1 fresh bay leaf or 2 dried
1 T. fresh thyme leaves
1 T. balsalmic vinegar
1 T. molasses
5 T. Cognac
1 c. dry white vermouth
Black pepper
Crusty white bread
Low-sodium swiss cheese (I used Sargento baby swiss)
Melt the butter and oil in a large stockpot or dutch oven over medium heat. Add the onions and cook until the onions are tender and translucent, about 10 to 15 minutes, stirring occassionally.
Stir in the dry mustard and brown sugar. Cook until the onions are well browned, about 15 to 20 minutes, stirring occassionally. It's ok (and good) if you get a lot of brown bits at the bottom of the pot, this will help deepen the flavor of the soup. You can scrape up some of the brown bits as you're stirring the onions. However, if it starts to burn or smell like burning, turn down the heat a little.
Add the flour and cook another 1 to 2 minutes. Add the Cognac, dry vermouth, molasses, and balsamic vinegar, scraping up the brown bits. Stir in the water and add the thyme, bay leaves and 1/2 t. pepper. Bring to a low boil and then partially cover and let simmer, over low heat, for about 45 minutes. Taste and add additional pepper or balsalmic vinegar to brighten it up if desired.
To serve: Preheat the broiler. Ladle the soup into oven-proof bowls or crocks and lay a piece of bread in the middle of each bowl. Lay a slice of swiss cheese on top of the bread. Put the bowls on foil-lined baking sheet and broil until the cheese is bubbly and starting to brown slightly. We served this as a main dish along with a big green salad. Enjoy!
While we might not all have conditions like Jess, I think it is important for us all to think about our sodium intake. We might focus on calories, carbs, and fat, but sodium intake has risen dramatically in recent years and can have long-term affects on your health. There are little ways that I try to cut back but I know I need to be more mindful of it. One easy first step is trying to avoid products that already have a lot of unnecessary sodium added to them - such as chicken/vegetable stock, soups, and canned goods - and buy a low-sodium or no salt added version instead. You can always add your own seasoning and in most cases will end up adding much less than what the full-sodium version contains. I do this with vegetable stock, canned tomatoes, and many other things.
This challenge was all about taking a traditionally high sodium favorite - I chose French Onion Soup - and trying to remake it to a very low sodium version. The trickiest part of this was the stock - even low sodium varieties have far higher sodium levels than the 40mg dictated by Jess' low sodium rules. So, I had to be creative, and ended up coming up with a flavorful soup based on Julia Child's version which incorporates vermouth and cognac, and adding depth by using herbs, balsamic vinegar, molasses, and most importantly, carmelizing the onions very well. This is not a quick recipe, but it isn't difficult either if you have the time!
Serves 4 as a main dish, 6 as a starter
Active Time: 1 hour
Total time: 1 hour, 45 minutes
Ingredients:
2 1/2 lbs. yellow onions, thinly sliced
3/4 lb. shallots, thinly sliced
2 T. unsalted butter
1 T. extra virgin olive oil
1/2 t. dry mustard
1/2 t. brown sugar
2 T. flour
4 c. hot water
1 fresh bay leaf or 2 dried
1 T. fresh thyme leaves
1 T. balsalmic vinegar
1 T. molasses
5 T. Cognac
1 c. dry white vermouth
Black pepper
Crusty white bread
Low-sodium swiss cheese (I used Sargento baby swiss)
Melt the butter and oil in a large stockpot or dutch oven over medium heat. Add the onions and cook until the onions are tender and translucent, about 10 to 15 minutes, stirring occassionally.
Stir in the dry mustard and brown sugar. Cook until the onions are well browned, about 15 to 20 minutes, stirring occassionally. It's ok (and good) if you get a lot of brown bits at the bottom of the pot, this will help deepen the flavor of the soup. You can scrape up some of the brown bits as you're stirring the onions. However, if it starts to burn or smell like burning, turn down the heat a little.
Add the flour and cook another 1 to 2 minutes. Add the Cognac, dry vermouth, molasses, and balsamic vinegar, scraping up the brown bits. Stir in the water and add the thyme, bay leaves and 1/2 t. pepper. Bring to a low boil and then partially cover and let simmer, over low heat, for about 45 minutes. Taste and add additional pepper or balsalmic vinegar to brighten it up if desired.
To serve: Preheat the broiler. Ladle the soup into oven-proof bowls or crocks and lay a piece of bread in the middle of each bowl. Lay a slice of swiss cheese on top of the bread. Put the bowls on foil-lined baking sheet and broil until the cheese is bubbly and starting to brown slightly. We served this as a main dish along with a big green salad. Enjoy!
Monday, December 27, 2010
Winter Minestrone Stew
My apologies for the long absence since my last post! Between traveling for Thanksgiving, our two-week honeymoon to Australia and New Zealand, and Christmas, I haven't been as active in creating or posting recipes. This soup I actually threw together the day after we got back from our honeymoon. We loved the food in New Zealand (I gained a lot of inspiration for food/flavor combinations that I am looking forward to experimenting with) but after two weeks of 3-course dinners every night, we were ready for a healthy but hearty meal. This technically is not a minestrone soup since it doesn't contain pasta, but the flavors are very similar. Plus, given how stocked full of vegetables that this stew is, I couldn't even fit pasta in it if I wanted to! This is now my favorite way to make minestrone and the best part is it tastes even better the next day. I am presenting this recipe a little bit differently to make preparing it the most efficient - chopping certain components as you go along rather than all ahead of time.
Winter Minestrone Soup
Serves 6-8
Active Time: 30 minutes
Total Time: 1 hour 15 minutes
Extra virgin olive oil
1 onion
4 ribs celery
3 carrots
1 bunch red or rainbow chard
4 cloves garlic
1 T. tomato paste
28 oz. can whole peeled tomatoes (such as San Marzano)
4 c. low-sodium vegetable stock
2 bay leaves
1/2 Savoy cabbage
Parmesan rind (optional)
15 oz. can cannellini beans
15 oz. can red kidney beans
Kosher salt
Pepper
Freshly grated parmesan cheese, for serving
Dice the onion, celery, and carrots. In a large dutch oven or stock pot (I used a 5.5 qt dutch oven and just barely fit everything), heat 1 T. olive oil over medium heat. Add the onion, carrots, and celery, and season with 1/2 t. kosher salt and 1/8 t. pepper.
Meanwhile, separate the chard ribs/stems from the leaves. Dice the ribs/stems and set the leaves aside. Add the chard stems to the pot, stir to combine, and saute until softened, about 10 minutes.
Mince the 4 cloves of garlic and add the garlic to the pot, cooking for 2-3 minutes more.
Add the 1 T. tomato paste, stirring to combine. Add the can of tomatoes, vegetable stock, and the bay leaves. Bring the heat up until the soup reaches a low boil.
Meanwhile, chop the chard leaves into thin strips. Add to the pot, stirring to incorporate. While the chard is wilting down in the pot, remove the core from the 1/2 head of cabbage and also cut into thin strips. Add to the pot, stirring to incorporate, as well as the parmesan rind, if using.
Add 1 T. kosher salt and 1/2 t. pepper. Reduce heat to simmer and let simmer, covered, for 30 minutes, stirring once or twice.
Rinse and drain the beans, add them to the pot, and simmer, covered, for an additional 15 minutes. Taste and adjust for seasoning - I found that I needed to add another 1/2 t. kosher salt. You may also want to try to break up a few of the whole tomatoes with a wooden spoon if they have not done so naturally through the cooking process.
Ladle into bowls and top with parmesan cheese. Enjoy!
Winter Minestrone Soup
Serves 6-8
Active Time: 30 minutes
Total Time: 1 hour 15 minutes
Extra virgin olive oil
1 onion
4 ribs celery
3 carrots
1 bunch red or rainbow chard
4 cloves garlic
1 T. tomato paste
28 oz. can whole peeled tomatoes (such as San Marzano)
4 c. low-sodium vegetable stock
2 bay leaves
1/2 Savoy cabbage
Parmesan rind (optional)
15 oz. can cannellini beans
15 oz. can red kidney beans
Kosher salt
Pepper
Freshly grated parmesan cheese, for serving
Dice the onion, celery, and carrots. In a large dutch oven or stock pot (I used a 5.5 qt dutch oven and just barely fit everything), heat 1 T. olive oil over medium heat. Add the onion, carrots, and celery, and season with 1/2 t. kosher salt and 1/8 t. pepper.
Meanwhile, separate the chard ribs/stems from the leaves. Dice the ribs/stems and set the leaves aside. Add the chard stems to the pot, stir to combine, and saute until softened, about 10 minutes.
Mince the 4 cloves of garlic and add the garlic to the pot, cooking for 2-3 minutes more.
Add the 1 T. tomato paste, stirring to combine. Add the can of tomatoes, vegetable stock, and the bay leaves. Bring the heat up until the soup reaches a low boil.
Meanwhile, chop the chard leaves into thin strips. Add to the pot, stirring to incorporate. While the chard is wilting down in the pot, remove the core from the 1/2 head of cabbage and also cut into thin strips. Add to the pot, stirring to incorporate, as well as the parmesan rind, if using.
Add 1 T. kosher salt and 1/2 t. pepper. Reduce heat to simmer and let simmer, covered, for 30 minutes, stirring once or twice.
Rinse and drain the beans, add them to the pot, and simmer, covered, for an additional 15 minutes. Taste and adjust for seasoning - I found that I needed to add another 1/2 t. kosher salt. You may also want to try to break up a few of the whole tomatoes with a wooden spoon if they have not done so naturally through the cooking process.
Ladle into bowls and top with parmesan cheese. Enjoy!
Labels:
Beans,
Gluten-Free,
Kid-friendly,
Over 1 hour,
Soup,
Swiss Chard,
Vegan,
Winter
Monday, November 15, 2010
Spaghetti Squash Gratin
Spaghetti squash is the first squash that my husband was willing to try when we were dating. It's a good squash to serve to people who might not think that they love squash - and my husband now loves all varieties! We normally serve spaghetti squash as a side dish, roasted and served simply with a little bit of butter, some parmesan cheese, and salt and pepper. However, after picking one up at the farmer's market this past week (spaghetti squash can also be found at most grocery stores) I wanted to try something different with it and was inspired by a recipe in the New York Times. It certainly tastes like comfort food but with a healthy spin on it. Plus, it looks beautiful coming out of the oven! We served it as a main dish with a green salad.
Spaghetti Squash Gratin
Serves 4 as a main, 6-8 as a side
Active Time: ~30 min
Total Time: ~1 hr 15 min
Extra virgin olive oil
1 spaghetti squash
1 large red onion or 2-3 large cipollini onions, halved and thinly sliced
2 garlic cloves, minced
3 eggs
1 c. low-fat (2%) milk
1/2 c. packed fresh basil, cut into a chiffonade
1 t. fresh thyme, finely chopped
4 oz. feta, crumbled
1 c. freshly grated parmesan cheese
Kosher salt
Black pepper
Preheat the oven to 400 degrees Fahrenheit. Cut the squash in half lengthwise (I find it helps to microwave it for a minute first), scoop out the seeds, and place it cut side down on a sheet pan or roasting pan (with sides). Fill the bottom of the pan with about a 1/4'' of water, or enough to coat the bottom of the pan and touch the sides of the squash. Bake for 45 minutes. Keep the oven on at 400 degrees.
Meanwhile, after the squash has been baking for about 20 minutes, thinly slice the onion(s) and mince the garlic cloves. I used these beautiful large cipollini onions from the farmer's market that were about the size of one red onion when put together, but you can definitely just use a red onion (or yellow if you don't have red). Heat 1 T. olive oil in a large skillet over medium heat. Add the onions and a pinch of salt and saute until golden brown and caramelized, about 20 minutes, adding the garlic after 15 minutes.
When the squash is done, remove it from the oven, turn the squash halves cut side up, and use a fork to loosen the squash strands. Scoop out the strands and add them to the skillet with the onions, stirring to combine. Cook for another 5 minutes, stirring occasionally, until the squash softens a little more. Season with 1/2 t. salt and 1/8 t. pepper
Meanwhile, whisk the eggs in a large bowl. Whisk in the milk, then stir in the basil, thyme, and feta. Add the squash and onion mixture and stir to combine. Grease a large oval gratin pan or similar large baking dish and fold in the squash mixture. Cover with the parmesan cheese, pressing down lightly on the cheese to moisten slightly. Bake for 30-35 minutes until the top is golden brown.
Spaghetti Squash Gratin
Serves 4 as a main, 6-8 as a side
Active Time: ~30 min
Total Time: ~1 hr 15 min
Extra virgin olive oil
1 spaghetti squash
1 large red onion or 2-3 large cipollini onions, halved and thinly sliced
2 garlic cloves, minced
3 eggs
1 c. low-fat (2%) milk
1/2 c. packed fresh basil, cut into a chiffonade
1 t. fresh thyme, finely chopped
4 oz. feta, crumbled
1 c. freshly grated parmesan cheese
Kosher salt
Black pepper
Preheat the oven to 400 degrees Fahrenheit. Cut the squash in half lengthwise (I find it helps to microwave it for a minute first), scoop out the seeds, and place it cut side down on a sheet pan or roasting pan (with sides). Fill the bottom of the pan with about a 1/4'' of water, or enough to coat the bottom of the pan and touch the sides of the squash. Bake for 45 minutes. Keep the oven on at 400 degrees.
Meanwhile, after the squash has been baking for about 20 minutes, thinly slice the onion(s) and mince the garlic cloves. I used these beautiful large cipollini onions from the farmer's market that were about the size of one red onion when put together, but you can definitely just use a red onion (or yellow if you don't have red). Heat 1 T. olive oil in a large skillet over medium heat. Add the onions and a pinch of salt and saute until golden brown and caramelized, about 20 minutes, adding the garlic after 15 minutes.
When the squash is done, remove it from the oven, turn the squash halves cut side up, and use a fork to loosen the squash strands. Scoop out the strands and add them to the skillet with the onions, stirring to combine. Cook for another 5 minutes, stirring occasionally, until the squash softens a little more. Season with 1/2 t. salt and 1/8 t. pepper
Meanwhile, whisk the eggs in a large bowl. Whisk in the milk, then stir in the basil, thyme, and feta. Add the squash and onion mixture and stir to combine. Grease a large oval gratin pan or similar large baking dish and fold in the squash mixture. Cover with the parmesan cheese, pressing down lightly on the cheese to moisten slightly. Bake for 30-35 minutes until the top is golden brown.
Labels:
Gluten-Free,
Kid-friendly,
Over 1 hour,
Squash
Sunday, November 7, 2010
Bean and Sweet Potato Chili
I love creating healthy and hearty soups. Sweet potatoes are something that you might not normally find in soup, or in chili for that matter, but it works so well combined with these tomatoes, beans, and spices. We are getting into the season where sweet potatoes and other root vegetables are at their peak, so I'm always looking for new ways to use them. This chili will please even guys who are used to meat and bean chili - it's hearty, spicy, and satisfying.
I used 2 serrano chiles here - one seeded and one left with the seeds left in - and found that it was the perfect amount of heat for me (if akin to salsa this would be medium spicy). However, if you like less heat, take the seeds out of both chiles, or if you like more heat, leave them all in. I cooked the sweet potatoes in the chili by simmering it for over an hour, but to cut down on the cooking time, you could either a) cook the sweet potatoes in the oven the night before, let cool, peel, cut up and throw in the soup, or b) peel, cut, and roast the sweet potatoes in the oven while the soup is simmering and add them in later - in either case you'd still want to simmer the soup for at least minutes once you add the potatoes to let the flavors come together.
Bean and Sweet Potato Chili
Extra Virgin Olive Oil
1 yellow onion, roughly diced
1 large pasilla pepper, diced
2 serrano chiles, 1 seeded and 1 left with the seeds in, minced
2-3 cloves garlic, minced
1 T. ancho chile powder
2 t. ground cumin
2 large sweet potatoes, peeled and cut into 1/2'' pieces
1 28 oz. (or two 15 oz.) cans diced tomatoes
1 15 oz. can crushed tomatoes
1 c. vegetable broth
1 15 oz. can pinto beans
1 15 oz. can black beans
Heat 1 T. olive oil over medium heat in a large dutch oven or stockpot. Add the onion, pepper, chiles, and garlic and saute until softened, about 5-7 minutes.
Meanwhile, peel and cut the potatoes into approximately 1/2'' pieces (not too big or they will take a long time to cook). Add the potatoes, chile powder, and cumin to the pot and stir to combine. Cook for 2-3 minutes, stirring frequently.
Add the diced and crushed tomatoes, vegetable browth and beans and stir to combine. Bring to a boil, then reduce the heat to simmer, and let cook for about 1 hour and 15 minutes, or until sweet potatoes are fork tender.
If you'd like, serve with a dollop of sour cream, cheese, or some cilantro to top it off.
I used 2 serrano chiles here - one seeded and one left with the seeds left in - and found that it was the perfect amount of heat for me (if akin to salsa this would be medium spicy). However, if you like less heat, take the seeds out of both chiles, or if you like more heat, leave them all in. I cooked the sweet potatoes in the chili by simmering it for over an hour, but to cut down on the cooking time, you could either a) cook the sweet potatoes in the oven the night before, let cool, peel, cut up and throw in the soup, or b) peel, cut, and roast the sweet potatoes in the oven while the soup is simmering and add them in later - in either case you'd still want to simmer the soup for at least minutes once you add the potatoes to let the flavors come together.
Bean and Sweet Potato Chili
Extra Virgin Olive Oil
1 yellow onion, roughly diced
1 large pasilla pepper, diced
2 serrano chiles, 1 seeded and 1 left with the seeds in, minced
2-3 cloves garlic, minced
1 T. ancho chile powder
2 t. ground cumin
2 large sweet potatoes, peeled and cut into 1/2'' pieces
1 28 oz. (or two 15 oz.) cans diced tomatoes
1 15 oz. can crushed tomatoes
1 c. vegetable broth
1 15 oz. can pinto beans
1 15 oz. can black beans
Heat 1 T. olive oil over medium heat in a large dutch oven or stockpot. Add the onion, pepper, chiles, and garlic and saute until softened, about 5-7 minutes.
Meanwhile, peel and cut the potatoes into approximately 1/2'' pieces (not too big or they will take a long time to cook). Add the potatoes, chile powder, and cumin to the pot and stir to combine. Cook for 2-3 minutes, stirring frequently.
Add the diced and crushed tomatoes, vegetable browth and beans and stir to combine. Bring to a boil, then reduce the heat to simmer, and let cook for about 1 hour and 15 minutes, or until sweet potatoes are fork tender.
If you'd like, serve with a dollop of sour cream, cheese, or some cilantro to top it off.
Labels:
Beans,
Gluten-Free,
Kid-friendly,
Over 1 hour,
Soup,
Sweet Potatoes,
Vegan
Wednesday, October 27, 2010
Mushroom, Wild Rice, and Brown Rice Soup
We had a busy weekend this past weekend with Stanford Homecoming and several guests in town. While we had a blast, we were pretty exhausted by the end and wanted a healthy but comforting and relatively easy dinner on Sunday night. I often make bean soups but we didn't feel like it this time so I played off of one of my other favorite kinds of soup - mushroom and wild rice - to come up with this recipe. Many mushroom wild rice soups are cream-based, but this uses vegetable broth. As the mushrooms simmer into the vegetable broth they also impart a nice earthy mushroomy flavor to the broth. This soup only calls for a few ingredients, which is great when you don't have much in the fridge. Carrots, celery, and onion are aromatics, and they are often used in soup to develop a base of flavor. They are also known as "mirepoix" in French cooking. I also used a combination of wild and brown rice in this soup - I like the two textures together. Both of these whole grains are good for you, and wild rice actually has more protein than brown rice.
This would also be a great soup for if you feel like you're coming down with a cold - it is so warming.
Mushroom Wild Rice Soup
Serves 6
Extra virgin olive oil
1 yellow onion, large diced
3 cloves garlic, minced
1 bunch celery, large diced
4 large carrots, large diced
6 c. low-sodium vegetable broth
1/2 c. wild rice, rinsed
1/2 c. brown basmati or jasmine rice, rinsed
16-20 oz. cremini mushrooms, thinly sliced
2 bay leaves
Kosher salt
Black pepper
Heat 1 T. of the olive oil over medium heat in a large dutch oven or stockpot. Add the onion and garlic and saute until softened, about 5 minutes. Add to carrots and celery to the pot and saute for an additional 3-4 minutes. Add the vegetable broth and bay leaves and bring to a low boil. Add the wild rice, brown rice, 1 t. kosher salt, and 1/2 t. pepper, cover and reduce heat to a simmer for 30 minutes. Add the mushroooms, re-cover and simmer for an additional 30 minutes, stirring occassionally. Taste for seasoning - I found that I needed an additional 1 t. salt and 1/4 t. black pepper. Discard the bay leaves and serve.
This soup was also great for leftovers. Reheat with some additional vegetable stock or water - the rice will absorb more of the liquid as it keeps.
This would also be a great soup for if you feel like you're coming down with a cold - it is so warming.
Mushroom Wild Rice Soup
Serves 6
Extra virgin olive oil
1 yellow onion, large diced
3 cloves garlic, minced
1 bunch celery, large diced
4 large carrots, large diced
6 c. low-sodium vegetable broth
1/2 c. wild rice, rinsed
1/2 c. brown basmati or jasmine rice, rinsed
16-20 oz. cremini mushrooms, thinly sliced
2 bay leaves
Kosher salt
Black pepper
Heat 1 T. of the olive oil over medium heat in a large dutch oven or stockpot. Add the onion and garlic and saute until softened, about 5 minutes. Add to carrots and celery to the pot and saute for an additional 3-4 minutes. Add the vegetable broth and bay leaves and bring to a low boil. Add the wild rice, brown rice, 1 t. kosher salt, and 1/2 t. pepper, cover and reduce heat to a simmer for 30 minutes. Add the mushroooms, re-cover and simmer for an additional 30 minutes, stirring occassionally. Taste for seasoning - I found that I needed an additional 1 t. salt and 1/4 t. black pepper. Discard the bay leaves and serve.
This soup was also great for leftovers. Reheat with some additional vegetable stock or water - the rice will absorb more of the liquid as it keeps.
Labels:
Gluten-Free,
Kid-friendly,
Mushrooms,
Over 1 hour,
Soup,
Vegan,
Whole-Grain
Thursday, October 21, 2010
Garnet Yam, Black Bean, and Rainbow Chard Enchiladas
I was having my good friend Sara over last night and wanted to make her something especially wonderful for dinner. She loves fall flavors like yams and sweet potatoes but also loves Mexican food. I have developed a great vegetarian enchiladas recipe that I make in the summer with corn and summer squash, and thought, why not make the fall version? The combination of yams, chard, black beans, and queso fresco in the filling is so good, we had no problem polishing off 2 enchiladas each. This recipe does take a little time because you have to roast the yams first and then assemble the enchiladas, but you could always roast the yams a day ahead of time and keep them in the fridge until you're ready to make the dish, or make the entire thing a day ahead of time and just pop it in the oven when you're ready to serve it.
Garnet Yam, Black Bean, and Rainbow Chard Enchiladas
Serves 4-6
Garnet Yam, Black Bean, and Rainbow Chard Enchiladas
Serves 4-6
Extra virgin olive oil
4 cloves garlic, minced
3 T. flour
2 c. low-sodium vegetable stock
15 oz. can fire-roasted tomatoes with chiles (you could also use canned fire-roasted or plain diced tomatoes and add a small can of green chiles)
1 T. ancho chili powder
1 ½ t. ground cumin
4 oz. queso fresco (Mexican cheese)
15 oz. can black beans, rinsed and drained
2 lb. garnet yams (about 3 medium or 2 large yams), peeled and cut into ¾’’ pieces
1 bunch rainbow or swiss chard, leaves only, rinsed and roughly chopped (save the stems for another use - coming soon!)
8 whole wheat tortillas
4 oz. pepper jack cheese, grated
Light sour cream, for topping (optional)
Kosher salt
Preheat the oven to 425°F. Toss the cut yams in a large bowl with 2 t. olive oil and season with ½ t. salt. Transfer the yams to a baking sheet and spread in an even layer. Roast the yams until tender, approximately 45 minutes.
Meanwhile, make the enchilada sauce. Heat 2 T. olive oil in a medium-sized saucepan over medium heat. Once the oil is hot, add the garlic and sauté until fragrant, approximately 30 seconds. Add 3 T. of flour to the pan and whisk together with the garlic and olive oil. Continue whisking and cook for about another 30 seconds or a minute more to allow the mixture to cook a little. Gradually add in the 2 cups of vegetable stock, whisking constantly to ensure a smooth consistency. Bring to a low boil, then reduce the heat to a simmer and stir in the diced tomatoes and their juices, chili powder, and cumin. If using low-sodium stock, add 1 t. of kosher salt. Allow to simmer for 10-15 minutes to thicken a little, stirring occasionally.
Heat 1 t. olive oil in a large sauté pan or stockpot over medium heat. Add the chard, cover, and cook for approximately 5 minutes or until chard is wilted, stirring occasionally. Season with 1/4 t. kosher salt and set aside in the bowl you used for the yams.
When the yams are done, pull them out, and decrease the temperature of the oven to 375°F. In the large bowl containing the chard, add the black beans (drained), cooked yams, and queso fresco cheese, crumbling as you add it. Stir together to combine. This is the filling for the enchiladas.
Put the stack of tortillas in between two sheets of dampened paper towel on a plate and microwave for approximately 1-2 minutes or until warm. This will make it easier to assemble the enchiladas. Grate the pepper jack cheese if you have not already done so.
Grease a large rectangular baking dish (I used a 4.5 qt Pyrex, one size larger than a 13x9x2 but use whatever you have that you think you can fit 8 enchiladas into). Get all of the components in one area for easy assembly (the baking pan, the filling mixture, the tortillas, the saucepan with the sauce, and a plate). To begin, spread approximately ½ cup of the sauce on the bottom of the baking dish to lightly coat it. Begin filling the tortillas one at a time. I do this by placing one tortilla on a plate, then scooping out 1 cup of the filling mixture and putting it along the middle of the tortilla. Then, roll up the tortilla as tightly as you can (no need to fold in the edges) and put it in the baking dish, starting with one edge, and repeating this process until all 8 tortillas are packed tightly together in the pan.
Top the tortillas with the remaining sauce, spreading the sauce around to cover the tortillas as well as possible. Top with the pepper jack cheese.
Bake, uncovered, for 45 minutes, until the dish is bubbly and cheese is melted. Serve with a dollop of sour cream, if you’d like.
If you made this recipe ahead of time and had it in the fridge, take it out of the fridge while the oven is preheating and cook for approximately 50 minutes.
Labels:
Beans,
Kid-friendly,
Over 1 hour,
Swiss Chard,
Whole-Grain,
Yams
Tuesday, October 19, 2010
Hearty Vegetable Bean Soup
It was a rainy day on Sunday in the Bay Area, which made it a perfect day for soup. I decided to try using dried beans, which turned out to be much easier than I expected. You can find much more variety in dried beans than canned, and they have this wonderful sort of al dente bite to them when cooked, versus canned beans which can be a little mushy. Having said this, I have shown how to modify the recipe below if you are in a rush and want to use canned. All it took to use the dried beans was to throw them in a pot with some water in the morning and let them sit until I made the soup that evening. Then, you just simmer the soup for longer than you would with canned beans, which is usually fine with me on Sunday evening as I'm usually at home preparing for work for the week. Another great thing about this soup is that it makes a big pot and tastes arguably even better over the next few days as leftovers.
Hearty Vegetable Bean Soup
Serves 6-8
16 oz. flageolet beans or other dried bean of your choice
(alternatively use two 15 oz. cans cannellini beans)
Extra virgin olive oil
1 yellow onion, thinly sliced
2-3 leeks, white and light green parts, thinly sliced
2 cloves garlic, minced
3-4 carrots, cut into 1/2'' pieces
28 oz. can San Marzano plum tomatoes
4 c. low-sodium vegetable broth
1 small bunch or about 10 springs fresh thyme
(really try to use fresh thyme - it's important to the flavor of the soup)
2 bay leaves
2 t. kosher salt
1 t. pepper
1 bunch kale or swiss chard (I used lacinato kale)
If using dried beans, soak for at least 4 hours or overnight (I just soaked them starting in the late morning and cooked the soup the same evening). When ready to make the soup, drain and rinse the beans.
In a large dutch oven or pot, heat 1 T. olive oil over medium heat. Add the onion, leeks, garlic, and a pinch of salt. Saute until tender but not browned, about 5 minutes.
Add the carrots and the can of tomatoes (plus their juices) and stir to combine. Add the dried beans or canned if using. Add the vegetable stock and the whole thyme sprigs and bay leaves (the thyme leaves will just dissolve off of the branches as the soup cooks). Add 1 t. kosher salt and 1/2 t. of the pepper. Bring the soup to a low boil, then cover and simmer for 2 hours if using dried beans or 30 minutes to 1 hour if using canned beans, stirring occasionally (the more time the better!). About 30 minutes before the soup is done (1 1/2 hours into the simmering process for dried beans, anywhere from right away to 30 minutes later for canned beans, depending on how long you're planning to simmer it), add the kale or swiss chard and stir well into the soup to combine. Recover and simmer for the remaining time. Taste for seasoning - I found that since I used low-sodium broth and it was a large pot of soup, I needed an additional 1 t. kosher salt and 1/2 t. pepper.
We liked this soup on its own but it was especially delicious with some grated or shaved parmesan cheese on the top!
Hearty Vegetable Bean Soup
Serves 6-8
16 oz. flageolet beans or other dried bean of your choice
(alternatively use two 15 oz. cans cannellini beans)
Extra virgin olive oil
1 yellow onion, thinly sliced
2-3 leeks, white and light green parts, thinly sliced
2 cloves garlic, minced
3-4 carrots, cut into 1/2'' pieces
28 oz. can San Marzano plum tomatoes
4 c. low-sodium vegetable broth
1 small bunch or about 10 springs fresh thyme
(really try to use fresh thyme - it's important to the flavor of the soup)
2 bay leaves
2 t. kosher salt
1 t. pepper
1 bunch kale or swiss chard (I used lacinato kale)
If using dried beans, soak for at least 4 hours or overnight (I just soaked them starting in the late morning and cooked the soup the same evening). When ready to make the soup, drain and rinse the beans.
In a large dutch oven or pot, heat 1 T. olive oil over medium heat. Add the onion, leeks, garlic, and a pinch of salt. Saute until tender but not browned, about 5 minutes.
Add the carrots and the can of tomatoes (plus their juices) and stir to combine. Add the dried beans or canned if using. Add the vegetable stock and the whole thyme sprigs and bay leaves (the thyme leaves will just dissolve off of the branches as the soup cooks). Add 1 t. kosher salt and 1/2 t. of the pepper. Bring the soup to a low boil, then cover and simmer for 2 hours if using dried beans or 30 minutes to 1 hour if using canned beans, stirring occasionally (the more time the better!). About 30 minutes before the soup is done (1 1/2 hours into the simmering process for dried beans, anywhere from right away to 30 minutes later for canned beans, depending on how long you're planning to simmer it), add the kale or swiss chard and stir well into the soup to combine. Recover and simmer for the remaining time. Taste for seasoning - I found that since I used low-sodium broth and it was a large pot of soup, I needed an additional 1 t. kosher salt and 1/2 t. pepper.
We liked this soup on its own but it was especially delicious with some grated or shaved parmesan cheese on the top!
Labels:
Beans,
Gluten-Free,
Kale,
Kid-friendly,
Leeks,
Over 1 hour,
Soup,
Vegan
Sunday, October 17, 2010
Coconut Carrot Bread
With the weather cooling off this weekend, I felt like baking and wanted to create a quick bread to have as an afternoon snack or in the morning with coffee. I love carrot cake, and this incorporates some of the flavors of carrot cake but in a much healthier version. It's very easy to make and the walnuts and coconut flakes give it a nice texture, but if you're not a nut person you can always omit those. I like this best served warm with a little butter.
Coconut Carrot Bread
1/4 c. olive oil1/4 c. unsweetened applesauce
1/2 c. honey
2 eggs
1 t. vanilla
1 1/2 c. whole wheat flour
1/2 t. baking soda
1/2 t. baking powder
1/2 t. salt
1 1/2 t. cinnamon
1/4 t. nutmeg
1 1/2 c. carrots (about 3 medium), grated
1/2 c. unsweetened coconut flakes (plus a little extra for the top)
1/2 c. walnuts
Preheat the oven to 350 degrees Farenheit. Put the walnuts in a small skillet and toast over low heat.
Meanwhile, in a large bowl, whisk the olive oil and honey together, then add the applesauce, whisking to combine. Add the eggs and vanilla and whisk until well incorporated.
In a medium-sized bowl, add the dry ingredients - whole wheat flour, baking soda, baking powder, salt, cinnamon, and nutmeg - and whisk with another whisk or a fork until well combined.
Chop the walnuts into small pieces when they are done toasting. Add the grated carrots and cocunut flakes to the wet ingredients and stir with a spoon. Add the dry ingredients and stir just until incorporated. Fold in the walnuts.
Pour the batter into a greased 9'' loaf pan and top with some more of the coconut flakes. Bake in the preheated oven for approximately 55 minutes, or until a toothpick inserted into the center comes out relatively clean.
Labels:
Bread,
Carrots,
Coconut,
Kid-friendly,
Over 1 hour,
Whole-Grain
Subscribe to:
Posts (Atom)