It's been about 2 months since my last post and I hope that will be the longest gap by far that I'll ever have away from this blog! Between a big promotion at work, buying a house, and moving from the Bay Area to Seattle, I can say that I am certainly coming out of one of the busiest periods of my life, which didn't leave much time for either cooking or blogging. Fortunately, now that we're getting settled in Seattle (we just made the big move last week), I'm planning to re-balance and get back to the cooking and creating that I love. My recipes are also apt to become even more seasonal, as the Northwest has true seasons as opposed to California which never really gets a winter and has very extended and different growing seasons. In the short time that we've been in Seattle the weather has actually been beautiful with little rain, and I have to say that I missed the fallen leaves and crisp, clean air. It also makes you want to roast, bake, and make soups. Even with our kitchen a little bit of a mess with the move-in process, I was able to easily whip up this simple, delicious soup (which also happens to be vegan). A great one for the weeknights served with some good bread.
Simple White Bean, Swiss Chard, and Tomato Soup
Serves 4
Active Time: 20 minutes
Total Time: 45 minutes
1 T. extra virgin olive oil
3 cloves garlic, minced
2 bunches swiss or rainbow chard, leaves separated from stems, with stems diced and leaves well chopped
2 cans cannellini or great northern white beans, rinsed and drained
2 14.5 oz cans diced tomatoes
1/4 t. crushed red pepper flakes
4 c. low sodium vegetable broth or 4 c. water with 2 low-sodium vegetable bouillon cubes
Kosher salt
Black pepper
1 T. aged balsamic vinegar
Heat a large stockpot or dutch oven with the tablespoon of olive oil over medium heat. Add the garlic and chard stems and cook, stirring occasionally, until stems start to soften, about 3-5 minutes. Add the tomatoes with their juices, the drained beans, red pepper flakes, the vegetable stock or water w/bouillon and 1 t. kosher salt. Bring to a near-boil, add the chard stems, and stir until they start to wilt and become incorporated into the soup, a few minutes. Reduce the heat to low and simmer for about 25 minutes, or even longer if you have the time - it only gets better. Stir in the balsamic vinegar, add some freshly ground black pepper, and taste for seasoning (my bouillon cubes were no sodium so I added another 1 1/2 t. of kosher salt). This recipe is also great reheated the next day.
Showing posts with label Under 45 minutes. Show all posts
Monday, November 12, 2012
Monday, August 6, 2012
Eggplant, Heirloom Tomato, and Chickpea Curry
I've been getting eggplants in my CSA box over the past few weeks and trying to figure out new ways to use them. I came across some recipes that used just the flesh of the eggplant in curry dishes (versus dicing it up and including the skin) and I thought this would bring a nice texture and meatiness to a vegetarian curry dish. I also had some heirloom tomatoes and some canned chickpeas on hand, and with some spices you can easily create this dish in a pinch. My favorite thing about these type of Indian-inspired curries is that they are so healthy and leave you feeling great after you eat them. The spices in this curry are also great for you - the turmeric is an anti-inflammatory, and the red chile flakes can help speed up your metabolism.
Eggplant, Heirloom Tomato, and Chickpea Curry
Active Time: 35 minutes
Total Time: 40 minutes
Serves 3-4
1 T. ghee (clarified butter), coconut oil, or olive oil (use the latter 2 for a vegan option)
1 large eggplant
2 medium or 1 very large heirloom tomatoes, diced
1 15 oz. can chickpeas, drained and rinsed
4 cloves garlic, minced
1 yellow onion, diced
2 t. ground cumin
1 t. ground turmeric
1 t. ground coriander
1/2 t. dried red chile flakes
Kosher salt
Brown rice, for serving
Preheat the oven to 425 degrees Fahrenheit. Cut the top off the eggplant and half lengthwise. On a baking sheet or sheet pan, drizzle a little olive oil in 2 places where you'll put the eggplant halves. Sprinkle some kosher salt on each eggplant half, then place the cut side down on the olive oil spots and rub around to coat. Transfer to the oven and cook for 30 minutes.
Meanwhile, prepare the onion, garlic, and tomatoes. Heat the ghee or other oil in a large skillet over medium heat. Add the onions and garlic and saute until softened, about 7-8 minutes. Add the tomatoes, chickpeas, cumin, turmeric, coriander, chile flakes, and 1/2 t. kosher salt and stir to combine, then reduce heat to a simmer and cook for about 5 minutes or whenever the eggplant is done.
Remove the eggplant from the oven, flip it over with a spatula, then use the spatula or a spoon to spoon the flesh of the eggplant into a small bowl. Mash it slightly with the spatula or spoon, then transfer to the pan with the other vegetables, stir to combine, and simmer for another 3-5 minutes. A nice shortcut for the rice in this recipe is Trader Joe's frozen organic short grain brown rice, which I always have on hand and only takes 3 minutes to reheat. Serve the curry over brown rice or with naan.
Eggplant, Heirloom Tomato, and Chickpea Curry
Active Time: 35 minutes
Total Time: 40 minutes
Serves 3-4
1 T. ghee (clarified butter), coconut oil, or olive oil (use the latter 2 for a vegan option)
1 large eggplant
2 medium or 1 very large heirloom tomatoes, diced
1 15 oz. can chickpeas, drained and rinsed
4 cloves garlic, minced
1 yellow onion, diced
2 t. ground cumin
1 t. ground turmeric
1 t. ground coriander
1/2 t. dried red chile flakes
Kosher salt
Brown rice, for serving
Preheat the oven to 425 degrees Fahrenheit. Cut the top off the eggplant and half lengthwise. On a baking sheet or sheet pan, drizzle a little olive oil in 2 places where you'll put the eggplant halves. Sprinkle some kosher salt on each eggplant half, then place the cut side down on the olive oil spots and rub around to coat. Transfer to the oven and cook for 30 minutes.
Meanwhile, prepare the onion, garlic, and tomatoes. Heat the ghee or other oil in a large skillet over medium heat. Add the onions and garlic and saute until softened, about 7-8 minutes. Add the tomatoes, chickpeas, cumin, turmeric, coriander, chile flakes, and 1/2 t. kosher salt and stir to combine, then reduce heat to a simmer and cook for about 5 minutes or whenever the eggplant is done.
Remove the eggplant from the oven, flip it over with a spatula, then use the spatula or a spoon to spoon the flesh of the eggplant into a small bowl. Mash it slightly with the spatula or spoon, then transfer to the pan with the other vegetables, stir to combine, and simmer for another 3-5 minutes. A nice shortcut for the rice in this recipe is Trader Joe's frozen organic short grain brown rice, which I always have on hand and only takes 3 minutes to reheat. Serve the curry over brown rice or with naan.
Labels:
Chickpeas,
Eggplant,
Gluten-Free,
Onions,
Tomatoes,
Under 45 minutes,
Vegan
Sunday, February 5, 2012
Crunchy Roasted Spiced Chickpeas
Looking for a last minute snack to enjoy while watching the game? These roasted chickpeas have become my go-to quick appetizer for dinner parties, casual get-togethers, or just for us to snack on. I've tried multiple variations of this recipe and the key is cooking them at the right temperature to get them to turn out crispy like corn nuts on the outside while slightly soft on the inside. Simply coated with olive oil, chile powder, cumin, smoked paprika, and salt, they're an incredibly easy and delicious snack and I generally have all of these ingredients in my pantry so I can throw them together in a pinch. These are best eaten the same day you make them as they get a little softer the next day, but I'll still eat them as a snack (if there are any left over!)
Crunchy Roasted Spiced Chickpeas
Active Time: 5 minutes
Total Time: About 45 minutes
Two 15 oz. cans chickpeas/garbanzo beans, drained and rinsed
2 T. olive oil
1 t. ancho chili powder
1 t. cumin
1/2 t. smoked paprika
1 t. fine grain sea salt, plus more for sprinkling at the end
Preheat the oven to 400 degrees Fahrenheit. Dry the chickpeas between paper towels or kitchen towels, getting them as dry as you can (this will help them absorb the spices and get crunchier in the oven). Put them in a medium-sized bowl, add the olive oil, spices, and salt, and stir to combine. Transfer to a sheet pan or cookie sheet and roast for approximately 20 minutes, then increase the heat to 450 degrees and roast for about another 10-15 minutes until the chickpeas are golden brown. Test a few to see if any of them have gotten crispy and if not, return to oven in 5 minute increments until they are done. There may be a few on the edges which get a little bit too brown - just discard these as you want the others to be able to get crunchy enough. Remove from oven, season with a pinch of fine-grain sea salt, transfer to a bowl, and serve.
Crunchy Roasted Spiced Chickpeas
Active Time: 5 minutes
Total Time: About 45 minutes
Two 15 oz. cans chickpeas/garbanzo beans, drained and rinsed
2 T. olive oil
1 t. ancho chili powder
1 t. cumin
1/2 t. smoked paprika
1 t. fine grain sea salt, plus more for sprinkling at the end
Preheat the oven to 400 degrees Fahrenheit. Dry the chickpeas between paper towels or kitchen towels, getting them as dry as you can (this will help them absorb the spices and get crunchier in the oven). Put them in a medium-sized bowl, add the olive oil, spices, and salt, and stir to combine. Transfer to a sheet pan or cookie sheet and roast for approximately 20 minutes, then increase the heat to 450 degrees and roast for about another 10-15 minutes until the chickpeas are golden brown. Test a few to see if any of them have gotten crispy and if not, return to oven in 5 minute increments until they are done. There may be a few on the edges which get a little bit too brown - just discard these as you want the others to be able to get crunchy enough. Remove from oven, season with a pinch of fine-grain sea salt, transfer to a bowl, and serve.
Labels:
Chickpeas,
Gluten-Free,
Kid-friendly,
Under 45 minutes,
Vegan
Thursday, October 27, 2011
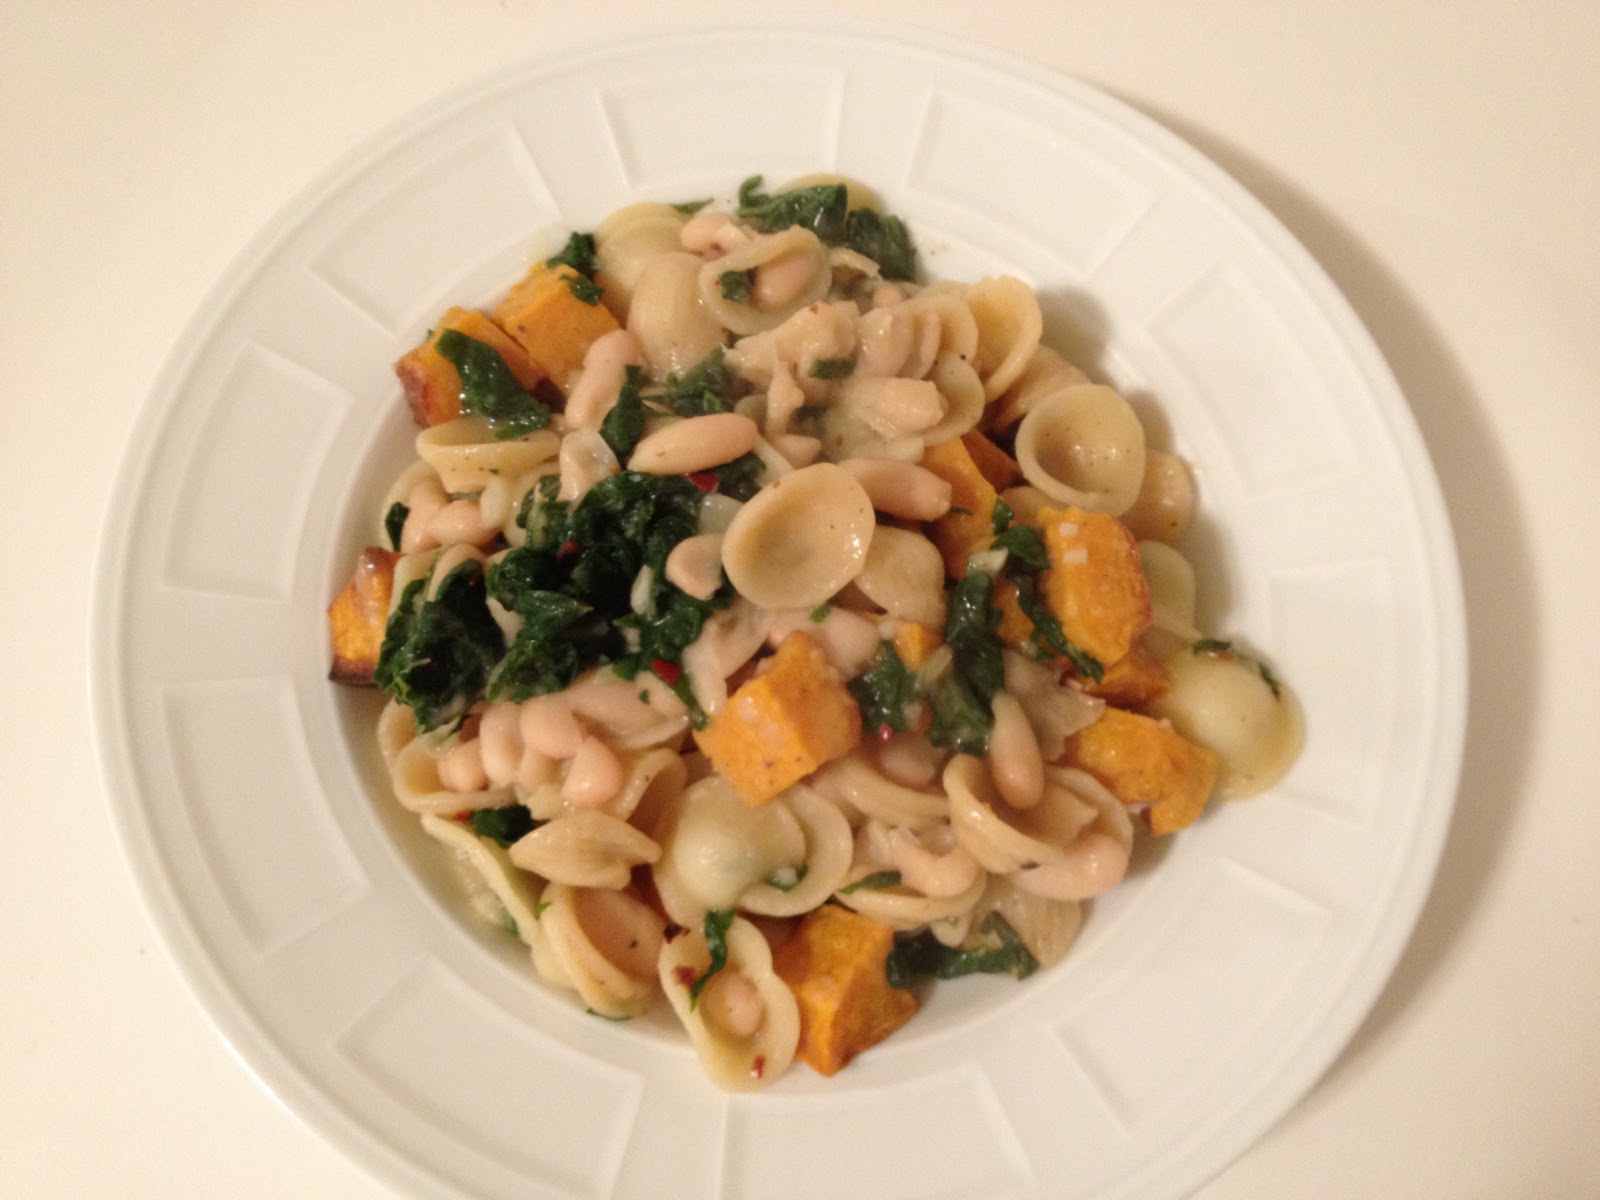
Butternut Squash, Chard, and White Bean Orecchiette
Sometimes it's difficult to use up a whole butternut squash and not get sick of it. Unless I'm making soup, I generally buy them smaller in size, and use it in a few different recipes as an accent (i.e. the Fall Moroccan Tagine that I recently posted) rather than the feature of a dish. I actually used the other half of the butternut squash I had from making that dish (it keeps well in the fridge) to come up with this quick pasta using just a few ingredients that I had on hand - green swiss chard, a can of cannellini beans, and some orecchiette pasta. It was a great weeknight meal not only because it's well balanced - getting your vegetables, protein, and carbohydrates in one bowl - but also because it's relatively quick, and the flavors all went together even better than I expected. When the butternut squash is roasted and paired with the earthy beans and chard, it takes on more of a savory quality in this dish than sweet, and I think you'll like it! This makes enough for 2, but can easily be doubled for more people.
Butternut Squash, Chard, and White Bean Orecchiette
Serves 2
Active Time: 15 minutes
Total Time: 45 minutes
Extra virgin olive oil
1/2 small or about 2 cups butternut squash, peeled and cubed
1/2 bunch green, swiss, or rainbow chard, leaves removed and chopped
6 oz. orecchiette or other small pasta (shells would also work)
1 15 oz. can cannellini or other white beans, drained and rinsed
2 cloves garlic, minced
1/4 t. crushed red pepper flakes
Kosher salt
Black pepper
Preheat the oven to 400 degrees Fahrenheit. Toss the squash in a little olive oil, season with a pinch of salt, and lay out on a sheet pan. Roast for about 30 minutes (mine went a little longer and was slightly browned on the bottom but still tasted great).
Meanwhile, heat a pot of water and cook the pasta until al dente, reserving 1/4 c. of the cooking water before draining. Additionally, heat 1 T. olive oil over medium heat in a large skillet or saucepan. Add the garlic and crushed red pepper and cook for about 30 seconds, then add the chard, cover, and cook for about 2-3 minutes, stirring once or twice, until wilted. Remove the lid, add the beans, and simmer over low heat until the pasta is done.
Combine the pasta, squash, greens/bean mixture, and cooking water along with 1 t. kosher salt and some freshly ground black pepper. Stir for 1-2 minutes until everything combines and a light sauce forms. Divide into pasta bowls and serve.
Butternut Squash, Chard, and White Bean Orecchiette
Serves 2
Active Time: 15 minutes
Total Time: 45 minutes
Extra virgin olive oil
1/2 small or about 2 cups butternut squash, peeled and cubed
1/2 bunch green, swiss, or rainbow chard, leaves removed and chopped
6 oz. orecchiette or other small pasta (shells would also work)
1 15 oz. can cannellini or other white beans, drained and rinsed
2 cloves garlic, minced
1/4 t. crushed red pepper flakes
Kosher salt
Black pepper
Preheat the oven to 400 degrees Fahrenheit. Toss the squash in a little olive oil, season with a pinch of salt, and lay out on a sheet pan. Roast for about 30 minutes (mine went a little longer and was slightly browned on the bottom but still tasted great).
Meanwhile, heat a pot of water and cook the pasta until al dente, reserving 1/4 c. of the cooking water before draining. Additionally, heat 1 T. olive oil over medium heat in a large skillet or saucepan. Add the garlic and crushed red pepper and cook for about 30 seconds, then add the chard, cover, and cook for about 2-3 minutes, stirring once or twice, until wilted. Remove the lid, add the beans, and simmer over low heat until the pasta is done.
Combine the pasta, squash, greens/bean mixture, and cooking water along with 1 t. kosher salt and some freshly ground black pepper. Stir for 1-2 minutes until everything combines and a light sauce forms. Divide into pasta bowls and serve.
Labels:
Beans,
Butternut Squash,
Fall,
Kid-friendly,
Pasta,
Swiss Chard,
Under 45 minutes
Monday, July 25, 2011
Ultimate Veggie Chili
I've made many a chili recipe in my day, and while they have all been pretty good, I wanted to create a veggie chili that had the right amount of heat, was full of vegetables, and hearty enough to be a full meal. This recipe actually includes bulgur wheat, which I've seen in chilis before and creates a great texture plus adds a whole grain component. Combined with fresh corn and a combination of spices, this is my favorite version of veggie chili yet.
Ultimate Veggie Chili
Serves 6-8
Active time: 15 minutes
Total Time: 40 minutes
Extra virgin olive oil
1 large onion, chopped
2 carrots, diced
1 green bell pepper, diced (I'm not normally a huge fan of these but they're good in this)
3 garlic cloves, minced
Kosher salt
1 T. ancho chili powder
2 t. ground cumin
2 t. unsweetened cocoa powder
2 t. smoked paprika
1/2 t. cayenne pepper
28 oz. diced tomatoes
1 c. bulgur wheat
2 c. water
15 oz. can red chili beans (or use 2 cans pinto beans instead of 1), drained and rinsed
15 oz. can pinto beans, drained and rinsed
2 ears fresh corn, kernels removed
Fresh cilantro, chopped
Grated pepper jack cheese
Heat 2 T. olive oil in a large stockpot or dutch oven over medium heat. Add the onion, carrots, green pepper, garlic cloves, and 1/2 t. kosher salt. Cook, stirring occasionally, until starting to soften, about 5 minutes.
Stir in the ancho chili powder, cumin, cocoa powder, smoked paprika, and cayenne until the vegetables are coated. Add the tomatoes and their juices, the bulgur wheat, 2 c. water, 1 t. kosher salt, and the two cans of beans, and bring to a low boil. Add the corn, reduce the heat to low and simmer for 20-25 minutes. Serve into bowls and top with fresh cilantro and any other toppings of your choice, such as grated pepper jack cheese.
Ultimate Veggie Chili
Serves 6-8
Active time: 15 minutes
Total Time: 40 minutes
Extra virgin olive oil
1 large onion, chopped
2 carrots, diced
1 green bell pepper, diced (I'm not normally a huge fan of these but they're good in this)
3 garlic cloves, minced
Kosher salt
1 T. ancho chili powder
2 t. ground cumin
2 t. unsweetened cocoa powder
2 t. smoked paprika
1/2 t. cayenne pepper
28 oz. diced tomatoes
1 c. bulgur wheat
2 c. water
15 oz. can red chili beans (or use 2 cans pinto beans instead of 1), drained and rinsed
15 oz. can pinto beans, drained and rinsed
2 ears fresh corn, kernels removed
Fresh cilantro, chopped
Grated pepper jack cheese
Heat 2 T. olive oil in a large stockpot or dutch oven over medium heat. Add the onion, carrots, green pepper, garlic cloves, and 1/2 t. kosher salt. Cook, stirring occasionally, until starting to soften, about 5 minutes.
Stir in the ancho chili powder, cumin, cocoa powder, smoked paprika, and cayenne until the vegetables are coated. Add the tomatoes and their juices, the bulgur wheat, 2 c. water, 1 t. kosher salt, and the two cans of beans, and bring to a low boil. Add the corn, reduce the heat to low and simmer for 20-25 minutes. Serve into bowls and top with fresh cilantro and any other toppings of your choice, such as grated pepper jack cheese.
Labels:
Beans,
Corn,
Kid-friendly,
Soup,
Under 45 minutes,
Whole-Grain
Sunday, June 26, 2011
Eggplant and Summer Squash Curry
Normally we like a cold dinner if it's hot outside, but a spicy dish can be equally as great on a warm day. While I love both Thai and Indian curries, I didn't feel like a heavier Thai-inspired curry with coconut milk and went for a more Indian-inspired dish with fresh vegetables, tomatoes, and lots of spice. Plus, it was a great way to use up some of the early summer produce I picked up - an eggplant and some beautiful little summer squash that are starting to come into season. This dish was equally delicious reheated for lunch the next day.
Eggplant and Summer Squash Curry
Serves 4
Active Time: 20 minutes
Total Time: 45 minutes
2 T. ghee (clarified butter) or extra virgin olive oil
1 medium eggplant, cut into 3/4'' pieces
3 small summer squash, diced
8 oz. firm tofu, cut into 1/2'' pieces
1 onion, diced
1'' fresh ginger, peeled and grated
6 cloves garlic, minced
1 t. ground cumin
1 T. ground coriander
1/2 t. turmeric
1/2 t. cayenne
1/2 t. crushed red pepper
1 1/2 t. kosher salt
1 15 oz. can diced tomatoes
1 c. water
Fresh cilantro
1 c. brown jasmine or basmati rice
Boil 2 c. water in a small stockpot, add the rice, and simmer for about 40 minutes or until the water is absorbed.
Meanwhile, heat the ghee or olive oil in a large skillet or stockpot over medium heat. Add the onion and cook, stirring occasionally, for about 10 minutes, until softened and starting to brown. Add the ginger, garlic, and cumin and cook for 2 minutes. Add the coriander, cayenne, salt, and turmeric, and cook an additional 30 seconds. Add the eggplant and summer squash and stir to coat well with the spices. Add the tofu, crushed red pepper flakes, and diced tomatoes (including their juices) and 1 c. water. Reduce the heat to medium-low and simmer for 15-20 minutes, stirring occasionally, until the eggplant and squash are tender. Serve over the rice and garnish with a generous amount of chopped cilantro. Season to taste with more salt if necessary.
Eggplant and Summer Squash Curry
Serves 4
Active Time: 20 minutes
Total Time: 45 minutes
2 T. ghee (clarified butter) or extra virgin olive oil
1 medium eggplant, cut into 3/4'' pieces
3 small summer squash, diced
8 oz. firm tofu, cut into 1/2'' pieces
1 onion, diced
1'' fresh ginger, peeled and grated
6 cloves garlic, minced
1 t. ground cumin
1 T. ground coriander
1/2 t. turmeric
1/2 t. cayenne
1/2 t. crushed red pepper
1 1/2 t. kosher salt
1 15 oz. can diced tomatoes
1 c. water
Fresh cilantro
1 c. brown jasmine or basmati rice
Boil 2 c. water in a small stockpot, add the rice, and simmer for about 40 minutes or until the water is absorbed.
Meanwhile, heat the ghee or olive oil in a large skillet or stockpot over medium heat. Add the onion and cook, stirring occasionally, for about 10 minutes, until softened and starting to brown. Add the ginger, garlic, and cumin and cook for 2 minutes. Add the coriander, cayenne, salt, and turmeric, and cook an additional 30 seconds. Add the eggplant and summer squash and stir to coat well with the spices. Add the tofu, crushed red pepper flakes, and diced tomatoes (including their juices) and 1 c. water. Reduce the heat to medium-low and simmer for 15-20 minutes, stirring occasionally, until the eggplant and squash are tender. Serve over the rice and garnish with a generous amount of chopped cilantro. Season to taste with more salt if necessary.
Labels:
Eggplant,
Gluten-Free,
Squash,
Summer,
Under 45 minutes,
Vegan
Sunday, June 12, 2011
Oatmeal Ranger Bars
I love oatmeal. I have it nearly every morning with milk, cinnamon, maple syrup, and either chia or flax seeds. I've made many oatmeal cookies in my day, but wanted to experiment with a cookie bar that could serve equally well as a dessert (I first made these for a dinner party and served them with vanilla bean ice cream), a mid-afternoon snack, or something to keep you going on a hike. Instead of your typical oatmeal-raisin variety, I wanted to incorporate some of my favorite flavors - chocolate, coconut, and nuts - to create something reminiscent of a "ranger" bar - basically a cookie or bar that contains a lot of good stuff!
These were so good that our guests asked for my recipe and are making them for their own dinner party, so I figured I had to share this creation with others. They don't require a mixer and they also freeze very well - pop them in the freezer after you've cooked and cut them apart and they can either be reheated for a quick fix in the microwave (about 30 seconds) or thawed on the counter.
Oatmeal Ranger Bars
Active Time: 10 minutes
Total Time: 35 minutes
These were so good that our guests asked for my recipe and are making them for their own dinner party, so I figured I had to share this creation with others. They don't require a mixer and they also freeze very well - pop them in the freezer after you've cooked and cut them apart and they can either be reheated for a quick fix in the microwave (about 30 seconds) or thawed on the counter.
Oatmeal Ranger Bars
Active Time: 10 minutes
Total Time: 35 minutes
2 sticks butter, melted
3/4 c. packed brown sugar
1/2 c. honey
2 eggs
1/4 c. lowfat milk
1 t. vanilla
1 t. baking soda
1 t. kosher salt
1 t. cinnamon
1/4 t. nutmeg
2 c. whole wheat pastry flour (or 1 c. regular whole wheat flour and 1 c. unbleached all-purpose flour)
3 c. old fashioned (not quick) oats
1/2 c. unsweetened shredded coconut
1 c. semi-sweet chocolate chips
1/2 c. walnuts, cut into small pieces
Preheat the oven to 350 degrees Fahrenheit. Butter a 13x9x2 baking pan and line with parchment paper (the butter helps the parchment stick to the pan).
In a large bowl, whisk together the melted butter, brown sugar, and honey. Whisk in the eggs, milk, vanilla, and whisk together. Then whisk in the salt, baking soda, cinnamon, and nutmeg.
Stir in the flour and oats with a wooden spoon, then add the chocolate chips, coconut, and walnuts. Spread the mixture evenly in the pan and bake for about 25 minutes, or until golden brown on the edges. Let cool in the pan, then lift out using the parchment paper and cut into bars.
Labels:
Kid-friendly,
Oats,
Under 45 minutes,
Whole-Grain
Sunday, May 8, 2011
Swiss Chard and Artichoke Pizza
Swiss chard is available most places year-round, but actually hits its peak in the late spring and summer months. You'll find red swiss chard, green swiss chard, and rainbow chard popping up more in the grocery store and at your farmer's market in the coming months. Swiss chard is a good leafy green for those people who aren't big kale fans but don't always want to each spinach to get their dark leafy greens. I actually much prefer the flavor of chard to spinach and often use it in recipes. In this case, I used red swiss chard as it looked the best that day, but rainbow chard would also work well here. I also love that this recipe uses the entire stalk - not just the leaves.
I've experimented a lot with different oven temperatures and cooking methods to try to get pizza dough to cook all the way through and get a good crust. I think I have finally learned the trick - use a higher temperature (500 degrees Fahrenheit) and put your pizza stone or baking sheet in the oven as it starts preheating so that it gets nice and hot, then assemble your pizza on a piece of parchment paper and remove the stone/baking sheet from the oven and slide the pizza on. You really can make restaurant-style pizza (or in my opinion, even better) at home and the reward is worth it!
Swiss Chard and Artichoke Pizza
Serves 2-4
Active time: 30 minutes
Total time: 45 minutes
Pizza dough (store bought (I use Trader Joe's)) or you can make your own
Extra virgin olive oil
1 red onion, diced
1 bunch swiss chard, stalks and leaves separated and chopped in small pieces
3-4 cloves garlic, minced
1 14 oz. can artichoke hearts, drained and rinsed and chopped into small pieces
3/4 c. pecorino-romano cheese, freshly grated
4 oz. shredded mozzarella cheese
Kosher salt
Black pepper
If using store-bought refridgerated dough, make sure to take it out of the fridge about 30 min to 1 hour before making the pizza to allow it to come to room temperature and make it easier to work with.
Place a pizza stone or baking sheet in the oven. Preheat the oven to 500 degrees Fahrenheit.
Chop the onion, garlic, swiss chard (separating the leaves and stalks) and artichoke hearts. Heat 1 T. olive oil in a large skillet or stockpot over medium heat. Add the onion, swiss chard stems, and a pinch of salt and pepper, and cook until softened, about 5 minutes, stirring occassionally. Add the garlic and saute an additional 2 minutes, stirring frequently. Stir in swiss chard leaves, chopped artichoke hearts, and another pinch of salt and pepper, reduce heat to medium low, cover, and cook, stirring occassionally, for about 10 minutes or until the swiss chard has wilted and the entire mixture cooks down.
Meanwhile, lay out a piece of parchment paper large enough to fit your pizza stone or baking sheet, then flour the pizza dough and stretch it out using your fists until you reach your desired size. Place the dough on the parchment paper, then brush it with a light coating of extra virgin olive oil, all the way to the edges, and sprinkle with a little salt. When the chard-onion mixture is done, remove from heat, let cool for just a few minutes, then stir in the grated pecorino cheese. Spread the mixture over the pizza dough in an even but not too thick layer - if you end up with a little extra you can use it as a pasta topping the next day (see below). Sprinkle with the mozzarella cheese, then remove the pizza stone or baking sheet from the oven and slide the pizza on the parchment paper onto the stone/sheet. Bake for approximately 8-12 minutes, or until cheese is golden brown. Let cool for a few minutes, then cut into pieces and serve.
Bonus: Depending on how big your bunch of swiss chard is, you might end up with leftover topping. No worries - I just cooked up some whole wheat penne the next day, tossed it with a little olive oil, and used the extra topping on top of the pasta for lunch. Delicious!
I've experimented a lot with different oven temperatures and cooking methods to try to get pizza dough to cook all the way through and get a good crust. I think I have finally learned the trick - use a higher temperature (500 degrees Fahrenheit) and put your pizza stone or baking sheet in the oven as it starts preheating so that it gets nice and hot, then assemble your pizza on a piece of parchment paper and remove the stone/baking sheet from the oven and slide the pizza on. You really can make restaurant-style pizza (or in my opinion, even better) at home and the reward is worth it!
Serves 2-4
Active time: 30 minutes
Total time: 45 minutes
Pizza dough (store bought (I use Trader Joe's)) or you can make your own
Extra virgin olive oil
1 red onion, diced
1 bunch swiss chard, stalks and leaves separated and chopped in small pieces
3-4 cloves garlic, minced
1 14 oz. can artichoke hearts, drained and rinsed and chopped into small pieces
3/4 c. pecorino-romano cheese, freshly grated
4 oz. shredded mozzarella cheese
Kosher salt
Black pepper
If using store-bought refridgerated dough, make sure to take it out of the fridge about 30 min to 1 hour before making the pizza to allow it to come to room temperature and make it easier to work with.
Place a pizza stone or baking sheet in the oven. Preheat the oven to 500 degrees Fahrenheit.
Chop the onion, garlic, swiss chard (separating the leaves and stalks) and artichoke hearts. Heat 1 T. olive oil in a large skillet or stockpot over medium heat. Add the onion, swiss chard stems, and a pinch of salt and pepper, and cook until softened, about 5 minutes, stirring occassionally. Add the garlic and saute an additional 2 minutes, stirring frequently. Stir in swiss chard leaves, chopped artichoke hearts, and another pinch of salt and pepper, reduce heat to medium low, cover, and cook, stirring occassionally, for about 10 minutes or until the swiss chard has wilted and the entire mixture cooks down.
Meanwhile, lay out a piece of parchment paper large enough to fit your pizza stone or baking sheet, then flour the pizza dough and stretch it out using your fists until you reach your desired size. Place the dough on the parchment paper, then brush it with a light coating of extra virgin olive oil, all the way to the edges, and sprinkle with a little salt. When the chard-onion mixture is done, remove from heat, let cool for just a few minutes, then stir in the grated pecorino cheese. Spread the mixture over the pizza dough in an even but not too thick layer - if you end up with a little extra you can use it as a pasta topping the next day (see below). Sprinkle with the mozzarella cheese, then remove the pizza stone or baking sheet from the oven and slide the pizza on the parchment paper onto the stone/sheet. Bake for approximately 8-12 minutes, or until cheese is golden brown. Let cool for a few minutes, then cut into pieces and serve.
Bonus: Depending on how big your bunch of swiss chard is, you might end up with leftover topping. No worries - I just cooked up some whole wheat penne the next day, tossed it with a little olive oil, and used the extra topping on top of the pasta for lunch. Delicious!
Labels:
Artichokes,
Kid-friendly,
Swiss Chard,
Under 45 minutes
Thursday, April 14, 2011
Whole-Wheat Oatmeal Pecan Cookies
Sometimes (ok, often) in the middle of the week I'm in the mood for a treat, but don't want something too heavy. I had some pecans in my cupboard along with some whole-wheat pastry flour but no butter, and thought I would experiment with making some cookies that are a little bit healthier using olive oil instead. The result was even better than I expected - cookies that are full of flavor, chewy yet relatively light in texture, and great for a little treat or snack.
These are also just about the easiest cookies I've made - since there's no butter, there is no mixer needed. You just stir the ingredients together!
I used a small ice cream scoop to form the cookies (my new favorite baking accessory for cookies - here's an example: http://www.crateandbarrel.com/kitchen-and-food/serving-utensils/stainless-steel-ice-cream-scoop/s283323) but you can certainly just drop them by the tablespoon onto the cookie sheets.
One more tip - this recipe makes about 30 cookies, but if you don't think you can polish them off in a week or so (these kept remarkably well in an airtight container), I also love to freeze almost any type of cookies before you bake them and then you can pop them out of the freezer for impromptu cookie cravings in the future right into the oven. To do this, drop the cookies as you normally would onto a cookie sheet, then put them in the freezer for about 15-30 minutes (it's ok if it's longer). Once they've started to freeze a little, you can transfer them to a ziplog bag or reusable container and freeze them for several months. When you're ready to bake them, take them out of the freezer, put them on a cookie sheet, and bake for 1-2 minutes longer than called for below.
Whole-Wheat Oatmeal Pecan Cookies
Makes ~ 30 cookies
Prep Time: 10 minutes
Total Time: 10 minutes cooking time per batch
1 1/2 c. whole-wheat pastry flour
1 1/4 c. old-fashioned rolled oats (not instant)
3/4 t. baking powder
1/2 t. baking soda
1/2 t. fine grain sea salt
1/2 t. cinnamon
1/2 c. chopped pecans
1 egg
1/2 c. brown sugar
1/4 c. maple syrup
2 T. molasses
1 t. vanilla
1/2 c. olive oil
Approx. 30 pecan halves
Preheat the oven to 350 degrees Fahrenheit. In a medium-sized bowl, stir together the flour, oats, baking powder, salt, cinnamonm and nuts. In a large bowl, whisk together the egg, brown sugar, maple syrup, molasses, vanilla, and olive oil. Stir in the dry ingredients to the wet ingredients. Drop by the tablespoon onto an ungreased cookie sheet. Bake for 10 minutes. Immediately upon taking the cookies out of the oven, press a pecan half into each cookie. Transfer to a wire rack to cool, then enjoy!
These are also just about the easiest cookies I've made - since there's no butter, there is no mixer needed. You just stir the ingredients together!
I used a small ice cream scoop to form the cookies (my new favorite baking accessory for cookies - here's an example: http://www.crateandbarrel.com/kitchen-and-food/serving-utensils/stainless-steel-ice-cream-scoop/s283323) but you can certainly just drop them by the tablespoon onto the cookie sheets.
One more tip - this recipe makes about 30 cookies, but if you don't think you can polish them off in a week or so (these kept remarkably well in an airtight container), I also love to freeze almost any type of cookies before you bake them and then you can pop them out of the freezer for impromptu cookie cravings in the future right into the oven. To do this, drop the cookies as you normally would onto a cookie sheet, then put them in the freezer for about 15-30 minutes (it's ok if it's longer). Once they've started to freeze a little, you can transfer them to a ziplog bag or reusable container and freeze them for several months. When you're ready to bake them, take them out of the freezer, put them on a cookie sheet, and bake for 1-2 minutes longer than called for below.
Whole-Wheat Oatmeal Pecan Cookies
Makes ~ 30 cookies
Prep Time: 10 minutes
Total Time: 10 minutes cooking time per batch
1 1/2 c. whole-wheat pastry flour
1 1/4 c. old-fashioned rolled oats (not instant)
3/4 t. baking powder
1/2 t. baking soda
1/2 t. fine grain sea salt
1/2 t. cinnamon
1/2 c. chopped pecans
1 egg
1/2 c. brown sugar
1/4 c. maple syrup
2 T. molasses
1 t. vanilla
1/2 c. olive oil
Approx. 30 pecan halves
Preheat the oven to 350 degrees Fahrenheit. In a medium-sized bowl, stir together the flour, oats, baking powder, salt, cinnamonm and nuts. In a large bowl, whisk together the egg, brown sugar, maple syrup, molasses, vanilla, and olive oil. Stir in the dry ingredients to the wet ingredients. Drop by the tablespoon onto an ungreased cookie sheet. Bake for 10 minutes. Immediately upon taking the cookies out of the oven, press a pecan half into each cookie. Transfer to a wire rack to cool, then enjoy!
Labels:
Cookies,
Kid-friendly,
Oats,
Under 45 minutes,
Whole-Grain
Wednesday, March 9, 2011
Romanesco Mac & Cheese
Everyone seems to love baked, golden mac & cheese. While I love it too, I wanted to create a version of macaroni & cheese that was packed with more nutrition and would be good for a weekend night meal, not just a once in a while splurge, while still being delicious and satisfying. I was inspired by these heads of romanesco at the farmer's market, which I thought would be great with the flavors of macaroni & cheese. Romanesco is also called Romanesco broccoli or Roman cauliflower. It looks similiar to cauliflower and tastes more like cauliflower than broccoli but has a beautiful bright green color. Cauliflower would also work great in this recipe if you can't find romanesco. We ate this as a main dish with a side green salad.
Romanesco Mac & Cheese
Serves 4-6
Active Time: 30 minutes
Total Time: 45 minutes
12 oz. elbow macaroni or small fusilli
2 small heads romanesco (approx. 2 lbs with stems on)
3 slices whole wheat bread
Extra virgin olive oil
1 onion, diced
1 1/2 c. grated gruyere cheese (about 6 oz.)
1 c. light sour cream
1/2 c. lowfat milk
1/2 c. grated parmesan cheese
Kosher salt
Black pepper
Preheat the oven to 400 degrees Fahrenheit. Boil the water for the pasta and cook the pasta until al dente.
Meanwhile, remove the stems from the romanesco, wash throroughly, and cut into small florets. Pulse the bread in a food processor until coarse crumbs form. Add 1 T. olive oil and 1/4 t. each kosher salt and pepper and pulse to combine. Additionally, in a small saucepan, heat 1 T. olive oil over medium heat and saute the onion with a pinch of kosher salt until soft, about 3-5 minutes.
Add the romanesco to the pasta pot for the last 3 minutes of cooking. Drain the pasta and romanesco and put in a large bowl. Add the onions, Gruyere cheese, sour cream, milk, 1 t. kosher salt and 1/4 pepper and stir to combine well.
Transfer the mixture to a large baking dish (oval gratin or rectangular baker), sprinkle with the parmesan cheese, and then coat with the breadcrumbs. Bake until golden brown, about 15 minutes.
Romanesco Mac & Cheese
Serves 4-6
Active Time: 30 minutes
Total Time: 45 minutes
12 oz. elbow macaroni or small fusilli
2 small heads romanesco (approx. 2 lbs with stems on)
3 slices whole wheat bread
Extra virgin olive oil
1 onion, diced
1 1/2 c. grated gruyere cheese (about 6 oz.)
1 c. light sour cream
1/2 c. lowfat milk
1/2 c. grated parmesan cheese
Kosher salt
Black pepper
Preheat the oven to 400 degrees Fahrenheit. Boil the water for the pasta and cook the pasta until al dente.
Meanwhile, remove the stems from the romanesco, wash throroughly, and cut into small florets. Pulse the bread in a food processor until coarse crumbs form. Add 1 T. olive oil and 1/4 t. each kosher salt and pepper and pulse to combine. Additionally, in a small saucepan, heat 1 T. olive oil over medium heat and saute the onion with a pinch of kosher salt until soft, about 3-5 minutes.
Add the romanesco to the pasta pot for the last 3 minutes of cooking. Drain the pasta and romanesco and put in a large bowl. Add the onions, Gruyere cheese, sour cream, milk, 1 t. kosher salt and 1/4 pepper and stir to combine well.
Transfer the mixture to a large baking dish (oval gratin or rectangular baker), sprinkle with the parmesan cheese, and then coat with the breadcrumbs. Bake until golden brown, about 15 minutes.
Labels:
Cauliflower,
Kid-friendly,
Pasta,
Romanesco,
Under 45 minutes
Tuesday, November 30, 2010
Pappardelle with Red Chard and Wild Mushroom Ragu
If you're looking for a way to break out of the standard marinara sauce and penne dinner, try this recipe. The mushroom and red swiss chard combined with crushed tomatoes create a thick and wonderful ragu that I think is perfect atop pappardelle pasta. However, if you can't find pappardelle, really any pasta would work well - fettuccine, rigatoni, or even penne. This recipe only calls for a few ingredients and other than a little bit of chopping, is easy and relatively fast to make.

Pappardelle with Red Chard and Wild Mushroom Ragu
Serves 4
Prep time: 35 min
Total time: 35 min
Extra virgin olive oil
12 oz. fresh or dried pappardelle (wide flat pasta)
4 cloves garlic, minced
1 lb. mixed mushrooms - I used 1/2 lb. cremini, 1/4 lb. oyster, and 1/4 lb. shitake mushrooms, chopped into small (~1/4-1/2'' pieces)
1 bunch red swiss chard, cut into very thin strips
28 oz. can crushed tomatoes
Kosher salt
Black pepper
Heat a large pot of salted water over high heat for the pasta.
Meanwhile, heat 1 t. olive oil in a large skillet over medium high heat. Add 1/2 of the garlic and cook 15-30 seconds, then add the chard, stirring often until wilted, about 5 minutes. Season with a pinch of salt and pepper. Set aside in a bowl.
Add 1 T. olive oil to the same pan over medium heat. Add the remaining garlic and cook 15-30 seconds, then add the mushrooms and saute, stirring often, until tender, about 5 minutes. Season with a pinch of salt and pepper. Add the crushed tomatoes and stir to combine. Add the reserved chard (leaving any liquid behind) to the skillet and stir to incorporate. Bring the mixture up until it starts to bubble and then simmer.
Add the pasta to the boiling water. If using fresh pasta just let the sauce simmer for the short time the pasta is cooking, or if using dried, you can just simmer the sauce a little longer. Taste the sauce and adjust for seasoning. I added 1/2 t. salt and 1/4 t. pepper.
When the pasta is done, drain and serve the sauce/ragu on top of the pasta. Serve with freshly grated Parmesan cheese, if you'd like.
Pappardelle with Red Chard and Wild Mushroom Ragu
Serves 4
Prep time: 35 min
Total time: 35 min
Extra virgin olive oil
12 oz. fresh or dried pappardelle (wide flat pasta)
4 cloves garlic, minced
1 lb. mixed mushrooms - I used 1/2 lb. cremini, 1/4 lb. oyster, and 1/4 lb. shitake mushrooms, chopped into small (~1/4-1/2'' pieces)
1 bunch red swiss chard, cut into very thin strips
28 oz. can crushed tomatoes
Kosher salt
Black pepper
Heat a large pot of salted water over high heat for the pasta.
Meanwhile, heat 1 t. olive oil in a large skillet over medium high heat. Add 1/2 of the garlic and cook 15-30 seconds, then add the chard, stirring often until wilted, about 5 minutes. Season with a pinch of salt and pepper. Set aside in a bowl.
Add 1 T. olive oil to the same pan over medium heat. Add the remaining garlic and cook 15-30 seconds, then add the mushrooms and saute, stirring often, until tender, about 5 minutes. Season with a pinch of salt and pepper. Add the crushed tomatoes and stir to combine. Add the reserved chard (leaving any liquid behind) to the skillet and stir to incorporate. Bring the mixture up until it starts to bubble and then simmer.
Add the pasta to the boiling water. If using fresh pasta just let the sauce simmer for the short time the pasta is cooking, or if using dried, you can just simmer the sauce a little longer. Taste the sauce and adjust for seasoning. I added 1/2 t. salt and 1/4 t. pepper.
When the pasta is done, drain and serve the sauce/ragu on top of the pasta. Serve with freshly grated Parmesan cheese, if you'd like.
Labels:
Kid-friendly,
Mushrooms,
Pasta,
Swiss Chard,
Under 45 minutes,
Vegan
Monday, November 1, 2010
Baked Gnocchi with Beets, Chickpeas, and Feta
After traveling this weekend and going for a long run on Sunday evening (I'm training for the Stinson Beach 25K trail race on November 13, http://www.pctrailruns.com/) I came up with this dish from the ingredients we had around the house and they worked together wonderfully. I had a combination of golden and red beets, but would suggest using all golden beets to avoid this turning a pink color when you dish it up - although we enjoyed it regardless. This is an easy recipe that only calls for a few ingredients and is both healthy and filling at the same time.
Baked Gnocchi with Beets, Chickpeas, and Feta
Serves 4
Extra virgin olive oil
16 oz. gnocchi (I used pre-made gnocchi, but if you want to make your own, go for it!)
1 lb. beets (see note above, I would suggest golden beets), peeled and cut into 3/4'' to 1'' chunks
15 oz. can chickpeas/garbanzo beans, drained and rinsed
4 oz. feta
1 c. vegetable stock/broth
1/2 lemon
Pepper
Preheat the oven to 400 degrees Fahrenheit. Toss the peeled and cut beets with 1 t. olive oil and place in a large oval gratin dish or other large baking dish. Bake for 20 minutes.
Meanwhile, drain and rinse the chickpeas and set aside. Heat 1 t. olive oil in a large skillet. Add the gnocchi and saute until lightly golden, about 6 minutes. Set aside.
Remove the dish with the beets from the oven and add the chickpeas and gnocchi to the pan. Pour the 1 c. vegetable broth over the dish. Crumble the feta over the mixture. Squeeze the 1/2 lemon over the dish, then drizzle 1 T. olive oil over the mixture. Sprinkle 1/4 t. black pepper over the dish, and put back in the oven for an additional 15 minutes. Spoon into pasta bowls or plates and serve.
Baked Gnocchi with Beets, Chickpeas, and Feta
Serves 4
Extra virgin olive oil
16 oz. gnocchi (I used pre-made gnocchi, but if you want to make your own, go for it!)
1 lb. beets (see note above, I would suggest golden beets), peeled and cut into 3/4'' to 1'' chunks
15 oz. can chickpeas/garbanzo beans, drained and rinsed
4 oz. feta
1 c. vegetable stock/broth
1/2 lemon
Pepper
Preheat the oven to 400 degrees Fahrenheit. Toss the peeled and cut beets with 1 t. olive oil and place in a large oval gratin dish or other large baking dish. Bake for 20 minutes.
Meanwhile, drain and rinse the chickpeas and set aside. Heat 1 t. olive oil in a large skillet. Add the gnocchi and saute until lightly golden, about 6 minutes. Set aside.
Remove the dish with the beets from the oven and add the chickpeas and gnocchi to the pan. Pour the 1 c. vegetable broth over the dish. Crumble the feta over the mixture. Squeeze the 1/2 lemon over the dish, then drizzle 1 T. olive oil over the mixture. Sprinkle 1/4 t. black pepper over the dish, and put back in the oven for an additional 15 minutes. Spoon into pasta bowls or plates and serve.
Labels:
Beets,
Chickpeas,
Feta,
Kid-friendly,
Pasta,
Under 45 minutes
Wednesday, October 13, 2010
Chickpea Curry
As I've been trying to cook more vegetarian dishes, I've found myself branching out towards making more curry dishes and experimenting with spices, which can really add dimension to dishes that don't have meat. Whatever I make also has to be guy-friendly and satisfying enough to appease my husband, Adam. This is one of our favorite curry dishes, made with chickpeas (garbanzo beans), potatoes, tomatoes, and lots of spices. We serve it over brown basmati or jasmine rice for a more filling meal and I top it with a quick yogurt-cucumber sauce, which creates a nice creamy texture when stirred into the curry, while the cucumber adds freshness.
Chickpea Curry
Serves 4
Extra virgin olive oil
1 15-oz can chickpeas, drained and rinsed
1 15-oz can diced tomatoes
1 1/2 c. vegetable broth/stock
3/4 lb. Yukon gold potatoes, cut into 1/2'' dice
1 yellow onion, diced
2 cloves garlic, minced
1 T. ginger, minced (you could substitute ~1 t. of ground ginger but fresh is so much better)
1 t. cumin
1 t. ground coriander
1 t. dried red chili flakes
1/2 t. turmeric
1/2 t. cayenne pepper
1 t. salt
1/2 t. ground black pepper
1 c. brown jasmine or basmati rice, uncooked
1 c. plain non-fat yogurt
1/4 c. diced cucumber
pinch of salt and pepper
Bring 2 cups water to a boil in a medium saucepan and add the rice. Reduce heat to simmer and cook until water is absorbed, approximately 35 minutes.
Meanwhile, heat 1 T. olive oil in a large skillet over medium heat. Add the onion and garlic and a pinch of salt cook until softened, about 5 minutes. Add the ginger, cumin, coriander, chile flakes, tumeric, and cayenne pepper, and cook, stirring, for 1 minute. Add the chickpeas and potatoes, and stir to coat with the spices. Add the diced tomatoes and vegetable broth and bring to a gentle boil. Reduce heat to medium low, cover, and let simmer vigorously for approximately 20 minutes, or until potatoes are fork-tender. Season with the salt and pepper.
Meanwhile, combine the yogurt, cucumber, salt and pepper in a small bowl. When the curry and rice are done, spoon a little of the rice into a bowl or plate and top with the curry and a dollop of the yogurt-cucumber mixture.
Labels:
Chickpeas,
Curry,
Gluten-Free,
Potatoes,
Under 45 minutes,
Vegan
Subscribe to:
Posts (Atom)