Showing posts with label Kid-friendly. Show all posts

Sunday, July 29, 2012

Summer's Bounty Quinoa

Summer is definitely one of my favorite times to cook because the quality and quantity of so many fruits and vegetables are at their peak. I received a large bunch of basil in my CSA box recently and wanted to come up with another way to use it besides in pasta. I ended up using quinoa as the base of the dish, combining it with a basil puree, and adding cherry tomatoes, corn, romano beans (similar to green beans, but slightly flatter and bigger), red onion, and some feta. The result was a flavorful, satisfying, healthy, and very summery dish that was equally good warm or at room temperature.


Summer's Bounty Quinoa
Serves 4 as a main dish, 6-8 as a side

Active Time: 30 minutes
Total Time: 30 minutes

1 c. quinoa
2 c. water
2 c. packed fresh basil leaves
1 clove garlic, minced
Extra virgin olive oil
Kosher salt
Black pepper
2 ears white corn, kernels cut off the cob
1 large red onion, peeled, halved, and thinly sliced
1 lb. romano beans or green beans, ends snapped or trimmed off, then chopped
1/2 pint cherry tomatoes, halved
1/2 c. feta cheese, crumbled

Put the quinoa and water into a medium sized saucepan, cover with a lid, and bring to a boil. Reduce the heat to low and simmer for 20-25 minutes, until liquid is absorbed.

Meanwhile, prep the vegetables. Then, in a large skillet, heat 1 T. olive oil over medium heat. Add the red onion and a pinch of salt and saute for about 7-10 minutes, or until softened. Set aside in a medium-sized bowl and cover with foil or a kitchen towel. Return the skillet to heat, add the corn and a pinch of salt and saute for 1-2 minutes, stirring, then remove from the pan and set aside in the bowl with the onion. In a small saucepan, bring some water to a boil for the beans. Cook for 3-4 minutes, then drain and add to the bowl with the onion and corn.

Add the basil, garlic, 1/2 t. kosher salt and 1/8 t. black pepper (or, a few grinds) to a food processor. Measure out 1/4 c. olive oil. Start the food processor, then slowly add in the olive oil until it comes together.  

When the quinoa is done, add the basil puree and stir to combine. Then, add in the reserved onion, corn, and beans as well as the tomatoes and feta and stir to combine. Season to taste for additional salt and pepper, garnish with a sprig of basil (if you have any left over) and serve.

Wednesday, June 27, 2012

Summer Vegetable Lasagna with Tomato-Pesto Sauce

Summer's harvest is starting to show up in our CSA box around now in Northern California and we just received our first summer squash as well as a huge bunch of basil this past week, along with some rainbow chard. One of my favorite things to do with the first vegetables of each season is make a new variation of my lasagna recipe. This time, since I had such a large amount of basil and I know that the flavors of pesto go so well with summer squash (try simply grilling it and topping it with some pesto for a side dish in the future), I thought I'd create a combination tomato-pesto sauce to work into the lasagna and really complement the vegetables. Lasagna is a dish that has a lot of individual components, but none of them are difficult. It's a great thing to make on a weekend night when you want to cook in - we always make a whole pan for the two of us and eat the leftovers for dinner the next night (this reheats really well).


Summer Vegetable Lasagna with Tomato-Pesto Sauce
Serves 4-6

Active Time: 45 minutes
Total Time: 1 hour, 15 minutes

~1lb. summer squash (such as yellow crookneck), diced
1 bunch rainbow or swiss chard, leaves ripped from stems and chopped
~1 lb. white mushrooms, diced
Whole wheat, brown rice, or regular dried lasagna noodles
1 15 oz container whole milk ricotta cheese
2 eggs
3/4 c. freshly grated parmesan cheese
4 oz. grated mozzarella cheese
28 oz. can crushed tomatoes
2 c. packed basil leaves
1/4 c. pine nuts, toasted
1 clove garlic, minced
Kosher salt
Black pepper
Extra virgin olive oil

Preheat the oven to 400 degrees. Figure out how many lasagna noodles you will need to create three layers of noodles in your baking dish (approximately 13x9) and set the baking dish aside. In a similar size Pyrex or other dish, lay the noodles inside, then fill with the hottest tap water that you can get (or near-boiling water from a tea kettle) and add a dash of olive oil to keep the noodles from sticking. This is my shortcut to boiling noodles for lasagna - they soften while you prepare the other ingredients.

Chop up the summer squash and mushrooms and heat a large skillet over medium heat with a drizzle (1-2t) of olive oil. When the skillet is ready (you'll know once the oil moves easily across the pan when you tip it), add the summer squash and a pinch of salt. Saute for about 5 minutes or until softened, then set aside in a bowl. Add some more olive oil to the pan, then add the mushrooms and a pinch of salt and a little pepper. Saute for about 5-7 minutes, stirring occasionally, and meanwhile prepare the chard. When the mushrooms are done, set aside in another bowl, then add a little more olive oil to the pan and cook the chard with a pinch of salt, stirring rather frequently, for about 3 minutes until wilted slightly, then set aside in another bowl. Notice that I season each component separately so that the entire dish is seasoned.

Next, prepare the pesto by placing the 2 c. packed basil leaves, minced garlic clove, and pine nuts in a food processor. Start the processor, then slowly add in the olive oil until the mixture starts to come together but isn't too oily - about 1/3 c. Scoop out of the food processor into a small bowl and stir in 1/2 t. kosher salt and 1/4 t. pepper (or a few generous grinds from a pepper grinder). I don't add cheese to this pesto since there is enough in the rest of the dish.

In a medium-sized bowl, add the crushed tomatoes, 1/2 c. of the pesto, and 1 t. kosher salt to make the sauce.

Grate the parmesan cheese. In another medium sized bowl, add the ricotta, eggs, 1/2 t. salt, and 1/4 c. of the parmesan cheese and stir until blended.

Now it's time to assemble. Add about 1/2 c. of the sauce to the bottom of the pan and smear to create a light coating (so the noodles won't stick to the bottom). Lay down a layer (1/3) of the noodles, then approximately 1/2 of the ricotta mixture. I find that using my hands in lasagna, while messy, is best to distribute the components, so spread the ricotta out with your fingers. Then, top with approximately 1/2 of the squash, 1/2 of the mushrooms, and 1/2 of the chard (also using your fingers). Top with about 3/4c. of the sauce (the sauce doesn't need to be in exactly an even layer as it will cook together). Repeat with another layer of noodles, the remaining 1/2 of the ricotta, 1/2 of the squash, 1/2 of the mushrooms, 1/2 of the chard, and another 3/4 c. sauce. Top with the final layer of noodles, then the remainder of the sauce. I try to more carefully spread out the sauce on this final layer as you ideally want the noodles to be coated so they don't dry out in the cooking process. Then, top with the mozzarella cheese, and finally, the remaining 1/2 c. of parmesan cheese. The great thing about making lasagna this way is since you've already pre-cooked many of the ingredients, you just have to pop it in the oven for 30 minutes. It should have a nice golden brown crust when you remove it and it's important to let it sit for a few minutes before serving so that the lasagna stays together. Enjoy!


Tuesday, March 27, 2012

Baked Artichoke, Spinach, and Ricotta Penne

It's a little rainy here in Northern California, which is to be expected in the Spring and we certainly need it after a very dry winter. On days like these, I tend to feel like something warm and comforting for dinner, but still healthy. This pasta dish features a nice balance of vegetables (artichokes and in-season spinach) with ricotta instead of a heavy (and time-consuming) bechamel sauce. I also simply broil it at the end with some parmesan cheese on top to create a nice golden crust, saving the hassle of having to bake it for a long time like other baked pasta dishes. I used brown rice penne (found easily at Trader Joe's or Whole Foods) in this dish, which I think has just as good of a texture as regular pasta, but some more nutritional value than regular white pasta and also provides a different grain source than wheat. Having said this, regular or whole wheat penne would also work great here.


Baked Artichoke, Spinach, and Ricotta Penne
Serves 2 (easily doubled to serve 4)

Active Time: 20 minutes
Total Time: 20 minutes

8 oz. brown rice, whole wheat, or regular penne (or other short pasta)
1 bunch spinach, roughly chopped, or 1 bag baby spinach
1 14 oz. can artichoke hearts (regular or marinated), drained and roughly chopped
1/2 c. ricotta cheese
1/4 c. freshly grated parmesan cheese
Kosher salt
Black pepper

Heat a pot of salted boiling water, add the pasta, and cook until al dente (according to package directions). Meanwhile, prepare the artichoke hearts, spinach, and parmesan cheese. Reserve about 1/4 c. of the pasta water, then drain. Return the pasta to the pot and add in the spinach and pasta water. Stir for a minute or two until the spinach starts to wilt, then add in the ricotta, artichoke hearts, 1/2 t. salt and some freshly ground black pepper. Stir to combine well. Put the oven on broil. Transfer the pasta mixture to either one 8x8 inch baking dish or 2 individual smaller gratin dishes. Top with the parmesan cheese, then broil until the top gets golden brown (watch it with the oven light on to make sure it doesn't burn). Remove from oven, wait a minute or two for it to cool slightly, then serve.

Friday, March 2, 2012

The Best Homemade Granola

I haven't always been the biggest granola fan - it's often too sweet for my taste or less healthy than it appears. This is until I made my own granola, and I have to tell you, it's one of the best things I've ever had and so incredibly easy to make. I've even given it recently as gifts, wrapped up in a mason jar. Homemade granola has a wonderful fresh, crunchy texture (but not too crunchy/hard like some storebought varieties) and I love that I can control what goes in mine. This recipe uses maple syrup (low glycemic) instead of brown sugar, and olive oil instead of canola oil or butter. I love the salty-sweet undertones and the combination of nuts, seeds, and coconut with the oats, but feel free to substitute and play around with whatever ingredients you like best in your granola. I love this granola over yogurt with banana or berries, or on its own with milk (it's a perfect pre-run breakfast). I keep the ingredients on hand in my pantry so that I can whip up a batch anytime. It's also gluten free for those of you who can't have wheat!


Homemade Granola
Makes about 7 cups

Active Time: 5 minutes
Total Time: 1 hour, 5 minutes

3 c. rolled oats (not instant)
1 c. hulled pumpkin seeds
1 c. hulled sunflower seeds
1 c. sliced almonds
1 c. buckwheat groats
2 c. unsweetened coconut flakes (not shredded)
2 c. pecans
2/3 c. maple syrup (pure, not imitation)
1/2 c. extra virgin olive oil
1 t. Kosher salt
1 t. cinnamon

Preheat oven to 300 degrees Fahrenheit. In a large bowl, combine the oats, pumpkin seeds, sunflower seeds, buckwheat groats, coconut flakes, sliced almonds, and pecans, then add the maple syrup, olive oil, stir, and the kosher salt and cinnamon. Stir to combine, then transfer to a sheet pan (ideally lined with a silpat or parchment) and spread out in a relatively even layer. Bake for about 1 hour, stirring each 15 minutes (remove the pan from the oven to stir it and close the oven door, then put it back in so that the oven doesn't cool down too much), until the granola is a nicely toasted golden brown. Let the mixture cool, then transfer to an airtight container for up to 1-2 months.

Friday, February 17, 2012

Butternut Squash Posole

If you like southwestern/mexican food, this is sure to become one of your favorite recipes. We visited Sante Fe, New Mexico a few years back on our road trip from North Carolina to California. I was struck by how delicious, fresh, and innovative the food was in Sante Fe, in addition to the beautiful setting in the mountains and interesting architecture. One of the things I loved about their cuisine was the incorporation of squash and hearty greens with traditional southwestern flavors. Posole is a southwestern soup made with hominy (essentially, large soaked corn kernels) that often includes pork, but I think this vegetarian version is even better and will appeal just as well to non-vegetarian eaters. One of the keys to this recipe is using real dried chiles as the base for the soup - chili powder just doesn't cut it here. Fortunately, good dried chiles are easier to find and cheaper than you'd think - I found a big bag of New Mexican chiles (or "chile pods") at Whole Foods for a few dollars. I'd definitely recommend not skipping the toppings here (queso fresco and hulled pumpkin seeds) as they add a nice balance and texture to the soup. Like many soup dishes, this is equally good if not better reheated the next day.


Butternut Squash Posole
Serves 4

Active Time: 30 minutes
Total Time: 1 hour, 15 minutes

Extra virgin olive oil
1 small (~ 2lb.) butternut squash, peeled and cut into small cubes
1 28 oz. can hominy (including water from can)
1 white onion, diced
2 cloves garlic, minced
6 dried New Mexican chiles (chile pods)
1 t. cumin
1 t. dried oregano
3 c. water
1 bunch collard greens, leaves ripped from stems and coarsely chopped
Kosher salt
Queso fresco, crumbled, for serving
Toasted salted hulled pumpkin seeds (pepitas), for serving

Heat 1 c. of boiling water. Rip the stems off of the chiles and shake out the seeds (discard seeds). Put the dried chiles in a blender and pour the boiling water over the chiles. Pressing down on the lid of the blender, blend the chiles and water until smooth. Let sit while preparing the squash, onion, garlic, and greens.

Heat 1 T. olive oil in a large stockpot or dutch oven over medium heat. Add the onion and a pinch of salt and saute for about 5 minutes until softened. Add the garlic and saute for another 30 seconds. Add the cumin and oregano, then add the butternut squash and stir to combine. Add the hominy (and water from the can), 2 additional cups of water, and 1 t. kosher salt. Bring to a low boil, then reduce heat to medium low and let simmer for 15 minutes. Add the collard greens, then simmer for an additional 30 minutes until the squash is tender. Taste for seasoning and add any additional salt if necssary to your liking (I added 1 t.). Ladle into bowls and top with crumbed queso fresco cheese and pumpkin seeds. I served this with a side of whole-grain cornbread using the recipe on the back of Bob Red Mill's organic medium-ground cornmeal.

Sunday, February 5, 2012

Crunchy Roasted Spiced Chickpeas

Looking for a last minute snack to enjoy while watching the game? These roasted chickpeas have become my go-to quick appetizer for dinner parties, casual get-togethers, or just for us to snack on. I've tried multiple variations of this recipe and the key is cooking them at the right temperature to get them to turn out crispy like corn nuts on the outside while slightly soft on the inside. Simply coated with olive oil, chile powder, cumin, smoked paprika, and salt, they're an incredibly easy and delicious snack and I generally have all of these ingredients in my pantry so I can throw them together in a pinch. These are best eaten the same day you make them as they get a little softer the next day, but I'll still eat them as a snack (if there are any left over!)


Crunchy Roasted Spiced Chickpeas

Active Time: 5 minutes
Total Time: About 45 minutes

Two 15 oz. cans chickpeas/garbanzo beans, drained and rinsed
2 T. olive oil
1 t. ancho chili powder
1 t. cumin
1/2 t. smoked paprika
1 t. fine grain sea salt, plus more for sprinkling at the end

Preheat the oven to 400 degrees Fahrenheit. Dry the chickpeas between paper towels or kitchen towels, getting them as dry as you can (this will help them absorb the spices and get crunchier in the oven). Put them in a medium-sized bowl, add the olive oil, spices, and salt, and stir to combine. Transfer to a sheet pan or cookie sheet and roast for approximately 20 minutes, then increase the heat to 450 degrees and roast for about another 10-15 minutes until the chickpeas are golden brown. Test a few to see if any of them have gotten crispy and if not, return to oven in 5 minute increments until they are done. There may be a few on the edges which get a little bit too brown - just discard these as you want the others to be able to get crunchy enough. Remove from oven, season with a pinch of fine-grain sea salt, transfer to a bowl, and serve.

Sunday, January 8, 2012

Almond & Kale Linguine

This dish was something I threw together the other night with some ingredients we had on hand and it turned out to be our favorite dish of the week. I had picked up some curly kale and thought that it would be fun to cut it up small to resemble curly parsley while also adding some extra nutrition to the pasta. I had some dried linguine (feel free to use either regular, whole wheat, or brown rice linguine) and thought I'd add in some toasted almonds to kick up the protein. This is a simple pasta but developed lots of flavor using some of the pasta water to make a light sauce and finishing with some fresh lemon juice and parmesan cheese. It's a quick, easy, healthy dish that's perfect for a weeknight meal.


Almond & Kale Linguine
Serves 2 (can be easily doubled)

Active Time: 20 minutes
Total Time: 30 minutes

8 oz. linguine
1/2 bunch curly kale, washed, leaves removed from stems, and chopped into small pieces
2 cloves garlic, minced
1/2 c. almonds, roughly chopped
1/4 c. freshly grated parmesan cheese, plus more for serving
Juice of 1/2 lemon
Salt

Boil pot of water for the pasta and add a few big pinches of salt. Cook pasta according to directions.

Meanwhile, if using salted almonds, simply toast in a small saucepan over medium heat until golden brown and fragrant (don't let them burn!). If using raw almonds, toast and then drizzle with a little olive oil and a pinch of fine grain sea salt and stir to coast. Set aside.

When pasta is almost done, heat 1 T. olive oil in a large skillet over medium heat. Add the garlic and saute for about 10 seconds, then add the kale. Saute for only about 1-2 minutes until it starts to wilt.

Reserve 1/2 c. of the pasta cooking liquid, then drain the pasta, and immediately add it to the skillet with the kale. Add the cheese, almonds, lemon juice, and 1 t. kosher salt, then pour the 1/2 c. cooking liquid over the dish and stir for a minute or two until it all comes together. Separate into bowls and serve with a little extra parmesan cheese.

Friday, December 30, 2011

Whole Wheat Dutch Babies

Need an easy, delicious breakfast idea for this weekend? While I love regular pancakes, we also grew up loving dutch babies around our house, which are essentially a puffed-up oven-baked pancake. Dutch babies are great because they only call for a few ingredients, they are hard to screw up, and the result is quite impressive with very minimal effort. I thought I would switch up the standard recipe by trying whole wheat pastry flour instead of regular all-purpose white flour in order to make my version of dutch babies a little more nutritious and they turned out great. Whole wheat pastry flour can be found at any grocery store in the baking aisle or bulk food section and is a great pantry staple to substitute for all-purpose white flour in almost any baked good recipe. Don't use regular whole wheat flour here - it's too heavy and the dutch babies won't rise correctly. Serve the dutch babies topped with a squeeze of lemon juice and a dusting of powdered sugar, then eat it like that or add maple syrup, jam, or fresh fruit.


Whole Wheat Dutch Babies
Serves 4

Active Time: 5 minutes
Total Time: 25 minutes

6 eggs
1 c. whole wheat pastry flour
1 c. lowfat milk
1/2 t. vanilla extract
4 T. (1/2 stick) butter
Lemon, powdered sugar and maple syrup, jam, or fruit for serving

Place a 10'' cast-iron skillet (or similar oven-proof skillet) in the oven and preheat to 450 degrees Fahrenheit
Whisk the eggs together in a medium-sized bowl until frothy. In a separate bowl, whisk the flour, then whisk the flour into the bowl with the eggs. Whisk in the milk and vanilla, combining well to make sure there are no clumps (the batter will be thin). When the oven is preheated, remove the skillet and add in the butter, stirring with a wooden spoon until melted (which only takes about 10 seconds). Then, immediately add the batter to the pan (right on top of the butter) and return to the oven. Bake for about 20 minutes or until golden and puffy. Don't peek until it's done or the dutch babies will lose their height. When ready, remove from the oven, cut into four big pieces, and serve with a squeeze of lemon juice, some powdered sugar, and syrup, jam, or fruit, if you'd like.

Saturday, December 10, 2011

Winter Vegetable Gratin

I'll admit - I think this is one of the most beautiful dishes that I've created, and it's much easier and healthier than most gratins! I've been getting all sorts of different root vegetables in our CSA box - celery root, yukon gold potatoes, butternut squash (ok that's not a root vegetable but same idea), and watermelon radish. I suggest using any combination of root or fall hard vegetables in this dish: potatoes, carrots, turnips, rutabagas, parsnips, hard squash like butternut or kabocha, even sugar pumpkin would be great. I happened to have the combination I talked about above - about 1 lb. each of celery root, butternut squash, a giant watermelon radish (yes, you can cook these and they taste similar to turnips), and yukon gold potatoes. Most gratins require making a bechamel sauce, which is delicious but not exactly heatlhy nor quick when you're also having to prep and arrange all of the vegetables. My version layers the vegetables with two cheeses, sage, and includes just a bit of lowfat milk poured over everything to bring it all together. The result was both gorgeous and delicious! I served this as a main dish with salad and bread, but it would also be a great side.


Winter Vegetable Gratin
Serves 4 as a main dish, 6-8 as a side

Active Time: 35 minutes
Total Time: 1 hour, 35 minutes

4 lb. assorted hard winter/root vegetables (I used 4 varieties, 1 lb. each)
1 c. freshly grated parmesan cheese
1 c. freshly grated gruyere cheese
1/2 c. lowfat milk
1 T. fresh sage, finely chopped
Extra virgin olive oil
Kosher salt

Preheat the oven to 375 degrees Fahrenheit. Peel and thinly slice all of the vegetables. Grease a large oval gratin dish or 9x13 baking dish. Arrange the vegetables in the first layer, alternating between the different types. The vegetables should be overlapping and create a relatively even, tight layer. Drizzle the first layer with a little extra virgin olive oil, a pinch of salt, 1/3 of the parmesan cheese, 1/3 of the gruyere cheese, and 1/3 of the sage. Add the next layer of vegetables and drizzle the olive oil, add the pinch of salt, another 1/3 of each of the cheeses, and the sage. Top with the last layer of vegetables, drizzle with olive oil and the pinch of salt, then pour the 1/2 c. of milk over the dish. Top with the remaining cheeses and sage, then transfer to the oven and bake for approximately one hour until lightly golden. Remove from the oven, let cool for a few minutes, then cut into sections for serving.

Wednesday, December 7, 2011

Sweet Potato Oat Bread

We've been getting sweet potatoes in our CSA box for the past few weeks and I've been trying to come up with inventive new ways to use them. I happen to love homemade breakfast breads, and thought why not use mashed sweet potatoes in place of something like pumpkin puree which you might normally find in one of these recipes. The result was a moist, not too sweet, healthy breakfast bread which is great with a cup of coffee in the morning or for a mid-morning snack. Eat it as it is or with a little bit of butter. This bread kept well for me for a few days wrapped in foil.


Sweet Potato Oat Bread
Makes 1 loaf

Active Time: 10 minutes
Total Time: 55 minutes (plus time to roast sweet potato)

1 1/2 c. mashed cooked sweet potato (about 2 medium)
1 1/4 c. whole wheat pastry flour (or 3/4 c. white and 1/2 c. normal whole wheat flour)
1/2 c. oat flour (can be found at Trader Joe's or Whole Foods - or make your own by grinding up oats in a food processor)
1/4 c. ground flaxseed meal
1 t. baking powder
1/2 t. baking soda
1/2 t. kosher salt
1 t. ground cinnamon
1/2 t. ground nutmeg
1/4 c. (1/2 stick) butter
1/2 c. agave nectar or maple syrup
2 eggs
1 t. vanilla extract

Preheat the oven to 350 degrees and grease a 9x5 inch loaf pan.

Roast the sweet potato for about an hour until a fork goes in easily (this can be done ahead of time). Remove from oven and set aside.

In a medium-sized bowl whisk together the flours, flaxseed meal, baking powder, baking soda, salt, cinnamon and nutmeg. In another medium-sized bowl remove the flesh from the sweet potato and mash well with a fork. If you've roasted the sweet potato the day before and it's cold, warm it up then add the butter and stir to combine (the heat will melt it), then add the eggs, agave/maple syrup, eggs, and vanilla extract and stir. Add the dry ingredients and stir to combine.

Transfer the batter to the pan and bake for about 45 minutes until golden brown on the edges. Let cool for at least 15 minutes in the pan before serving.

Sunday, November 27, 2011

Fall Vegetable Barley Soup

We're back in California after a wonderful Thanksgiving trip up to Seattle where I pitched in to create our feast of mashed potatoes with caramelized shallots; sauteed brussel sprouts with slivered almonds, lemon zest, and thyme; a roasted trio of root vegetables (sweet potatoes, butternut and kabocha squash); stuffing; and local heritage breed turkey; not to mention my sister's fabulous homemade pumpkin pies and cranberry sauce. Needless to say it was a wonderful meal!

Before we left, I made this great soup to get us ready for the holiday using up some of the fall vegetables from our last CSA box - tokyo turnips and carrots. Tokyo turnips are tender white turnips that don't need to be peeled, and this recipe even takes advantage of the greens that are attached. If your turnips don't have greens or are a harder variety, peel them before chopping and substitute the turnip greens with some kale. Even if you think you don't like turnips I encourage you to try this recipe - when they're cut up small and a component of this flavorful soup, you'll forget you ever didn't like them.


Fall Vegetable Barley Soup
Serves 4-6

Active Time: 25 minutes
Total Time: 55 minutes

4 turnips, peeled if thick skinned, and diced into small pieces
Turnip greens from the bunch of carrots, or 1 small bunch kale, chopped
3 medium carrots, diced into small pieces (similar in size to the turnips if you can)
3-4 stalks celery, diced into small pieces (ditto on the size)
3 leeks, white and light green parts, thinly sliced
4-5 cloves garlic, minced
1 15-oz can crushed tomatoes
6 c. low-sodium vegetable broth
1 c. semi-pearled barley
1 t. dried or fresh thyme
1 bay leaf
Extra virgin olive oil
Kosher salt
Black pepper

Heat 2 T. olive oil in a dutch oven or stockpot over medium heat. Add the turnips, carrots, celery, garlic, leeks, thyme, and a pinch of salt and pepper and saute until softened a little, about 5 minutes.

Add the broth, tomatoes, and bay leaf, and 1 t. kosher salt as well as some fresh ground black pepper and bring to a low boil. Add the barley, reduce the heat to medium low, and let cook for about 25-30 minutes or until the barley is al dente. Then, add the turnip greens (or kale) and cook while stirring for another 1-2 minutes until the greens are wilted. Taste for additional seasoning depending on the saltiness of your broth and serve.

Sunday, November 20, 2011

Pumpkin Pomegranate Pancakes

It's Sunday morning, and I can't think of anything better when it's cold and rainy outside than a big plate of pancakes. I love coming up with different pancake recipes (since we have pancakes just about every weekend) and these are some of my favorites yet - the pumpkin makes the pancakes so moist, and the topping of pomegranate seeds with maple syrup adds a little bite and a bit of sweet-tartness. These would also be a wonderful breakfast on either Thanksgiving morning or the day after - as you can see they are quite festive!


Pumpkin Pomegranate Pancakes
Makes ~12-14 pancakes

Active Time: 20 minutes
Total Time: 20 minutes

1 1/2 c. whole wheat pastry flour (or 3/4 c. each regular whole-wheat flour and all-purpose flour)
1/2 t. cinnamon
1/2 t. ground ginger
1/4 t. nutmeg
1 t. kosher salt
1 T. baking powder
1 c. canned or fresh pumpkin puree
1 T. maple syrup
1 T. molasses
2 eggs
1 1/2 c. lowfat milk
Pomegranate seeds and warm maple syrup, for serving

Whisk together the dry ingredients in a medium-sized bowl. In a separate bowl, stir together the pumpkin, molasses, maple syrup, and eggs and blend well. Add the milk and stir to incorporate, then add the wet ingredients to the dry ingredients and stir to combine. Using a 1/4 c. measure, spoon out each pancake onto a griddle, keeping the other pancakes warm in a 200 degree F oven. Top each stack of pancakes with pomegranate seeds and serve with warm maple syrup.

Tuesday, November 15, 2011

Green Goodness Soup

One of my favorite things about fall is soup. There's something comforting about a nice big bowl when it starts to get dark earlier and temperatures are dropping. But perhaps most of all I love soup because it's so easy to make and so good for you (and you can make soup with almost any kind vegetables that you have on hand). Our recent CSA box had 2 heads of broccoli in it and I'm not a big broccoli person so I needed to figure out somehow else to use it. I was reminded of our trip to New Zealand last year, when we had a broccoli soup that I loved and it was thickened with potatoes instead of cream, making it both healthier and heartier. I also added some kale and leeks to this recipe, and when it's all blended up it turns the most lovely green color. Best of all, unlike some other pureed soups, this one is actually filling, and tastes just as good the next day!


Green Goodness Soup
Active Time: 25 minutes
Total Time: 45 minutes

Extra virgin olive oil
2 heads broccoli, stalks chopped and florets separated
2 medium russet potatoes (~1 1/4 lbs.) peeled and cut into 1/2'' pieces
2 leeks, white and light green parts, sliced
1/2 bunch lacinato kale, leaves removed and chopped
2 cloves garlic, minced
1 small onion, chopped
4 c. low sodium vegetable stock
1 bay leaf
Kosher salt
Black pepper

Heat 1 T. olive oil in a dutch oven or stockpot over medium heat. Add the leeks, garlic, and onion and saute about 5 minutes, or until softened. Add the broccoli stalks and potatoes and cook an additional 3 minutes. Add the stock, bring to a boil and add 1 t. kosher salt and some fresh ground black pepper as well as the bay leaf. Add the kale (stir to submerge), cover, reduce heat to medium-low, and cook for about 15 minutes, stirring occasionally. Add the broccoli florets and recover the pot, then cook for an additional 5 minutes. Use an immersion blender to puree the soup or a regular blender in batches. Season to taste with salt and pepper and serve garnished with shaved parmesan cheese or some fresh herbs, such as chives.

Monday, October 31, 2011

Baked Mac & Cheese with Heirloom Tomatoes

Happy Halloween! I realize that a pumpkin-related post would be more relevant today (and I actually made a recipe with sugar pumpkin last night that I'll be posting soon) but I wanted to get this recipe up before it's too late to find the last tomatoes. We recently joined a CSA through Full Belly Farm and I'm already in love with it after the first two weeks of boxes. Here in Northern California (where it was 75 degrees today) we are still getting the last bits of some indian summer produce, and I was lucky enough to get a few beautiful tomatoes from our CSA box over the past two weeks. Given that they are a little past their peak, I thought they'd be best incorporated in a dish rather than on their own, and they were absolutely delicious as an accent in this baked mac n' cheese. If the tomatoes near you don't look good, try stirring in another vegetable instead, such as roasted butternut squash, steamed/sauteed broccoli, or you could even use diced canned tomatoes (rinsed of their juices). We ate half of this for dinner along with a green salad one night, then had the rest for lunch for leftovers for lunch the next day, and it was equally delicious!


Baked Mac & Cheese with Heirloom Tomatoes
Serves 4

Active Time: 25 minutes
Total Time: 55 minutes

8 oz. brown rice, whole wheat, or regular dried macaroni noodles (I used brown rice macaroni noodles that I found at the store but regular or whole wheat macaroni would also work well)
3 T. flour
2 T. olive oil
2 cloves garlic, minced
2 c. lowfat milk
1 bay leaf
8 oz. sharp cheddar (preferably lighter in color, not orange), grated
1 large heirloom tomato, chopped (or other vegetable of your choice)
1 1/2 - 2 slices whole wheat bread, torn and pulsed in a food processor or blender until breadcrumbs form

Preheat the oven to 400 degrees Fahrenheit and grease an 8x8 inch baking pan with olive oil or butter.

Heat a pot of boiling water and cook the noodles about 1-2 minutes less than the stated cooking time. Meanwhile, in a medium saucepan, heat 2 T. olive oil over medium heat. Add the garlic and saute 15 seconds, then whisk in the flour, continuing to whisk for about 2 more minutes. Then, gradually whisk in the milk, whisking constantly to ensure that that everything combines without clumps forming. Add the bay leaf and continue cooking until the pasta is done, whisking occasionally.

Drain the pasta, then stir in most of the cheese into the saucepan with the milk, then add the noodles, tomato/vegetable, and 1 t. salt. Transfer the mixture to the baking dish (it will be saucy, but this will all bake together) and top with the remaining cheese and the breadcrumbs, pressing the breadcrumbs down slightly into the top of the macaroni mixture (the top should be well coated with breadcrumbs).  Bake for about 30 minutes until golden brown and bubbling, then remove from the oven and let sit a few minutes before serving.

Thursday, October 27, 2011

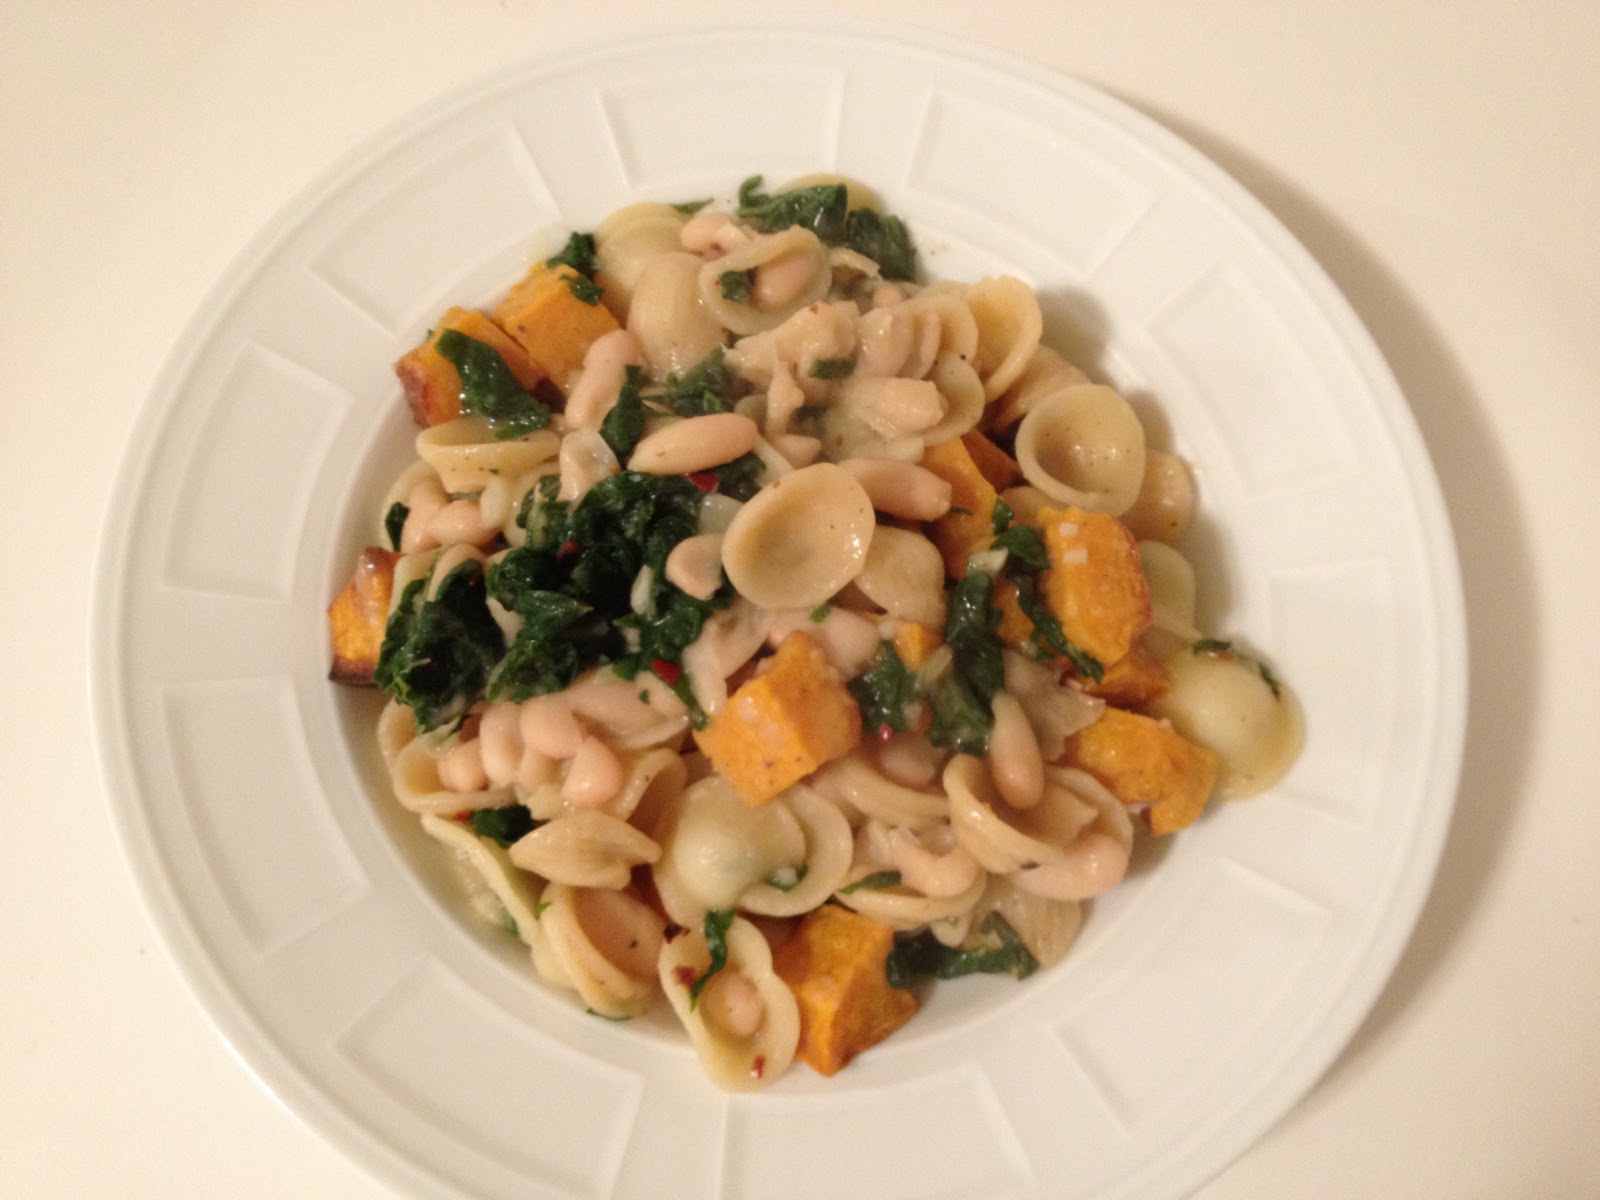
Butternut Squash, Chard, and White Bean Orecchiette

Sometimes it's difficult to use up a whole butternut squash and not get sick of it. Unless I'm making soup, I generally buy them smaller in size, and use it in a few different recipes as an accent (i.e. the Fall Moroccan Tagine that I recently posted) rather than the feature of a dish. I actually used the other half of the butternut squash I had from making that dish (it keeps well in the fridge) to come up with this quick pasta using just a few ingredients that I had on hand - green swiss chard, a can of cannellini beans, and some orecchiette pasta. It was a great weeknight meal not only because it's well balanced - getting your vegetables, protein, and carbohydrates in one bowl - but also because it's relatively quick, and the flavors all went together even better than I expected. When the butternut squash is roasted and paired with the earthy beans and chard, it takes on more of a savory quality in this dish than sweet, and I think you'll like it! This makes enough for 2, but can easily be doubled for more people.


Butternut Squash, Chard, and White Bean Orecchiette
Serves 2

Active Time: 15 minutes
Total Time: 45 minutes

Extra virgin olive oil
1/2 small or about 2 cups butternut squash, peeled and cubed
1/2 bunch green, swiss, or rainbow chard, leaves removed and chopped
6 oz. orecchiette or other small pasta (shells would also work)
1 15 oz. can cannellini or other white beans, drained and rinsed
2 cloves garlic, minced
1/4 t. crushed red pepper flakes
Kosher salt
Black pepper

Preheat the oven to 400 degrees Fahrenheit. Toss the squash in a little olive oil, season with a pinch of salt, and lay out on a sheet pan. Roast for about 30 minutes (mine went a little longer and was slightly browned on the bottom but still tasted great).

Meanwhile, heat a pot of water and cook the pasta until al dente, reserving 1/4 c. of the cooking water before draining. Additionally, heat 1 T. olive oil over medium heat in a large skillet or saucepan. Add the garlic and crushed red pepper and cook for about 30 seconds, then add the chard, cover, and cook for about 2-3 minutes, stirring once or twice, until wilted. Remove the lid, add the beans, and simmer over low heat until the pasta is done.

Combine the pasta, squash, greens/bean mixture, and cooking water along with 1 t. kosher salt and some freshly ground black pepper. Stir for 1-2 minutes until everything combines and a light sauce forms. Divide into pasta bowls and serve.

Sunday, October 23, 2011

Fall Moroccan Tagine

This was my first attempt at a Moroccan-style tagine and it was quite successful! Traditionally, a tagine is made in a special dome-shaped pot, but I found that using a dutch oven (or any large saucepan or stockpot with a lid) substituted just fine. This dish incorporates some classic tagine spices - coriander, cumin, turmeric, cinnamon, paprika, ginger, and cayenne, with butternut squash, carrots, sweet potato, chickpeas, dried apricots and olives. Other than prepping the ingredients, it's an easy dish to make, incredibly healthy and wonderfully warming on a fall evening. I served this over whole-wheat couscous, but quinoa or brown rice would also work well.


Fall Moroccan Tagine
Serves 4

Active Time: 20-25 minutes
Total Time: 65-70 minutes

Extra virgin olive oil
1 onion, chopped
4 cloves garlic, minced
1 large sweet potato or yam, peeled and cut into small (~1/2'') pieces
1/2 small butternut squash, peeled and cut into small (~1/2'') pieces
1 15-oz can chickpeas, drained and rinsed
1/2 c. green olives (such as castelvetrano)
1/2 c. dried apricots, chopped
1 t. coriander
1 t. cumin
1 t. turmeric
1/2 t. cayenne pepper
1/2 t. cinnamon
1/2 t. sweet paprika
1/2 t. ground ginger
Kosher salt

Toast the spices in a small saucepan over medium-low heat until fragrant, a few minutes, and set aside.

In a dutch oven or stockpot, heat 1 T. olive oil over medium heat. Add the onions and saute until soft, about 5 minutes. Add the garlic and saute another 30 seconds, then stir in the spices. Add the carrots, sweet potato/yam, butternut squash, and apricots to the pan, along with 1 1/2 c. water and 1 t. salt. Cook for a minute longer until everything reheats, then reduce heat to medium-low, cover, and simmer for 30 minutes, stirring occasionally. Stir in the chickpeas and olives, reduce heat to low, re-cover, and cook another 10-15 minutes. Season to taste with salt (I added another 1 t.), stir, and serve over whole-wheat couscous, quinoa, or brown rice.

Friday, September 30, 2011

Kale Salad

After making this kale salad, I know that it is going to become a regular part of our weeknight and weekend meals, and after you try it I'm pretty sure that you'll start rethinking your regular lettuce salads as well. I got the inspiration for it from an event we recently attended at Scribe Winery, where we're wine club members. If you happen to visit Sonoma, I would highly recommend it - they not only make amazing wine (chardonnay, pinot noir, cabernet, and syrah) but they have also managed to create a winery experience unlike many other places we have been to. Tastings are served at picnic tables looking out over the valley with wildflowers from their garden (they operate an organic garden on site and have chickens and pigs) and they bring out complimentary cheese, salami, and crackers with each tasting. They have perfected the sort of laid-back chic look and mentality - you can feel free to hang out after your tasting, bring a picnic, or explore the grounds. The winery also throws periodic parties for wine club members and it was at one of these events when we had the kale salad, which was fresh from their garden. They also roasted 2 pigs that were raised on the property and served fingerling potato salad, roasted peppers from their garden, baked white beans over the fire with herbs and tomatoes, and of course poured their wine freely. I've included some pictures from the event below.

Back to the kale salad - we actually eat a lot of kale, but I usually always cook it - whether it's a quick braise over the stovetop with garlic, olive oil, and salt and pepper, an added ingredient to soups, or even part of a stir fry. I've had kale salad before and excluding the version at Scribe, I always thought of it as a little too bitter and raw tasting. The secret is lettuce the dressing sit on the kale for a little bit of time before serving, much different from lettuce salads where you want to dress it at the last minute. Dressing the kale early allows it to soften a little bit and absorb the flavor of the dressing. I also love it because you can make it ahead of time if you're having company, or before you start making the other components of your dinner on a weeknight, and then just let it be until you're ready to serve. I'd recommend letting it sit for at least 30 minutes or so before serving. I made it before a dinner party and let it sit for about 3 hours, although I don't know that I'd do it overnight. Lacinato (or dino) kale is best in this recipe vs. the regular curly kind, although either would probably be good.


Kale Salad
Active Time: 15 minutes
Total Time: 15 minutes (plus time to sit)

2 bunches lacinato kale, rinsed, leaves ripped from stems, and cut into thin strips
1/2 c. freshly grated pecorino or parmesan cheese

Dressing:
1 clove garlic, finely minced
2 T. fresh lemon juice 
3 T. extra virgin olive oil
1 T. dijon mustard
1/2 t. kosher salt
Lots of freshly ground black pepper

Prepare the kale and grate the cheese. Combine all of the dressing ingredients and whisk together, then combine in a large bowl with the kale and cheese. Let sit for at least 30 minutes or up to several hours before serving.


Sunday, September 25, 2011

Green Enchiladas

Enchiladas are becoming one of my favorite thing to make when we're in the mood for Mexican food, and they actually can be healthy when you pack them with fresh vegetables and don't go overboard on the cheese. They are a little bit time consuming, but I attempted to cut down on the prep time here by making a green tomatillo and cilantro sauce that whips us easily in the blender. Like lasagna, enchiladas are something where you can vary the ingredients depending on the season to take advantage of what is fresh (see my prior post for enchiladas with yams in the fall/winter). For this recipe, I made one big batch (since you're already doing the work) and divided the enchiladas into one pan with 8 and another one with 4. You can either cook them all at once or pop one of the pans in the freezer for the future - just put it in the fridge the night before you want to make it to allow it to unthaw and cook per the same instructions the following night.


Green Enchiladas
Serves 6 (2 enchiladas each)

Active Time: 40 minutes
Total Time: 1 hour, 15 minutes

1 lb. roma tomatoes, diced
1 lb. yellow summer squash, halved and cut into thin half moons
Two 15 oz. cans pinto beans, drained and rinsed
2 yellow onions, peeled, halved, with one onion thinly sliced and one cut into chunks
3 cloves garlic, peeled
1 lb. tomatillos, husks removed, rinsed, and quartered
2 serrano peppers (for medium spiciness, or use only 1 for mild), with stems cut off
2 c. cilantro, chopped
1 c. low sodium vegetable broth
4 oz. queso fresco cheese, crumbled
6 oz. monterey jack cheese, grated
12 whole wheat tortillas (about 8'' in diameter)
Extra virgin olive oil
Kosher salt
Black pepper
Avocado, sliced, for garnish

Prep all of the vegetables, rinse/drain the beans, and preheat the oven to 375 degrees Fahrenheit. Heat 1 T. olive oil in a large skillet over high heat and 1 T. olive oil in another large skillet over medium heat. Put the whole tomatillos, garlic cloves, onion chunks, and serrano peppers in the skillet on high heat. Cook 3 minutes, making sure that they get some color, then turn and cook 2 minutes more. Transfer to a blender.  Meanwhile, in the other skillet, add the squash and sliced onion and a pinch of salt and pepper. Cook about 8-10 minutes until softened, then transfer to a large bowl.

In the blender with the tomatillos, peppers, and onion, add 1 c. of the cilantro, 1 c. of vegetable broth, and 1/2 t. kosher salt. Blend until smooth.

In the bowl with the squash and onions, add the beans, tomatoes, the other cup of chopped cilantro, the queso fresco cheese, 1 1/2 t. kosher salt and 1/2 t. black pepper. Stir to combine.

Add 1/2 c. of the green enchilada sauce from the blender to a 9x13'' baking pan and 1/4 c. of the sauce to an 8x8'' baking pan. Heat the tortillas in the microwave between two pieces of dampened paper towel for about 45 seconds - 1 minute to soften.

Get everything together in one area (tortillas, sauce, bowl of filling, and pans) to assemble the enchiladas.  To do this, take one tortilla at a time, put it on a plate, scoop a generous amount of filling along the middle, then roll it up and place it seam-side down into the pan. Repeat with the remaining tortillas, putting 8 in the 9x13'' pan and 4 in the 8x8'' pan. Then, top with the remaining enchilada sauce, using your fingers to help you spread the sauce, trying to moisten each enchilada (and keep it from drying out too much during cooking). Top with the monterey jack cheese. From here you can either bake all of the enchiladas at once, or freeze either the smaller or larger pan if you'd like.

Bake for about 35 minutes until the cheese starts to turn golden brown. Let sit for a couple of minutes before serving, then divide onto serving plates and top with sliced avocado.

Monday, September 19, 2011

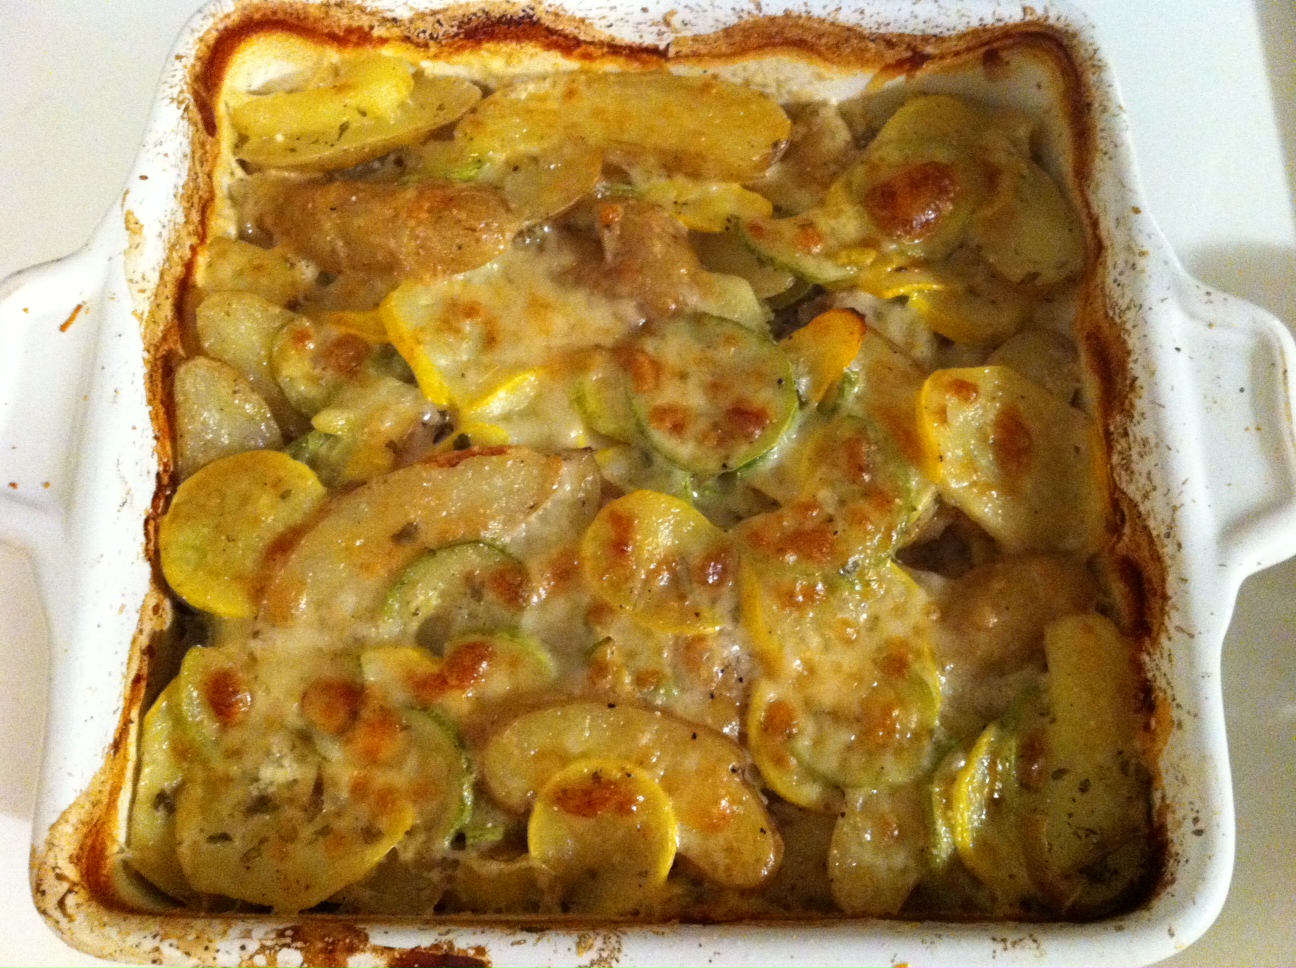
Fingerling Potato & Summer Squash Gratin

There is still an abundance of summer squash (at least down here in California) as we're experiencing the last part of all of the wonderful summer produce. Tomatoes and summer squash tend to do exceptionally well late in the season, when they've had a chance to ripen with some warmer temperatures. I attempted to take advantage of the summer squash here in a rustic gratin with some fingerling potatoes, fresh herbs, and a little bit of cheese. Serve with a salad and some bread and you have a delicious late summer/early fall meal.


Fingerling Potato & Summer Squash Gratin
Serves 4

Active Time: 30 minutes
Total Time: 1 hour, 10 minutes

Extra virgin olive oil
1 1/4 lb. fingerling potatoes
1 1/4 lb. assorted summer squash, thinly sliced
1 t. fresh rosemary, finely chopped
1 t. fresh thyme, finely chopped
2 oz. goat cheese, crumbled
1/4 c. lowfat or whole milk
1/2 c. gruyere cheese, grated
1/2 c. parmesan cheese, grated
Kosher salt
Black pepper

Preheat the oven to 400 degrees Fahrenheit. Put the potatoes in a pot with water covering to 1'' above the potatoes. Cover and bring to a boil, then uncover and let cook 10 minutes. Drain and set aside to cool slightly.

Meanwhile slice the squash and heat 1 T. olive oil in a medium skillet over medium heat. Add the squash and saute for about 5 minutes or until slightly softened.

Slice the potatoes into thirds lengthwise and combine with the squash in a large bowl. Add 1 T. olive oil, 1 1/2 t. kosher salt, 1/2 t. black pepper, and the rosemary and thyme and stir to coat.

Coat an 8x8 inch baking dish with olive oil or cooking spray and add 1/2 of the potato/squash mixture to the pan, pressing down with your fingers. Then add the goat cheese and top with the other half of the potato/squash mixture, pressing down again with your fingers. Drizzle the milk over the whole thing, then top with the gruyere and parmesan cheeses.

Bake for 30 minutes covered with foil, then uncover, return to the oven, increase the temperature to 425, and bake for another 10 minutes until golden brown.

Sunday, September 11, 2011

Almond Butter Cookies

I whipped up these cookies using only a few ingredients, with one of my favorite things as the star - almond butter. They are particularly great because they're just sweet enough for a treat but also healthy enough to be a great snack. I would even bring these along with me on a hike or trail run. As an added bonus, they're gluten free since I made them with oat flour instead of whole wheat flour. You can find oat flour at almost every supermarket (I bought mine at Trader Joe's), or make it yourself by putting some rolled oats in a food processor and running it until it resembles a coarse flour. To add some extra interest (and texture), I rolled these cookies in chopped sliced almonds before baking. The agave nectar and almond butter combination does lead these to leak out a little bit of stickiness while they're baking - don't worry about this, it actually creates a nice caramelized bottom. I was also able to fit all of these onto one baking sheet since they don't expand much when baking, which makes these quick enough to make even on a weeknight.


Almond Butter Cookies
Makes 16-18 cookies

Active Time: 10 minutes
Baking Time: 10-12 minutes

1 c. creamy almond butter
1 egg
3/4 c. oat flour
1/2 c. cane sugar
1/4 c. agave nectar
1/4 t. cinnamon
1/2 t. fine grain sea salt
1/2 to 3/4 c. sliced almonds, chopped

Preheat the oven to 375 degrees Fahrenheit. Combine all of the ingredients in a bowl, cover with plastic wrap, and put in the fridge for 30 minutes (you can also leave them in there longer if need be). Remove from the fridge, roll the dough into about 1-1 1/2'' balls, then flatten slightly with your hands, and roll in the chopped sliced almonds. Transfer to a baking sheet and cook for 10-12 minutes. Let cool for at least a few minutes on the baking sheet to set, then transfer to a wire rack to cool completely.