Sunday, June 12, 2011

Oatmeal Ranger Bars

I love oatmeal. I have it nearly every morning with milk, cinnamon, maple syrup, and either chia or flax seeds. I've made many oatmeal cookies in my day, but wanted to experiment with a cookie bar that could serve equally well as a dessert (I first made these for a dinner party and served them with vanilla bean ice cream), a mid-afternoon snack, or something to keep you going on a hike. Instead of your typical oatmeal-raisin variety, I wanted to incorporate some of my favorite flavors - chocolate, coconut, and nuts - to create something reminiscent of a "ranger" bar - basically a cookie or bar that contains a lot of good stuff!

These were so good that our guests asked for my recipe and are making them for their own dinner party, so I figured I had to share this creation with others. They don't require a mixer and they also freeze very well - pop them in the freezer after you've cooked and cut them apart and they can either be reheated for a quick fix in the microwave (about 30 seconds) or thawed on the counter.


Oatmeal Ranger Bars
Active Time: 10 minutes
Total Time: 35 minutes


2 sticks butter, melted
3/4 c. packed brown sugar
1/2 c. honey
2 eggs
1/4 c. lowfat milk
1 t. vanilla
1 t. baking soda
1 t. kosher salt
1 t. cinnamon
1/4 t. nutmeg
2 c. whole wheat pastry flour (or 1 c. regular whole wheat flour and 1 c. unbleached all-purpose flour)
3 c. old fashioned (not quick) oats
1/2 c. unsweetened shredded coconut
1 c. semi-sweet chocolate chips
1/2 c. walnuts, cut into small pieces

Preheat the oven to 350 degrees Fahrenheit. Butter a 13x9x2 baking pan and line with parchment paper (the butter helps the parchment stick to the pan). 

In a large bowl, whisk together the melted butter, brown sugar, and honey. Whisk in the eggs, milk, vanilla, and whisk together. Then whisk in the salt, baking soda, cinnamon, and nutmeg.

Stir in the flour and oats with a wooden spoon, then add the chocolate chips, coconut, and walnuts. Spread the mixture evenly in the pan and bake for about 25 minutes, or until golden brown on the edges. Let cool in the pan, then lift out using the parchment paper and cut into bars.


Tuesday, May 31, 2011

Spring Farro and Pea Soup

There has been quite a hiatus in between my last post and this post due to some significant life changes - a new job and a move from the Peninsula to Marin County (all still in the Bay Area). Now that I'm settled and starting the new gig tomorrow, I was finally ready to resume cooking tonight and create something that incorporates my favorite vegetable - fresh english peas. Granted, you don't have to make this recipe with fresh peas (frozen will work fine) but the plump, beautiful peas that are in season only in the spring are worth it if you can find them. I usually buy mine at the farmer's market, but having missed it last weekend, was surprised (and happy) to find them at Whole Foods.

This soup takes a little time to simmer so that the farro can cook, but other than that is very easy to make. I made it tonight and if you're making it on a weeknight, you can always get in a quick workout/run, catch up on some more work, or do something around the house while it cooks.

This dish is also great the next day - the farro will have absorbed more of the liquid so you can either just heat it up and serve it like a risotto or add some water and heat it up if you want more of a soup-like consistency.


Spring Farro and Pea Soup
Serves 4-6

Active Time: 20 minutes
Total Time: 1 hour, 10 minutes

Extra virgin olive oil
1 yellow or vidalia onion, thinly sliced
1 large leek, white and light green parts only, thinly sliced
2 celery stalks, thinly sliced
2 large carrots, diced
1 cup farro
1 15 oz. can cannellini or Great Northern beans, drained and rinsed
1 T. fresh thyme leaves
2 dried or 1 fresh bay leaf
4 c. low-sodium vegetable stock
Water
1 to 1 1/2 c. fresh shelled english peas or frozen peas (about 1 lb. fresh english peas in their shell)
Kosher salt and black pepper
Freshly grated Parmesan cheese

Chop/slice the onion, leek, celery, and carrots. Heat 1 T. olive oil over medium high heat in a large stockpot or dutch oven. Add the onion and leek and saute for 2-3 minutes, stirring occasionally. Add the carrots and celery and saute for an additional 2-3 minutes, stirring occasionally.

Add the beans, farro, thyme, bay leaves and stir to combine. Pour in the vegetable stock, add 1 t. kosher salt and 1/4 t. black pepper. Bring to a boil, then simmer for 40 minutes.

Add the peas and simmer an additional 10 minutes. Taste for seasoning and add more salt and pepper depending on the saltiness/seasoning of your stock.

I recommend garnishing the soup with freshly grated parmesan cheese as it really finishes the dish (I added it after taking the picture).

Sunday, May 8, 2011

Swiss Chard and Artichoke Pizza

Swiss chard is available most places year-round, but actually hits its peak in the late spring and summer months. You'll find red swiss chard, green swiss chard, and rainbow chard popping up more in the grocery store and at your farmer's market in the coming months. Swiss chard is a good leafy green for those people who aren't big kale fans but don't always want to each spinach to get their dark leafy greens. I actually much prefer the flavor of chard to spinach and often use it in recipes. In this case, I used red swiss chard as it looked the best that day, but rainbow chard would also work well here. I also love that this recipe uses the entire stalk - not just the leaves.

I've experimented a lot with different oven temperatures and cooking methods to try to get pizza dough  to cook all the way through and get a good crust. I think I have finally learned the trick - use a higher temperature (500 degrees Fahrenheit) and put your pizza stone or baking sheet in the oven as it starts preheating so that it gets nice and hot, then assemble your pizza on a piece of parchment paper and remove the stone/baking sheet from the oven and slide the pizza on. You really can make restaurant-style pizza (or in my opinion, even better) at home and the reward is worth it!


Swiss Chard and Artichoke Pizza
Serves 2-4

Active time: 30 minutes
Total time: 45 minutes

Pizza dough (store bought (I use Trader Joe's)) or you can make your own
Extra virgin olive oil
1 red onion, diced
1 bunch swiss chard, stalks and leaves separated and chopped in small pieces
3-4 cloves garlic, minced
1 14 oz. can artichoke hearts, drained and rinsed and chopped into small pieces
3/4 c. pecorino-romano cheese, freshly grated
4 oz. shredded mozzarella cheese
Kosher salt
Black pepper

If using store-bought refridgerated dough, make sure to take it out of the fridge about 30 min to 1 hour before making the pizza to allow it to come to room temperature and make it easier to work with.

Place a pizza stone or baking sheet in the oven. Preheat the oven to 500 degrees Fahrenheit.

Chop the onion, garlic, swiss chard (separating the leaves and stalks) and artichoke hearts. Heat 1 T. olive oil in a large skillet or stockpot over medium heat. Add the onion, swiss chard stems, and a pinch of salt and pepper, and cook until softened, about 5 minutes, stirring occassionally. Add the garlic and saute an additional 2 minutes, stirring frequently. Stir in swiss chard leaves, chopped artichoke hearts, and another pinch of salt and pepper, reduce heat to medium low, cover, and cook, stirring occassionally, for about 10 minutes or until the swiss chard has wilted and the entire mixture cooks down.

Meanwhile, lay out a piece of parchment paper large enough to fit your pizza stone or baking sheet, then flour the pizza dough and stretch it out using your fists until you reach your desired size. Place the dough on the parchment paper, then brush it with a light coating of extra virgin olive oil, all the way to the edges, and sprinkle with a little salt. When the chard-onion mixture is done, remove from heat, let cool for just a few minutes, then stir in the grated pecorino cheese. Spread the mixture over the pizza dough in an even but not too thick layer - if you end up with a little extra you can use it as a pasta topping the next day (see below). Sprinkle with the mozzarella cheese, then remove the pizza stone or baking sheet from the oven and slide the pizza on the parchment paper onto the stone/sheet. Bake for approximately 8-12 minutes, or until cheese is golden brown. Let cool for a few minutes, then cut into pieces and serve.

Bonus: Depending on how big your bunch of swiss chard is, you might end up with leftover topping. No worries - I just cooked up some whole wheat penne the next day, tossed it with a little olive oil, and used the extra topping on top of the pasta for lunch. Delicious!


Tuesday, May 3, 2011

Asian Noodles with Broccolini and Tofu

Don't be afraid of tofu if you haven't tried it or haven't liked it in the past. I was not a big fan of it until I finally learned the trick to cooking it correctly - pressing the water out and then searing it until it's crispy on the outside. The best thing about this dish, howeverm besides the fact that it's quick and good weeknight meal, are the flavors - and you could certainly substitute shrimp for the tofu and snap peas or snow peas for the broccolini. I used broccolini here, sliced in half lengthwise, instead of regular broccoli, to mimic the noodles. Both broccoli and broccolini are in season in the spring and at the peak of their flavor.


Asian Noodles with Broccolini and Tofu
Serves 2

Active Time: 10 minutes
Total Time: 20 minutes

1/4 c. low-sodium soy sauce or Bragg liquid aminos
1 T. mirin or rice wine vinegar
2 T. + 2 t. sesame oil
3/4 t. Tabasco
8 oz. extra-firm tofu
8 oz. broccolini
1/2 c. green onions, white & light green parts only
1/4 c. sliced almonds, toasted
6 oz. whole wheat or brown rice spaghetti or angel hair pasta

Bring a medium pot of water to a boil. Meanwhile, slice the tofu lengthwise into 4 rectangles and lay them out in between a clean kitchen cloth or paper towel. Put a few cookbooks or something similar on top of the tofu slices and let them compress for about 5 minutes.

Slice the broccolini lengthwise to make slimmer pieces. Thinly slice the green onions and set aside.

Heat 2 t. of the sesame oil in a large skillet over medium-high heat. When the oil is hot, remove the tofu from the compress and cook for about 3-4 minutes on each side, until it gets a light brown crust on each side, then set aside.

Meanwhile, when the water starts to boil, add the noodles and cook according to package directions, adding the broccolini during the last 2 minutes of cooking time. Drain and place in a medium-sized bowl.

In a small bowl, whisk together the soy sauce/Bragg liquid aminos, mirin or rice wine vinegar, 2 T. sesame oil, and tabasco. Slice the tofu into matchsticks and add it to the noodles and broccolini along with the green onions. Pour the dressing over it all and stir to coat. Divide into two servings and top with the toasted sliced almonds.

Thursday, April 28, 2011

Peanut Soba Noodles

My apologies for the hiatus in not posting a recipe last week - to make up for it here is the first of two wonderful asian noodle dishes that I have created recently. These are great for a weeknight meal when you want to throw something together in less than 30 minutes.

While this dish doesn't have a main protein, this soba noodle recipe is actually packed with it, between the peanut butter, peanuts, and edamame. We like to make a big batch of this and have it for leftovers, but you can certainly cut it in half or a third for a one-night meal or smaller portions. We also served this at a casual dinner party - everyone went back for seconds!

Soba noodles made with 100% buckwheat are gluten-free, making this a great meal for anyone with a gluten allergy. Just make sure that you read the label if this is the case - some soba noodles also include whole wheat flour. Soba noodles can generally be found in any grocery store in the asian section.


Peanut Soba Noodles
Makes 6-8 servings

Active time: 5 minutes
Total time: 15 minutes

16 oz. dried soba noodles
2 c. edamame
2 carrots, grated
1 c. roasted, salted, shelled peanuts, plus a few more for garnish
1 c. chopped green onions, plus a few more for garnish
1 T. toasted sesame seeds, plus a few more for garnish
3/4 c. natural creamy peanut butter
4 T. low-sodium soy sauce
2 T. sesame oil
2 t. Tabasco or other hot sauce
3/4 c. hot water from the soba noodles

Bring a large pot of water to a boil. Meanwhile, grate the carrots and chop the scallions. Additionally, combine the peanut butter, soy sauce, sesame oil, and Tabasco in a small bowl.

Cook the soba noodles according to package directions, reserving about 1 c. of the cooking water before draining. Drain the noodles. Gradually add about 3/4 c. of the cooking water to the peanut sauce mixture, whisking to combine. This will help to thin and emulsify the sauce, making it easier to coat the noodles. Put the noodles, carrots, sesame seeds, peanuts, edamame, and green onions in a large bowl. Add the peanut sauce gradually and stir to combine until coated to your liking (I used the full amount of sauce for this amount of noodles).  Top with some additional peanuts, scallions, and green onions, and serve!

Thursday, April 14, 2011

Whole-Wheat Oatmeal Pecan Cookies

Sometimes (ok, often) in the middle of the week I'm in the mood for a treat, but don't want something too heavy. I had some pecans in my cupboard along with some whole-wheat pastry flour but no butter, and thought I would experiment with making some cookies that are a little bit healthier using olive oil instead. The result was even better than I expected - cookies that are full of flavor, chewy yet relatively light in texture, and great for a little treat or snack.

These are also just about the easiest cookies I've made - since there's no butter, there is no mixer needed. You just stir the ingredients together!

I used a small ice cream scoop to form the cookies (my new favorite baking accessory for cookies - here's an example: http://www.crateandbarrel.com/kitchen-and-food/serving-utensils/stainless-steel-ice-cream-scoop/s283323) but you can certainly just drop them by the tablespoon onto the cookie sheets.

One more tip - this recipe makes about 30 cookies, but if you don't think you can polish them off in a week or so (these kept remarkably well in an airtight container), I also love to freeze almost any type of cookies before you bake them and then you can pop them out of the freezer for impromptu cookie cravings in the future right into the oven. To do this, drop the cookies as you normally would onto a cookie sheet, then put them in the freezer for about 15-30 minutes (it's ok if it's longer). Once they've started to freeze a little, you can transfer them to a ziplog bag or reusable container and freeze them for several months. When you're ready to bake them, take them out of the freezer, put them on a cookie sheet, and bake for 1-2 minutes longer than called for below.


Whole-Wheat Oatmeal Pecan Cookies
Makes ~ 30 cookies

Prep Time: 10 minutes
Total Time: 10 minutes cooking time per batch

1 1/2 c. whole-wheat pastry flour
1 1/4 c. old-fashioned rolled oats (not instant)
3/4 t. baking powder
1/2 t. baking soda
1/2 t. fine grain sea salt
1/2 t. cinnamon
1/2 c. chopped pecans
1 egg
1/2 c. brown sugar
1/4 c. maple syrup
2 T. molasses
1 t. vanilla
1/2 c. olive oil
Approx. 30 pecan halves

Preheat the oven to 350 degrees Fahrenheit. In a medium-sized bowl, stir together the flour, oats, baking powder, salt, cinnamonm and nuts. In a large bowl, whisk together the egg, brown sugar, maple syrup, molasses, vanilla, and olive oil. Stir in the dry ingredients to the wet ingredients. Drop by the tablespoon onto an ungreased cookie sheet. Bake for 10 minutes. Immediately upon taking the cookies out of the oven, press a pecan half into each cookie. Transfer to a wire rack to cool, then enjoy!

Monday, April 4, 2011

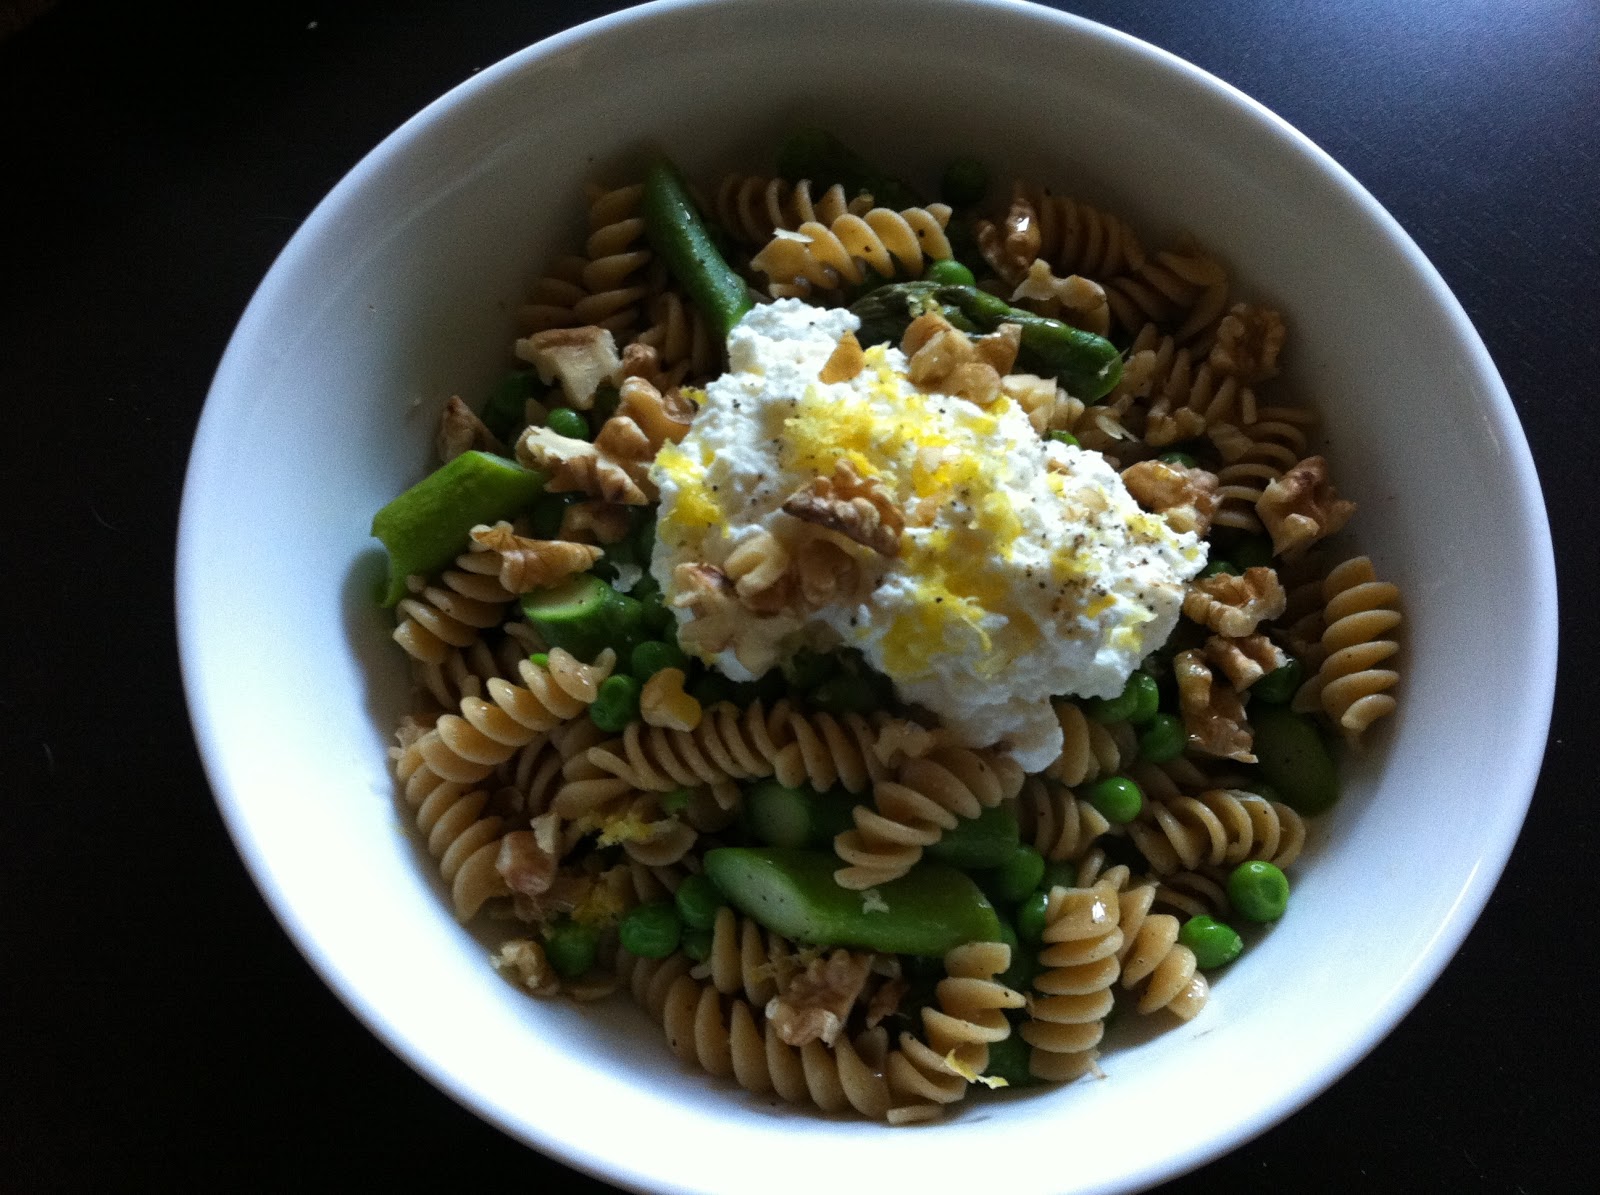
Hello Spring Asparagus & Pea Pasta

I have been anxiousy awaiting the arrival of spring vegetables - particularly asparagus and fresh spring peas. This pasta dish (which can be made gluten free with the substitution of brown rice pasta) allowed me to use up some of the rotini I had left over from my arugula and pumpkin seed pesto pasta and incorporate some of the wonderful new things I got at the farmer's market. Don't worry, however, if you can't find fresh peas - frozen actually work well in this dish. It's a simple, delicious, and easy weeknight meal.


Hello Spring Asparagus & Pea Pasta
Serves 2

Active Time: 5 minutes
Total Time: 15 minutes

3/4 lb. asparagus, ends snapped off and cut into 1'' pieces
1 c. peas (fresh or frozen & thawed - they can be easily thawed in the microwave)
6 oz. (about 2 c.) whole wheat rotini pasta (this shape holds onto the ricotta the best)
1/3 c. walnuts, toasted and roughly chopped
Lemon zest
Extra virgin olive oil
Whole-milk ricotta cheese
Kosher salt
Black pepper

Boil water for the pasta. Meanwhile, snap off the tough ends of the asparagus and cut into 1'' pieces. Also, toast the walnuts in a small skillet until fragrant and lightly browned, a few minutes, then roughly chop.

Add the pasta when the water is boiling and cook until al dente (according to package directions - or about 9 minutes), adding the asparagus and peas for the last 3 minutes of cooking time.

Drain and toss with 1 T. olive oil, 1/2 t. salt and 1/4. t. pepper. Divide into pasta bowls and top with a large dollop of ricotta, a fresh grating of lemon zest, walnuts, pinch of kosher salt and pepper, and a drizzle of olive oil.